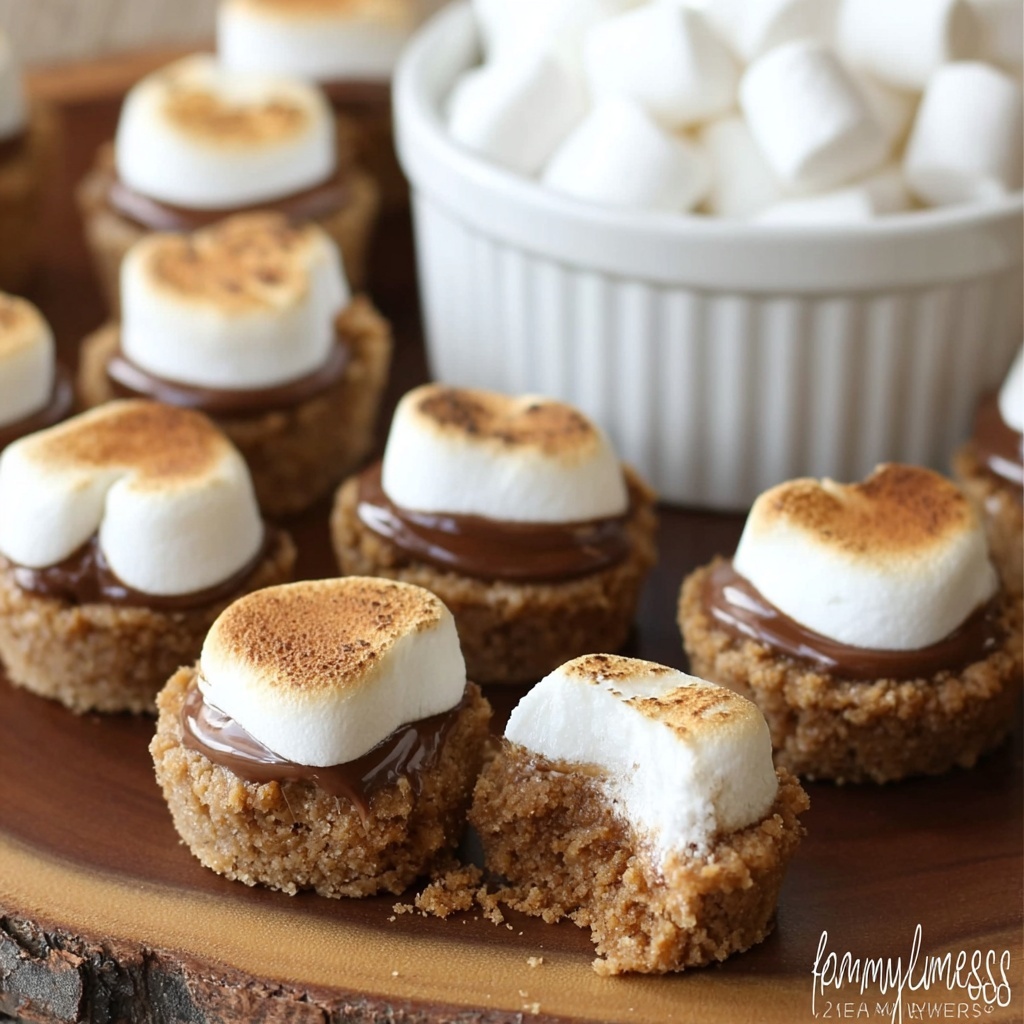
If you have a serious sweet tooth and love that classic campfire dessert, you are going to fall head over heels for this Peanut Butter Cup Smore Bites Recipe. These little bites are the perfect blend of crunchy, gooey, and nutty, with buttery graham cracker crusts hugging melted marshmallows and rich peanut butter cups. They turn the traditional s’more into an irresistible mini treat you can bake right at home, anytime you’re craving something warm, chocolatey, and just the right touch of nostalgia.
Ingredients You’ll Need
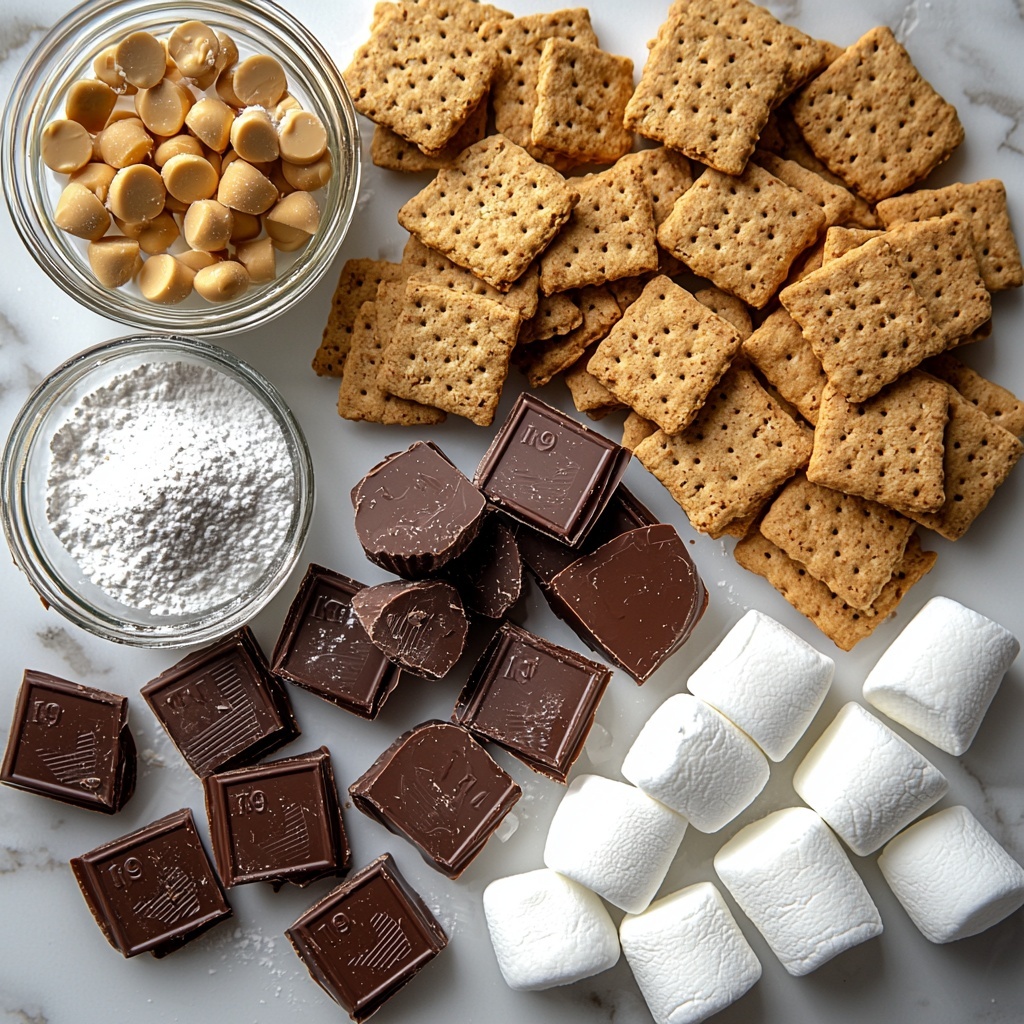
Gathering the ingredients for this Peanut Butter Cup Smore Bites Recipe is refreshingly simple, yet each component plays a starring role in building those layers of flavor and texture. From the crispy graham cracker base to the creamy peanut butter cups and fluffy marshmallows, every ingredient pulls together for that perfect bite-sized delight.
- 7 graham cracker sheets: Crushed finely for a buttery, crunchy crust that forms the foundation of your bites.
- 1/4 cup powdered sugar: Adds just the right hint of sweetness and helps to bind the crust ingredients together.
- 5 tablespoons butter (melted): Provides richness and helps the graham cracker crumbs hold their shape when baked.
- 24 miniature peanut butter cups: The star ingredient delivering that luscious, nutty chocolate center in every bite.
- 12 large marshmallows: Cut in half to create the gooey, melty top that completes the s’more experience beautifully.
How to Make Peanut Butter Cup Smore Bites Recipe
Step 1: Prepare Your Crust
Begin by preheating your oven to 350°F and greasing a 24-cup mini muffin pan so each bite won’t stick, ensuring a smooth release after baking. Blitz the graham cracker sheets into fine crumbs with a food processor, leaving no chunks for an even texture. This crushed base is what makes your smore bites perfectly crisp and flavorful.
Step 2: Mix the Crust Ingredients
In a medium bowl, combine the freshly ground graham cracker crumbs with powdered sugar and melted butter. Stir well until everything is evenly combined, creating a buttery mixture that will bake into a sturdy base while staying delicately sweet and crunchy.
Step 3: Form the Crust Wells
Divide the crust mixture evenly among the 24 mini muffin cups—about a tablespoon per cup works great. Using your thumb or the back of a small spoon, press the crumbs down and shape them into wells to hold your peanut butter cups and marshmallows. A neat trick is to press a second mini muffin pan over the mixture to create uniform wells quickly. Bake these in the oven for 5 minutes to set the crust.
Step 4: Add Peanut Butter Cups and Marshmallows
While the crusts cool slightly, unwrap your miniature peanut butter cups and cut the large marshmallows in half. Place one peanut butter cup into each crust well, pressing down just a little to nestle them in. Then, top each peanut butter cup with a marshmallow half, sticky side down, preparing for the final melty layer.
Step 5: Bake or Broil to Finish
For an authentic s’more experience with that toasted marshmallow top, pop the muffin pan under the broiler for 1 to 3 minutes. Keep a close eye because it happens fast—just as soon as the marshmallows turn golden and puffy, they’re ready. Alternatively, bake everything at 350°F for a few minutes if you want soft marshmallows without the toasted finish. Once done, transfer the pan to a cooling rack to let these bites set up perfectly.
How to Serve Peanut Butter Cup Smore Bites Recipe
Garnishes
Sprinkle a pinch of crushed graham crackers or a light dusting of powdered sugar over your Peanut Butter Cup Smore Bites Recipe to add a charming touch. You can also drizzle some melted chocolate or even a little caramel for that extra indulgent finish that’ll wow your guests and family alike.
Side Dishes
These bites are sweet and rich on their own but pair wonderfully with a cold glass of milk or a cup of hot cocoa. For a more grown-up twist, serve them alongside a scoop of vanilla ice cream or a fresh fruit salad to balance the richness and add some refreshing notes to your dessert spread.
Creative Ways to Present
Think beyond the muffin tin! Place your Peanut Butter Cup Smore Bites Recipe on a rustic wooden board for a picnic vibe, or arrange them on a colorful platter with some toasted marshmallow sticks nearby. Wrapping each bite in mini parchment squares or decorating with food-safe edible flowers can elevate the presentation for special occasions.
Make Ahead and Storage
Storing Leftovers
If you somehow have leftovers—which is rare!—store these delightful bites in an airtight container at room temperature for up to 2 days to keep their texture intact. Avoid refrigeration unless your home is particularly warm, as this can toughen the marshmallow tops.
Freezing
Peanut Butter Cup Smore Bites Recipe freezes beautifully. Simply place them in a single layer on a baking sheet to freeze initially, then transfer to a freezer-safe container or bag. Frozen, they’ll keep well for up to 3 months. When you’re ready to enjoy, thaw them at room temperature before serving.
Reheating
To revive the gooey marshmallow magic, warm your bites in a low oven at 300°F for about 5 minutes or until soft and melty again. Avoid microwave reheating as it can make the marshmallows tough and chewy instead of delightfully soft.
FAQs
Can I use regular-sized peanut butter cups instead of miniature ones?
Regular-sized peanut butter cups are larger than the mini ones, so they can overpower the bites or cause overflow. If you want to use them, consider cutting the cups into smaller pieces to maintain the perfect bite size represented in the Peanut Butter Cup Smore Bites Recipe.
What can I substitute for graham crackers if I don’t have any?
While graham crackers form the classic s’more base, digestive biscuits or even crushed vanilla wafers work well as substitutes. Just make sure to finely crush them and adjust the sugar a bit depending on sweetness, to keep the balance right in the recipe.
Is it okay to use marshmallow fluff instead of marshmallows?
Marshmallow fluff is a bit runnier and won’t toast or hold shape the same way as marshmallows do when baked or broiled. For the signature toasted top in the Peanut Butter Cup Smore Bites Recipe, fresh marshmallows are your best bet.
Can I make these bites gluten-free?
Yes! Just swap out the graham crackers for gluten-free graham-style crackers or any gluten-free cookie crumbs with a similar texture. Make sure the other ingredients, like peanut butter cups and marshmallows, are labeled gluten-free to keep it safe.
How do I prevent the marshmallows from burning under the broiler?
Keep a very close eye while broiling—marshmallows can go from perfectly toasted to burnt in seconds. Place the pan a bit farther from the broiler heat source if possible, and check every 30 seconds to get that golden puff without burning.
Final Thoughts
Nothing beats the comfort and joy of a freshly baked bite of these Peanut Butter Cup Smore Bites Recipe treats. They’re easy to make, irresistibly delicious, and packed with the warm nostalgia of campfire s’mores with a peanut butter twist. Whether for a party, a snack, or a cozy night in, do yourself a favor and whip up a batch—you’ll be delighted at how fast they disappear!
Print
Peanut Butter Cup Smore Bites Recipe
- Prep Time: 10 minutes
- Cook Time: 12 minutes
- Total Time: 22 minutes
- Yield: 24 servings
- Category: Dessert
- Method: Baking
- Cuisine: American
Description
These Peanut Butter Cup S’more Bites are a delightful, bite-sized twist on the classic campfire treat. Combining a buttery graham cracker crust with creamy peanut butter cups and toasted marshmallows, they are perfect for parties or an easy, fun dessert.
Ingredients
Crust Ingredients
- 7 graham cracker sheets
- 1/4 cup powdered sugar
- 5 tablespoons butter, melted
Filling Ingredients
- 24 miniature peanut butter cups
- 12 large marshmallows (cut in half to yield 24 halves)
Instructions
- Preheat and Prepare Pan: Preheat your oven to 350°F (175°C). Grease a 24-cup mini muffin pan thoroughly to prevent sticking.
- Make Graham Cracker Crust: Place the graham cracker sheets in a food processor and pulse until finely ground with no chunks remaining. In a medium bowl, combine the graham cracker crumbs, powdered sugar, and melted butter until the mixture is well incorporated.
- Form Crust Wells: Divide the graham cracker mixture evenly among the 24 mini muffin cups, about one tablespoon per cup. Using your thumb or a second mini muffin pan, press the crumbs down firmly to create a well in each cup. Bake the crusts for 5 minutes, then set aside to cool slightly.
- Add Peanut Butter Cups and Marshmallows: Unwrap the miniature peanut butter cups and place one into each crust well, pressing down gently. Cut the 12 large marshmallows in half to make 24 pieces, then place one marshmallow half on top of each peanut butter cup with the sticky side down.
- Toast Marshmallow Topping: For a broiled finish, place the muffin pan under the oven broiler for 1-3 minutes, watching closely to avoid burning. Alternatively, for a softer melt without browning, return the pan to the oven at 350°F and bake for a few minutes until the marshmallows soften.
- Cool and Serve: Remove the pan from the oven and transfer the bites to a cooling rack. Allow them to cool completely before serving for best results.
Notes
- Watch the marshmallows closely when broiling as they can burn quickly.
- Pressing the crust mixture firmly helps to hold the shape and keep the filling intact.
- Mini muffin pans work best to keep bites uniform and easy to serve.
- These bites can be stored in an airtight container for up to 2 days for freshness.

