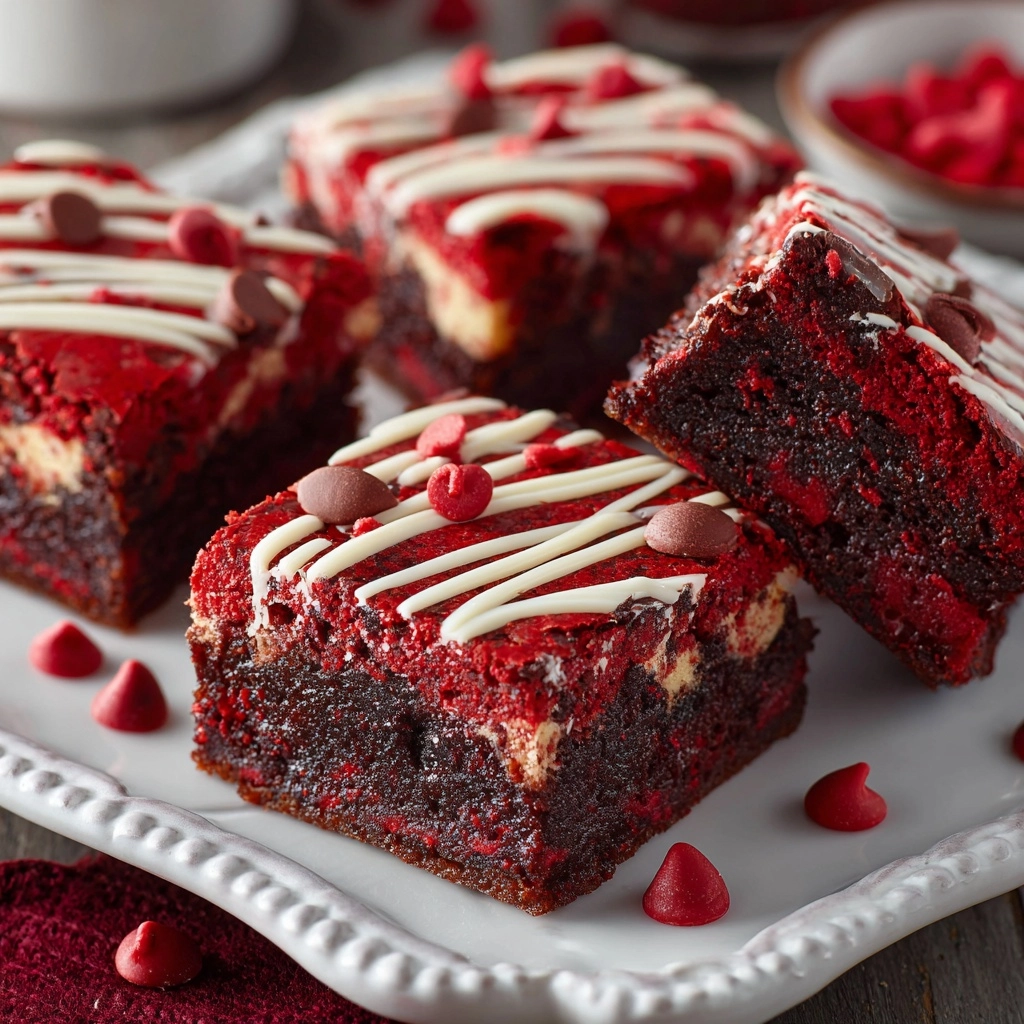
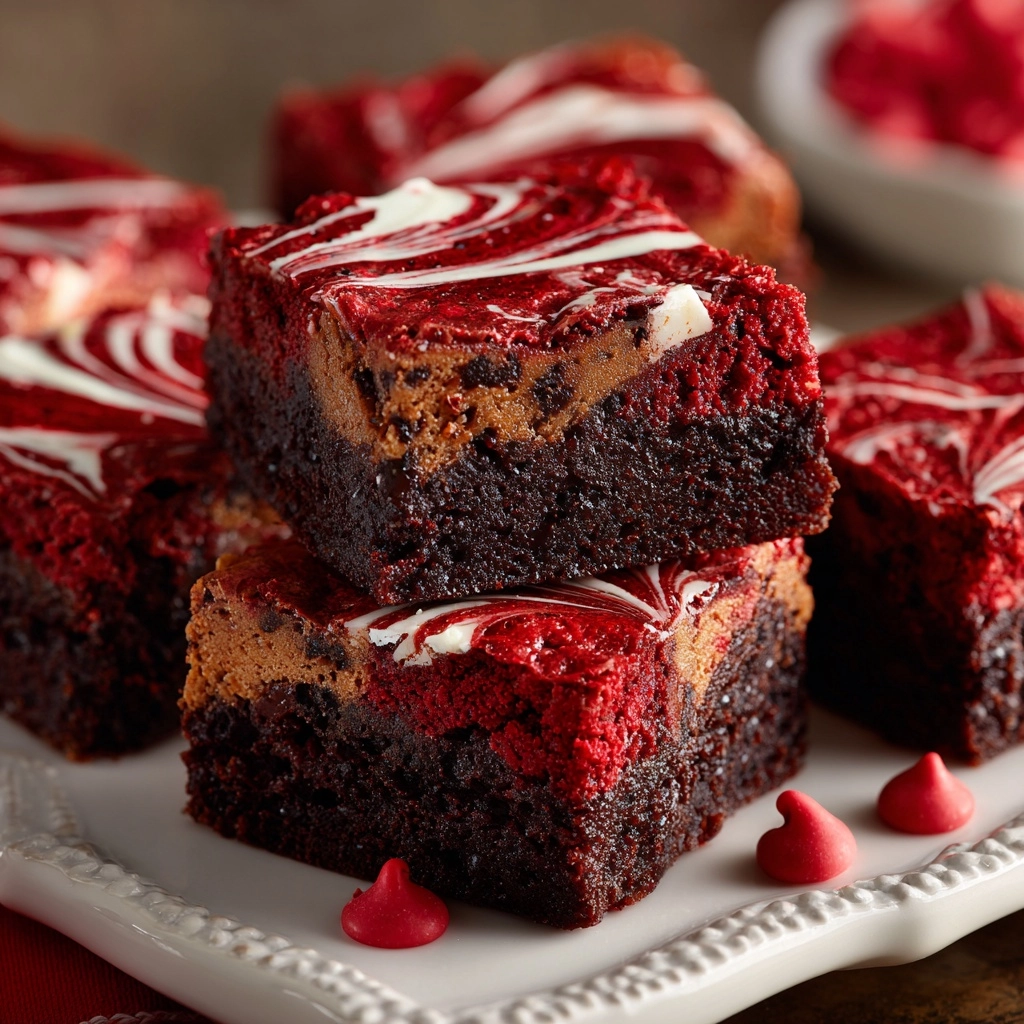
If you’re ready to swoon over a dessert that brings together the richness of chocolate and the vibrant charm of red velvet, then you’re in for a real treat with the Kiss Me Red Velvet Brownies Recipe. This delightfully indulgent dessert effortlessly blends a tender, luscious crumb with swirls of white and semi-sweet chocolate chips, making each bite a dreamy balance of flavors and textures. Whether you’re baking for a special occasion or simply craving a decadent chocolate fix, these brownies deliver that perfect pop of color and sweetness that will have everyone asking for the recipe.
Ingredients You’ll Need
The beauty of the Kiss Me Red Velvet Brownies Recipe lies not only in its delicious outcome but also in its simple, straightforward ingredient list. Each component plays a vital role in building the texture, taste, and vibrancy of the brownies, so gather these essentials before you start baking your way to bliss.
- 1/2 cup unsalted butter, melted: Provides a rich, smooth base that keeps the brownies beautifully moist.
- 1 cup granulated sugar: Sweetens perfectly to balance the slight tang of the vinegar and cocoa.
- 2 large eggs: Act as the binding agents giving structure and tenderness.
- 1 teaspoon vanilla extract: Enhances the overall flavor with a warm, familiar aroma.
- 1 tablespoon red food coloring: Creates that signature red velvet hue that makes these brownies pop.
- 1/4 cup unsweetened cocoa powder: Adds a subtle chocolate depth without overpowering the red velvet essence.
- 3/4 teaspoon white vinegar: Gives that classic red velvet tang while intensifying the color.
- 1/4 teaspoon salt: Balances the sweetness and heightens flavor complexity.
- 3/4 cup all-purpose flour: The foundation that gives the brownies their structure without making them cakey.
- 1/2 cup white chocolate chips: Melts into little pockets of creamy sweetness throughout.
- 1/2 cup semi-sweet chocolate chips: Introduces a well-rounded chocolate bite for richness and texture contrast.
- Optional pink or red sprinkles for garnish: Adds a fun, festive touch perfect for gifting or celebration.
How to Make Kiss Me Red Velvet Brownies Recipe
Step 1: Preheat and Prepare Your Pan
Start by heating your oven to 350°F (175°C). Line an 8×8-inch baking pan with parchment paper, making sure to leave an overhang on the sides. This little trick makes lifting out your perfectly baked Kiss Me Red Velvet Brownies Recipe a breeze after cooling, saving those clean, neat edges you’ll love to show off.
Step 2: Combine Butter and Sugar
In your largest mixing bowl, whisk together the melted butter and granulated sugar until the mixture is smooth and glossy. This creamy base is crucial as it ensures the sugar dissolves nicely, giving the brownies that tender texture we crave.
Step 3: Add Eggs, Vanilla, and Food Coloring
Next, add the eggs one at a time, beating well after each to fully incorporate air and bind the batter. Stir in the vanilla extract followed by the bold splash of red food coloring—this transforms the batter from ordinary to extraordinary, setting the stage for that classic red velvet charm.
Step 4: Mix in Dry Ingredients
Now, sprinkle in the cocoa powder, vinegar, and salt, mixing thoroughly. The cocoa deepens the flavor while the vinegar works its magic, brightening the color and tenderizing the crumb. Gently fold in the flour just until combined to keep your brownies tender, avoiding overmixing which can make them dense.
Step 5: Fold in the Chocolate Chips
Delicately stir in both white and semi-sweet chocolate chips. These chips bake into melty pockets of sweet and slightly bitter chocolate goodness, creating exciting bursts of flavor in every bite of your Kiss Me Red Velvet Brownies Recipe.
Step 6: Bake to Perfection
Pour the luscious batter evenly into your prepared pan. If you’re feeling festive, sprinkle the pink or red sprinkles on top now to add a playful texture and color accent. Bake for 25 to 30 minutes until a toothpick inserted in the center comes out with moist crumbs. Patience here is key—overbaking will dry out your brownies, and that’s just not the experience we want.
Step 7: Cool Completely
Once out of the oven, allow the brownies to cool entirely in the pan. This step helps them set and makes slicing neat squares simple and satisfying.
How to Serve Kiss Me Red Velvet Brownies Recipe

Garnishes
These brownies are stunning on their own, but decorating with a dollop of cream cheese frosting adds that dreamy tang and creaminess that pairs impeccably with red velvet. Alternatively, a dusting of powdered sugar or a handful of fresh berries on top can elevate the presentation and add a fresh contrast.
Side Dishes
Serve your Kiss Me Red Velvet Brownies Recipe with a scoop of vanilla ice cream or alongside a hot cup of coffee or tea. The creamy coldness of ice cream melts gloriously against the warm brownie, while coffee’s bitterness expertly offsets the sweet richness.
Creative Ways to Present
For a charming party centerpiece, cut the brownies into bite-sized squares and arrange them on a pretty platter with edible flowers or peppermint candies. You can also sandwich two small squares with cream cheese frosting in between for delightful mini brownie sandwiches that everyone will rave about.
Make Ahead and Storage
Storing Leftovers
Once cooled, store your Kiss Me Red Velvet Brownies Recipe in an airtight container at room temperature for up to 3 days. This keeps them moist and preserves their tenderness. If keeping longer, refrigeration is fine but bring them to room temp before serving to enjoy their full flavor.
Freezing
Want to stash some away for later? Wrap the brownies tightly in plastic wrap and place them in a freezer-safe bag or container. They freeze beautifully for up to 2 months. To thaw, just leave them at room temperature for a few hours and they’ll be ready to enjoy like fresh-baked.
Reheating
Reheat brownies by microwaving for about 15-20 seconds or warming in a low oven for 5 minutes. This revives their fudgy texture and enhances the melting of chocolate chips for that freshly made indulgence.
FAQs
Can I use a different type of food coloring in the Kiss Me Red Velvet Brownies Recipe?
Absolutely! Gel food coloring tends to be most vibrant and requires less quantity, but liquid food coloring works just fine. Just be mindful not to add too much liquid to the batter to maintain the perfect texture.
Is it possible to substitute the white vinegar in this recipe?
Yes, you can use apple cider vinegar as a substitute without significantly affecting the flavor or texture. The vinegar is key in balancing the batter’s pH, which enhances the color and tenderness.
How do I know when the Kiss Me Red Velvet Brownies are perfectly baked?
Insert a toothpick into the center of the brownies—when it comes out with just a few moist crumbs clinging to it, they’re done. Avoid waiting for it to come out completely clean, or the brownies may dry out.
Can I make these brownies gluten-free?
Yes, swapping the all-purpose flour with a 1-to-1 gluten-free baking flour blend should work well. The texture might vary slightly but the delicious red velvet flavor will shine through!
What’s the best way to create the red velvet color without too much food coloring?
The vinegar and cocoa powder naturally enhance the red hue, so start with a smaller amount of food coloring and adjust to your preferred shade. Using gel colors helps achieve brighter results with less coloring.
Final Thoughts
There’s just something so special about the Kiss Me Red Velvet Brownies Recipe; it’s that irresistible mix of rich, chocolatey goodness and vibrant, colorful charm that makes it a crowd favorite every time. Whether you’re baking for a loved one, a heartfelt celebration, or simply treating yourself, these brownies promise a joyful experience from the first forkful to the last crumb. Give this recipe a try and watch it become a beloved staple in your dessert collection!
Print
Kiss Me Red Velvet Brownies Recipe
- Prep Time: 15 minutes
- Cook Time: 30 minutes
- Total Time: 45 minutes
- Yield: 9 to 12 brownies
- Category: Dessert
- Method: Baking
- Cuisine: American
- Diet: Vegetarian
Description
Delight in these luscious Kiss Me Red Velvet Brownies, a perfect blend of classic red velvet flavor and rich chocolate chips. Soft, moist, and topped with optional sprinkles, these brownies make a charming dessert for Valentine’s Day or any special occasion.
Ingredients
Dry Ingredients
- 1/4 cup unsweetened cocoa powder
- 3/4 teaspoon white vinegar
- 1/4 teaspoon salt
- 3/4 cup all-purpose flour
- 1/2 cup white chocolate chips
- 1/2 cup semi-sweet chocolate chips
Wet Ingredients
- 1/2 cup unsalted butter, melted
- 1 cup granulated sugar
- 2 large eggs
- 1 teaspoon vanilla extract
- 1 tablespoon red food coloring
Optional
- Pink or red sprinkles for garnish
Instructions
- Preheat and Prepare Pan: Preheat the oven to 350°F (175°C) and line an 8×8-inch baking pan with parchment paper, allowing some overhang for easy removal.
- Mix Butter and Sugar: In a large mixing bowl, whisk together the melted butter and granulated sugar until the mixture is smooth and combined.
- Add Eggs and Flavorings: Add the eggs one at a time, beating well after each addition to ensure a smooth batter. Stir in the vanilla extract and red food coloring for that signature red velvet color.
- Incorporate Dry Ingredients: Add the cocoa powder, white vinegar, and salt to the wet mixture, mixing until fully incorporated. Then, gently fold in the flour just until combined to avoid over-mixing.
- Add Chocolate Chips: Fold in the white chocolate chips and semi-sweet chocolate chips evenly throughout the batter for perfect melty pockets of chocolate.
- Transfer and Bake: Pour the batter into the prepared pan and spread it evenly. Optionally, sprinkle pink or red sprinkles on top for decoration. Bake for 25 to 30 minutes or until a toothpick inserted into the center comes out with a few moist crumbs.
- Cool and Serve: Allow the brownies to cool completely in the pan. Use the parchment paper overhang to lift the brownies out easily, then slice into 9 to 12 squares and serve.
Notes
- For an extra festive touch, top with cream cheese frosting or dust lightly with powdered sugar.
- You can adjust the amount of red food coloring to achieve your desired shade of red.
- Use parchment paper to ensure easy removal and clean slicing.

