
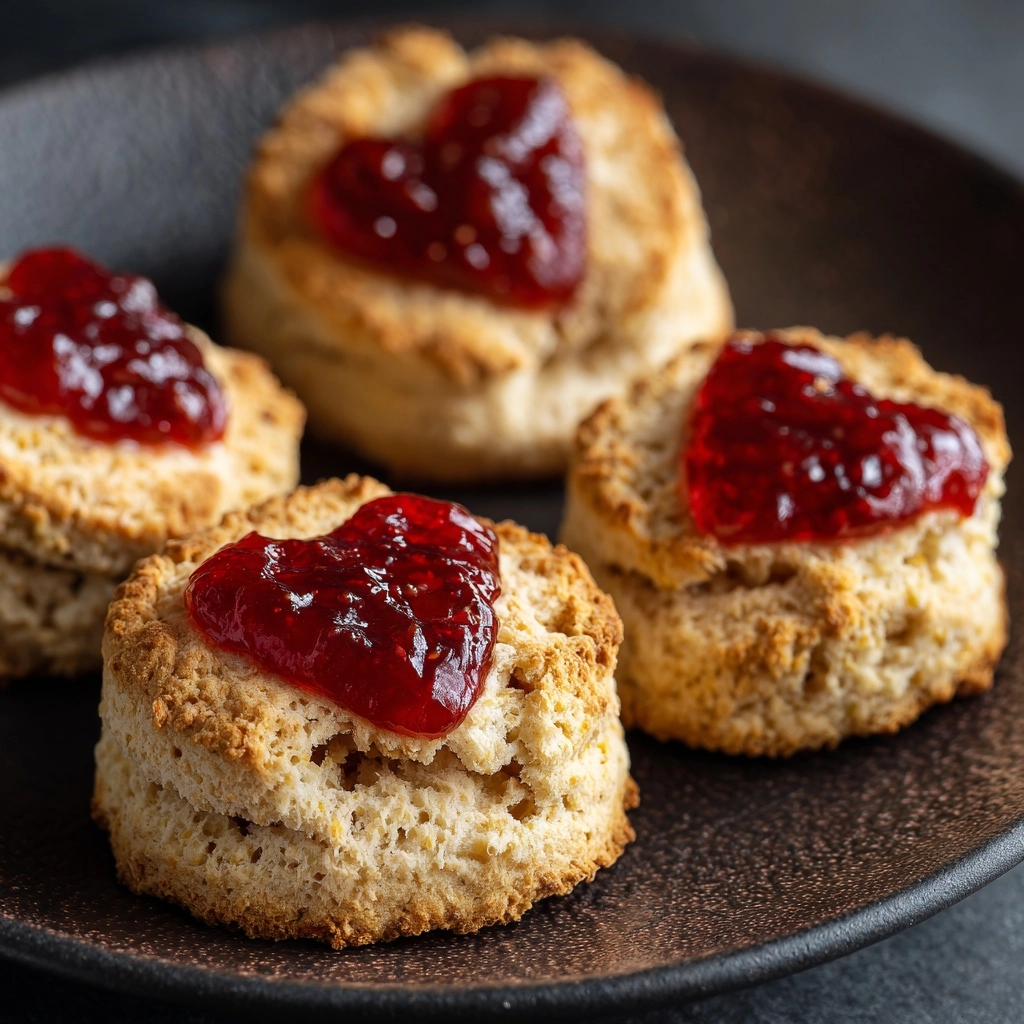
There is something truly magical about sharing homemade treats, and the I-Love-You Scones Recipe captures that warm, heartfelt feeling perfectly. These tender, berry-filled scones with a hint of vanilla and white chocolate chips are not just delicious—they’re a sweet way to show someone you care. Whether for a special breakfast or an indulgent snack, this recipe balances simplicity with a touch of elegance, making it an instant favorite that will have everyone asking for more.
Ingredients You’ll Need
The beauty of this recipe is how it uses simple, everyday ingredients that come together to create an irresistible flavor and texture. Each item is carefully chosen to provide the perfect balance of softness, sweetness, and a flaky crumb that defines great scones.
- 2 cups all-purpose flour: The foundation of the dough, providing structure and tenderness.
- 1/3 cup granulated sugar: Adds just the right amount of sweetness without overpowering.
- 1 tablespoon baking powder: Gives the scones their gentle rise and lightness.
- 1/2 teaspoon salt: Enhances the sweetness and balances the flavors beautifully.
- 6 tablespoons cold unsalted butter (cubed): Key for that flaky, tender crumb that melts in your mouth.
- 1/2 cup heavy cream (plus extra for brushing): Keeps the scones rich and moist, and helps create a golden crust.
- 1 large egg: Binds the ingredients and adds richness.
- 1 teaspoon vanilla extract: Infuses a gentle, comforting aroma and flavor.
- 1/2 cup fresh raspberries or chopped strawberries: Fresh fruit bursts that add color, freshness, and a slight tartness.
- 1/4 cup white chocolate chips (optional): For a subtle sweet contrast and a creamy texture.
- Coarse sugar for sprinkling: Adds a lovely sparkle and crunch to the scone tops.
How to Make I-Love-You Scones Recipe
Step 1: Prepare Your Oven and Mixing Bowl
Start by preheating your oven to 400°F (200°C) and line a baking sheet with parchment paper to prevent sticking and make cleanup easier. This initial step ensures your baking environment is ready to deliver perfectly golden scones.
Step 2: Combine Dry Ingredients
In a large bowl, whisk together the flour, sugar, baking powder, and salt. This dry mix is the base that will support all the delicious flavors and gives the scones their structure. Thoroughly blending these ingredients now helps your scones rise evenly.
Step 3: Cut in the Butter
Add the cold, cubed butter to the dry mix. Using a pastry cutter or clean fingertips, cut the butter into the flour until the mixture resembles coarse crumbs. This step is crucial: the small flakes of butter create the tender, flaky texture that makes scones so irresistible.
Step 4: Mix Wet Ingredients Separately
Whisk together the heavy cream, egg, and vanilla extract in a small bowl. This mixture adds moisture and richness to your dough, and the vanilla brings in that lovely warm flavor that makes the scones feel truly special.
Step 5: Combine Wet and Dry Ingredients
Pour the wet ingredients into the bowl with the dry mixture and gently mix until just combined. Avoid over-mixing here—overworking the dough can lead to tough scones, and we want them soft and tender.
Step 6: Add Berries and White Chocolate
Carefully fold in your fresh raspberries or strawberries along with the optional white chocolate chips. Be gentle to prevent the fruit from breaking apart but ensure they’re evenly distributed to give every bite a delightful surprise.
Step 7: Shape and Cut the Dough
Turn the dough out onto a lightly floured surface and pat it into a round about 1 inch thick. For a classic look, slice into 8 wedges. For a unique, heartfelt touch, use a heart-shaped cookie cutter instead.
Step 8: Final Touches Before Baking
Transfer the wedges onto your prepared baking sheet, brush the tops with a little heavy cream, and sprinkle with coarse sugar. This will help create a glossy, slightly crunchy topping that adds texture and visual appeal.
Step 9: Bake to Golden Perfection
Bake for 18 to 20 minutes until golden brown on top. Let your scones cool slightly before serving to allow flavors to settle and the centers to finish firming up. The smell at this point will be absolutely heavenly.
How to Serve I-Love-You Scones Recipe

Garnishes
These scones shine on their own, but you can elevate the experience with simple garnishes like a dollop of clotted cream, a smear of strawberry jam, or a drizzle of honey. These add complimentary sweetness and creaminess that pair perfectly with the fruity and vanilla notes.
Side Dishes
Serve these scones alongside a hot cup of tea or freshly brewed coffee for a cozy, comforting pairing. Fresh fruit or a mixed green salad can also add a fresh contrast if you’re making the scones part of a larger brunch spread.
Creative Ways to Present
For a truly personal touch, arrange the scones on a pretty platter with edible flowers or fresh berries around them. Using a heart-shaped cutter when making the I-Love-You Scones Recipe can turn this treat into a charming gift that speaks volumes without saying a word.
Make Ahead and Storage
Storing Leftovers
Store any leftover scones in an airtight container at room temperature for up to two days. To keep them fresh, avoid refrigeration, as this can dry them out quickly. When you’re ready to enjoy, simply rewarm gently for that fresh-baked feel.
Freezing
This recipe freezes beautifully. Wrap scones individually in plastic wrap and place in a freezer-safe bag. They can be frozen for up to three months and still taste fresh and tender when thawed and reheated.
Reheating
For the best texture, reheat scones in a preheated oven at 350°F (175°C) for about 5 to 7 minutes. Avoid the microwave if possible, as it tends to make scones chewy rather than flaky and tender.
FAQs
Can I use frozen berries in the I-Love-You Scones Recipe?
Yes, frozen berries work very well and help prevent the dough from becoming too wet. Just be sure to toss them in a little flour before folding in to reduce excess moisture.
What if I don’t have white chocolate chips?
No worries! The scones are delicious without them, or you could substitute with dark or milk chocolate chips for a different flavor twist.
Can I make the dough in advance?
Absolutely. The dough can be prepared up to a day ahead and kept wrapped in the refrigerator. Just slice and bake when you’re ready for fresh scones.
Is the I-Love-You Scones Recipe suitable for vegans?
This recipe contains butter, cream, and egg, so it isn’t vegan as written. However, you could experiment with plant-based alternatives, but the texture and flavor may differ.
How do I get perfectly flaky scones every time?
Key tips include using very cold butter, not over-mixing the dough, and handling it gently while shaping. These steps help create those delicate, flaky layers that make scones special.
Final Thoughts
There is something truly heartwarming about baking something as charming as the I-Love-You Scones Recipe. It’s a simple yet meaningful way to infuse a bit of love into your day or someone else’s. So go ahead, gather those ingredients, whip up a batch, and enjoy the blissful taste of these tender, berry-kissed scones. Your kitchen—and anyone lucky enough to share them—will thank you for it!
Print
I-Love-You Scones Recipe
- Prep Time: 15 minutes
- Cook Time: 20 minutes
- Total Time: 35 minutes
- Yield: 8 scones
- Category: Breakfast
- Method: Baking
- Cuisine: American
- Diet: Vegetarian
Description
Delight in these I-Love-You Scones, a tender and flaky breakfast treat bursting with fresh berries and optional white chocolate chips. Perfectly baked to a golden brown, these scones combine the richness of cold butter with the subtle sweetness of vanilla and cream. Ideal for a romantic breakfast or a cozy tea time, they offer a wonderful balance of flavors and textures that are sure to impress.
Ingredients
Dry Ingredients
- 2 cups all-purpose flour
- 1/3 cup granulated sugar
- 1 tablespoon baking powder
- 1/2 teaspoon salt
Wet Ingredients
- 6 tablespoons cold unsalted butter, cubed
- 1/2 cup heavy cream, plus extra for brushing
- 1 large egg
- 1 teaspoon vanilla extract
Add-ins
- 1/2 cup fresh raspberries or chopped strawberries
- 1/4 cup white chocolate chips (optional)
- Coarse sugar, for sprinkling
Instructions
- Preheat and Prepare Baking Sheet: Preheat your oven to 400°F (200°C) and line a baking sheet with parchment paper to prevent sticking and ensure even baking.
- Mix Dry Ingredients: In a large mixing bowl, whisk together the all-purpose flour, granulated sugar, baking powder, and salt until evenly combined.
- Cut in Butter: Add the cold, cubed unsalted butter to the dry mixture. Using a pastry cutter or your fingers, cut the butter into the flour mixture until it resembles coarse crumbs, which will help create flaky layers.
- Combine Wet Ingredients: In a separate small bowl, whisk together the heavy cream, egg, and vanilla extract until smooth and well combined.
- Form Dough: Pour the wet mixture into the dry ingredients and gently mix until just combined, being careful not to overwork the dough to keep it tender.
- Add Berries and Chocolate: Gently fold in the fresh raspberries or chopped strawberries along with the white chocolate chips if using, taking care not to crush the berries.
- Shape and Cut Dough: Turn the dough onto a lightly floured surface and pat into a 1-inch thick round. Cut the round into 8 wedges using a knife or a heart-shaped cookie cutter for a romantic touch.
- Prepare for Baking: Transfer the wedges to the prepared baking sheet. Brush the tops lightly with extra cream and sprinkle with coarse sugar for added texture and sweetness.
- Bake: Bake in the preheated oven for 18–20 minutes, or until the scones are golden brown and a toothpick inserted into the center comes out clean.
- Cool and Serve: Allow the scones to cool slightly on the baking sheet before serving. Enjoy warm, ideally with a cup of tea or coffee.
Notes
- Using frozen berries can help prevent the dough from becoming too wet and soggy.
- These scones are best enjoyed warm, straight from the oven, paired with your favorite tea or coffee.
- For a romantic twist, use a heart-shaped cookie cutter instead of cutting the dough into wedges.


