
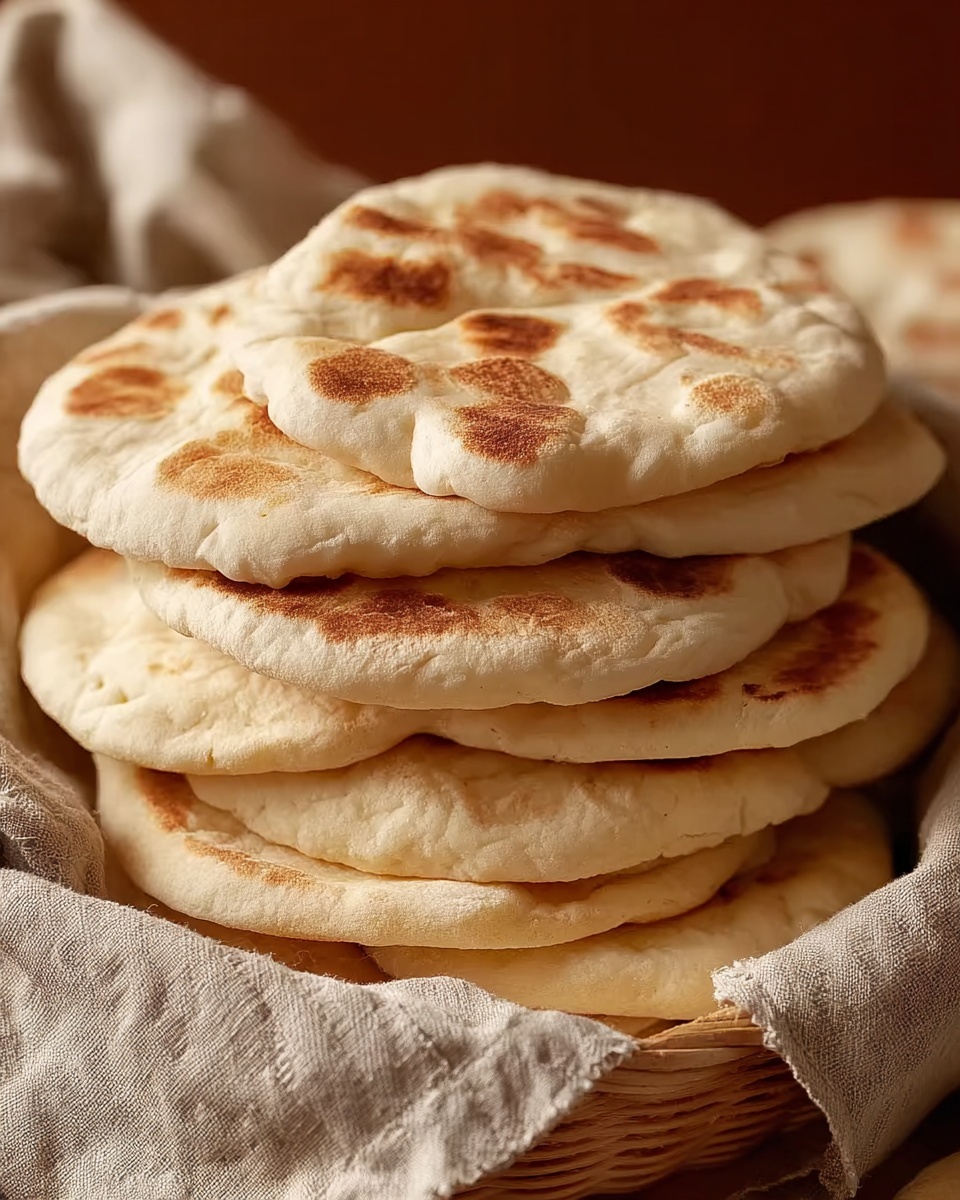
If you have ever yearned for that perfect, fluffy pocket of warmth that can cradle your favorite fillings or serve as a soft scoop for dips, then this Homemade Pita Bread Recipe is about to become your new best friend. It’s a simple yet deeply satisfying bread, boasting a light, airy texture and delightful puff that almost demands you pause and savor every bite. Making pita bread at home may sound intimidating, but with this approachable recipe, anyone can master the art of that beautiful pita pocket, straight from your kitchen to your plate.

Ingredients You’ll Need
Every ingredient in this recipe plays a vital role, working harmoniously to create pita bread that’s soft, flavorful, and perfectly puffed. The beauty here is in the simplicity—no fancy flours or additives, just basic pantry staples that you likely already have on hand.
- 2.5 cups all-purpose flour: The backbone of your pita, providing a tender crumb and just enough structure for puffing.
- 1 tsp dry active yeast: This little powerhouse is what makes the dough rise, giving those signature airy pockets.
- 1 tsp salt: Enhances all the flavors and balances the sweetness in the dough.
- 1 tbsp granulated sugar: Feeds the yeast and helps develop a warm, golden crust.
- 1 tbsp olive oil: Adds richness and keeps the dough soft and pliable.
- 1 cup warm water: Activates the yeast and binds everything into a smooth, elastic dough.
How to Make Homemade Pita Bread Recipe
Step 1: Activate the yeast
The magic starts here. Combine half of the warm water with your dry active yeast and sugar, then let it rest for around 10 minutes. As you watch those bubbles form and the mixture grow foamy, you’ll know it’s alive and ready to work its magic in the dough.
Step 2: Make the dough
Pour the flour and salt into a mixing bowl, then add the activated yeast mixture, remaining warm water, and olive oil. Knead everything together for about 10 minutes until the dough transforms into a smooth, elastic ball. This kneading step is crucial—it develops the gluten that creates structure and chewiness.
Step 3: Let it rise
Cover your dough with a towel and set it somewhere cozy to rise for 1 to 2 hours. During this time, the dough will double in size as the yeast ferments, producing those lovely air bubbles that ultimately give us the pita’s iconic puff.
Step 4: Shape the dough
Once risen, break the dough into 8 equal pieces and roll each into a neat ball. Then flatten each ball into a disc about 1/4-inch thick—thin enough to puff but thick enough to hold your fillings.
Step 5: Cook the pitas
Heat a skillet over high heat and cook each pita for 2 to 3 minutes on each side. You’ll notice them puffing up beautifully and turning a golden brown, signaling the perfect moment to pull them off the heat. This quick cooking seals in the moisture while giving you that satisfying pita pocket.
How to Serve Homemade Pita Bread Recipe
Garnishes
Fresh homemade pita is a blank canvas that shines even brighter with the right accompaniments. Sprinkle some sesame seeds or za’atar on top before cooking for a fragrant, slightly nutty finish that adds an extra layer of flavor and fun texture.
Side Dishes
Pita bread is a versatile companion to so many middle-eastern classics. Serve it alongside creamy hummus, rich baba ganoush, or a vibrant tabbouleh salad for a well-rounded, colorful meal that bursts with freshness and depth.
Creative Ways to Present
Want to jazz up your homemade pita bread recipe experience? Slice the pita into wedges for dipping parties, stuff it with falafel and veggies for satisfying sandwiches, or use it as a base for quick personal pizzas loaded with your favorite toppings—there’s no wrong way to enjoy it!
Make Ahead and Storage
Storing Leftovers
If you have extra pita bread, wrap it tightly in plastic wrap or place it in a sealed bag and keep it at room temperature for up to two days. This protects the bread’s softness while preventing it from drying out.
Freezing
Pita freezes wonderfully, which is perfect if you want to make a big batch ahead of time. Place pita breads in an airtight container or freezer bag with layers of parchment paper to avoid sticking, then freeze for up to three months.
Reheating
To bring your frozen or leftover pita back to life, warm them briefly in a skillet or oven. A few seconds on each side over medium heat or 3-5 minutes in a 350°F oven will restore that irresistible softness and fresh-baked warmth.
FAQs
Can I use whole wheat flour in this Homemade Pita Bread Recipe?
Absolutely! You can substitute whole wheat flour for all or part of the all-purpose flour for a nuttier flavor and added fiber, though the pitas might turn out a bit denser and less pillowy.
Why did my pita not puff up?
Pita bread puffs best when the dough is rolled evenly and cooked on a very hot surface. If your pitas don’t puff, check that your skillet is properly heated and that your dough is not rolled too thick or too thin.
How do I know when the yeast is active?
Activated yeast should form bubbles and foam within 10 minutes of combining with warm water and sugar. If nothing happens, the yeast might be expired or the water temperature was too hot or too cold.
Can I add herbs or spices to the dough?
Definitely! Adding finely chopped herbs like rosemary or spices such as cumin to the dough can yield delicious variations that make your homemade pita bread recipe uniquely yours.
Is it necessary to knead the dough by hand?
Kneading by hand works great and gives you control over the dough’s texture, but a stand mixer fitted with a dough hook saves time and effort without compromising the final result.
Final Thoughts
Making your own pita bread might feel like a small kitchen victory, but it’s truly a delicious triumph that elevates everyday meals into something special. I encourage you to try this Homemade Pita Bread Recipe, savor the process, and enjoy the comforting, warm pockets fresh from your skillet. Trust me, once you taste that first puffed pita, you’ll wonder why you ever bought them from the store!
Print
Homemade Pita Bread Recipe
- Prep Time: 20 minutes
- Cook Time: 15 minutes
- Total Time: 2 hours 10 minutes
- Yield: 8 servings
- Category: Bread
- Method: Stovetop
- Cuisine: Mediterranean
Description
This Homemade Pita Bread recipe guides you through making soft, puffy pita pockets from scratch using simple ingredients like flour, yeast, and olive oil. The recipe involves activating yeast, kneading dough, letting it rise, shaping into discs, and cooking on a hot skillet until golden brown and perfectly puffed.
Ingredients
Dry Ingredients
- 2.5 cups all-purpose flour
- 1 tsp dry active yeast
- 1 tsp salt
- 1 tbsp granulated sugar
Wet Ingredients
- 1 tbsp olive oil
- 1 cup warm water (divided)
Instructions
- Activate the yeast: Mix half of the warm water (about 1/2 cup) with the dry active yeast and granulated sugar. Let it sit for about 10 minutes until the mixture becomes bubbly and frothy, indicating that the yeast is active.
- Make the dough: In a mixer or large bowl, combine the flour, salt, remaining half of the warm water, and the activated yeast mixture. Knead the mixture for about 10 minutes until the dough becomes smooth and elastic, which helps develop the gluten.
- Let it rise: Cover the dough with a clean towel and place it in a warm spot. Allow it to rise for 1 to 2 hours, or until the dough doubles in size, which makes the bread light and airy.
- Shape the dough: Once risen, divide the dough into 8 equal pieces. Roll each piece into a ball, then flatten each ball into a 1/4-inch thick disc using your hands or a rolling pin, preparing them for cooking.
- Cook the pitas: Heat a skillet over high heat. Place each dough disc in the hot skillet and cook for 2 to 3 minutes on each side. The pitas will puff up as they cook and should turn a golden brown, forming perfect pockets inside.
Notes
- Use warm water around 110°F to activate the yeast properly.
- Make sure your skillet is hot enough to help the pitas puff up when cooking.
- You can store leftover pita bread in an airtight container for up to 3 days or freeze for longer storage.
- For softer pitas, brush them lightly with olive oil after cooking.


