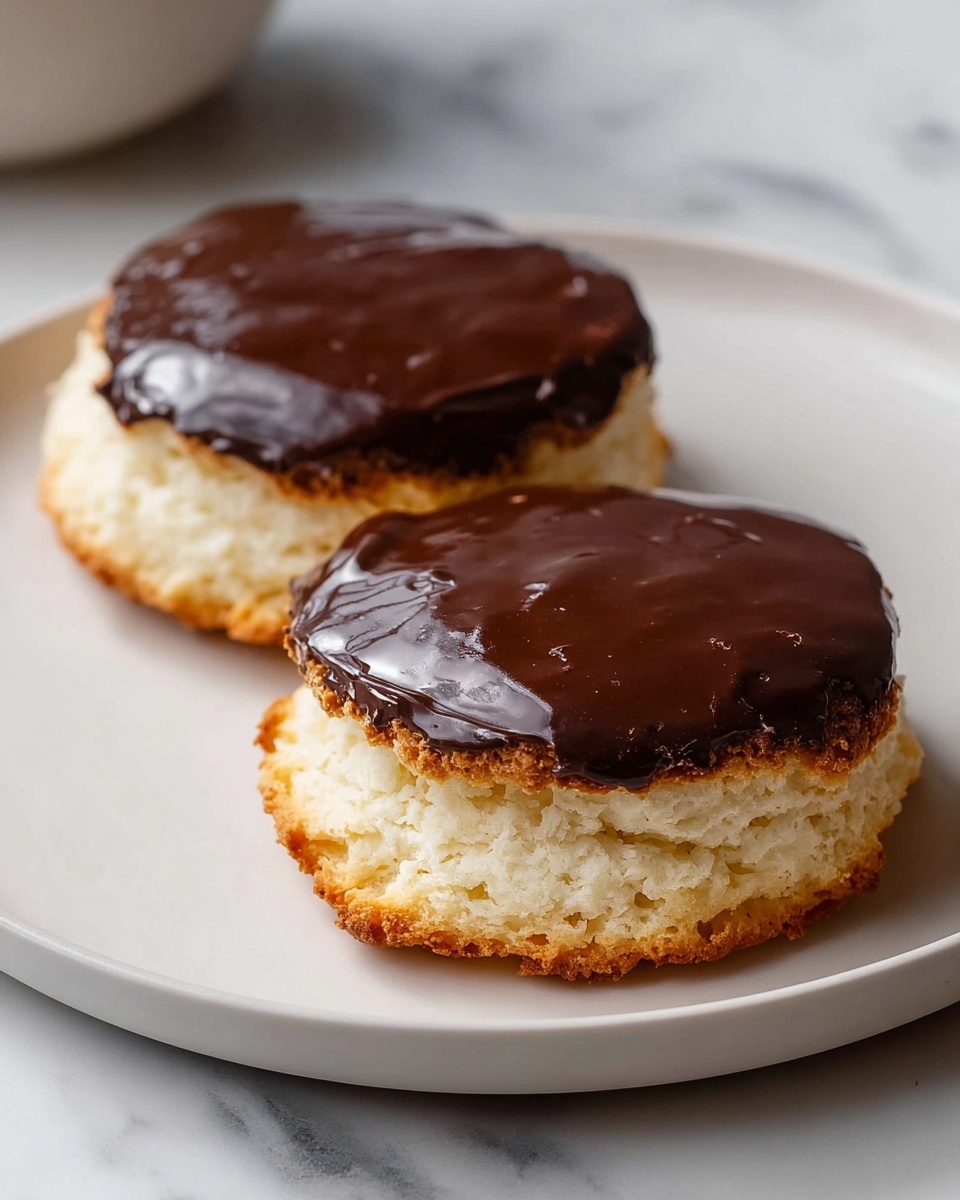
If you’ve never heard of chocolate gravy, you’re in for a delightful surprise with this Chocolate Gravy Recipe. Imagine a rich, velvety sauce that combines the warmth of cocoa and vanilla with a lightly sweetened, creamy texture that’s perfect poured generously over freshly baked biscuits. It’s a comforting Southern tradition that serves up nostalgia and indulgence all in one bite. Whether you’re new to this luscious treat or a longtime fan, this recipe will show you how incredibly easy it is to make chocolate gravy from scratch and bring a little magic to your breakfast table.

Ingredients You’ll Need
This Chocolate Gravy Recipe uses simple ingredients that you probably already have in your kitchen. Each one plays a crucial role in creating the perfect balance of flavor and texture—cocoa powder for that deep chocolatey richness, flour to give it body, and whole milk to keep it creamy and smooth.
- Granulated sugar (⅔ cup, 133g): Adds the perfect touch of sweetness to balance the cocoa’s natural bitterness.
- All-purpose flour (¼ cup, 30g): This is the thickening agent that creates the gravy’s luscious, silky texture.
- Cocoa powder (¼ cup, 25g): The star ingredient that delivers deep, rich chocolate flavor without overpowering.
- Whole milk (2 cups, 480ml): Provides creaminess and helps dissolve the dry ingredients into a smooth sauce.
- Unsalted butter (2 tablespoons, cubed): Enriches the gravy with a silky finish and subtle richness.
- Vanilla extract (1 teaspoon): Adds warmth and enhances all the chocolate notes beautifully.
- Biscuits: Essential for serving, soft and buttery biscuits soak up the chocolate gravy perfectly.
How to Make Chocolate Gravy Recipe
Step 1: Mix the Dry Ingredients
Start by whisking together the granulated sugar, all-purpose flour, and cocoa powder in a medium saucepan. This dry base is essential for evenly distributing the chocolate and thickening agents, preventing lumps from forming when you add the milk.
Step 2: Slowly Add Milk
Pour the whole milk gradually into the dry mixture while whisking constantly. Adding the milk slowly and whisking helps create a smooth, creamy consistency without any clumps. This step sets the stage for the perfect chocolate gravy texture.
Step 3: Cook Until Thickened
Place the saucepan over medium heat and continue to whisk as the mixture heats. Within about 8 to 10 minutes, you’ll notice the gravy thickening to a pudding-like consistency. Keep stirring to avoid scorching the bottom and maintain a velvety texture.
Step 4: Add Butter and Vanilla
Once thickened, remove the pan from the heat and stir in the cubed unsalted butter until fully melted and incorporated. Then add the vanilla extract to enhance the flavor, giving your chocolate gravy that inviting aroma and complex taste.
How to Serve Chocolate Gravy Recipe

Garnishes
For a little extra flair, sprinkle some mini chocolate chips, chopped toasted pecans, or a dusting of powdered sugar on top. These simple garnishes add texture, visual appeal, and sometimes an added burst of flavor, making every bite an indulgence.
Side Dishes
While biscuits are the classic partner to chocolate gravy, you can also try it alongside warm waffles, buttered toast, or even fluffy pancakes. The gravy adds a chocolatey layer that complements these breakfast staples perfectly.
Creative Ways to Present
Serve your chocolate gravy in a small gravy boat for a charming, rustic breakfast table. You can also pour it over vanilla ice cream for an unexpected dessert twist or fold it into whipped cream to create a decadent chocolate mousse topping. The possibilities with this Chocolate Gravy Recipe are endless and deliciously fun.
Make Ahead and Storage
Storing Leftovers
Chocolate gravy can be stored in an airtight container in the refrigerator for up to 3 days. The sauce will thicken as it cools, so give it a good stir when you’re ready to enjoy again.
Freezing
While freezing chocolate gravy isn’t ideal due to changes in texture after thawing, you can freeze it if necessary. Transfer it to a freezer-safe container and use within one month. Thaw in the refrigerator overnight before reheating gently on the stove.
Reheating
To reheat, warm your chocolate gravy over low heat while stirring constantly to return it to that smooth, pourable consistency. You may need to add a splash of milk to loosen it up and regain its creamy texture.
FAQs
What makes this Chocolate Gravy Recipe different from regular chocolate sauce?
Chocolate gravy uses flour as a thickening agent, creating a richer, more velvety texture that’s thicker than typical chocolate sauce. It is also less sweet and often served warm over biscuits, making it a unique Southern comfort food.
Can I use cocoa powder substitutes for this recipe?
Natural unsweetened cocoa powder works best here for its pure chocolate flavor and texture. Dutch-process cocoa may work but may slightly alter the color and acidity, impacting flavor and thickening.
Is it necessary to use whole milk in this Chocolate Gravy Recipe?
Whole milk provides the best creaminess and mouthfeel, but you can use 2% milk if needed. Avoid skim milk because the gravy may lose richness and become less silky.
How do I prevent lumps in my chocolate gravy?
Whisking the dry ingredients thoroughly before adding milk and then gradually pouring the milk while whisking continuously will prevent lumps. Cooking over medium heat and stirring constantly also helps maintain smoothness.
Can I add other flavors to this recipe?
Absolutely! A pinch of cinnamon or a splash of espresso can deepen the chocolate flavor. Just be sure to add these flavors gradually to keep the balance perfect in your Chocolate Gravy Recipe.
Final Thoughts
This Chocolate Gravy Recipe is the kind of treat that makes mornings feel special and cozy. It’s simple, quick, and oh-so-satisfying—perfect for when you want to impress family or indulge yourself with a comforting classic. I encourage you to give it a try and watch how something so straightforward becomes a memorable favorite on your breakfast table.
Print
Chocolate Gravy Recipe
- Prep Time: 5 minutes
- Cook Time: 10 minutes
- Total Time: 15 minutes
- Yield: 8 to 8 servings
- Category: Sauce
- Method: Stovetop
- Cuisine: Southern American
Description
This rich and creamy Chocolate Gravy recipe is a Southern classic that transforms simple ingredients into a decadent sauce perfect for pouring over warm biscuits. Easy to prepare in just minutes, this chocolate gravy offers a delightful twist on traditional sausage gravy, combining cocoa powder, sugar, and vanilla for a comforting, indulgent breakfast or brunch treat.
Ingredients
Chocolate Gravy
- ⅔ cup granulated sugar (133g)
- ¼ cup all-purpose flour (30g)
- ¼ cup cocoa powder (25g)
- 2 cups whole milk (480ml)
- 2 tablespoons unsalted butter, cubed
- 1 teaspoon vanilla extract
To Serve
- Biscuits, warm
Instructions
- Combine Dry Ingredients: In a medium saucepan, whisk together granulated sugar, all-purpose flour, and cocoa powder until thoroughly blended to remove any lumps.
- Add Milk: Gradually whisk in the whole milk, ensuring a smooth mixture before placing the pan on heat.
- Cook the Gravy: Place the saucepan over medium heat and cook the mixture, stirring constantly, until it thickens and begins to bubble gently. This should take about 8–10 minutes.
- Incorporate Butter and Vanilla: Remove the saucepan from heat and stir in the cubed unsalted butter and vanilla extract until the butter melts completely, yielding a glossy, smooth chocolate gravy.
- Serve Warm: Spoon the chocolate gravy generously over warm biscuits and enjoy immediately for a comforting and indulgent breakfast experience.
Notes
- Use whole milk for the creamiest texture; you can substitute with 2% milk for a lighter version, but the gravy will be less rich.
- Whisk continuously during cooking to prevent lumps and to avoid burning the bottom of the pan.
- Chocolate gravy is best served fresh and warm; if it thickens too much upon standing, gently reheat with a splash of milk while stirring.
- For a dairy-free version, use a plant-based milk and butter substitute.
- Store leftovers in an airtight container in the refrigerator for up to 2 days and reheat gently before serving.


