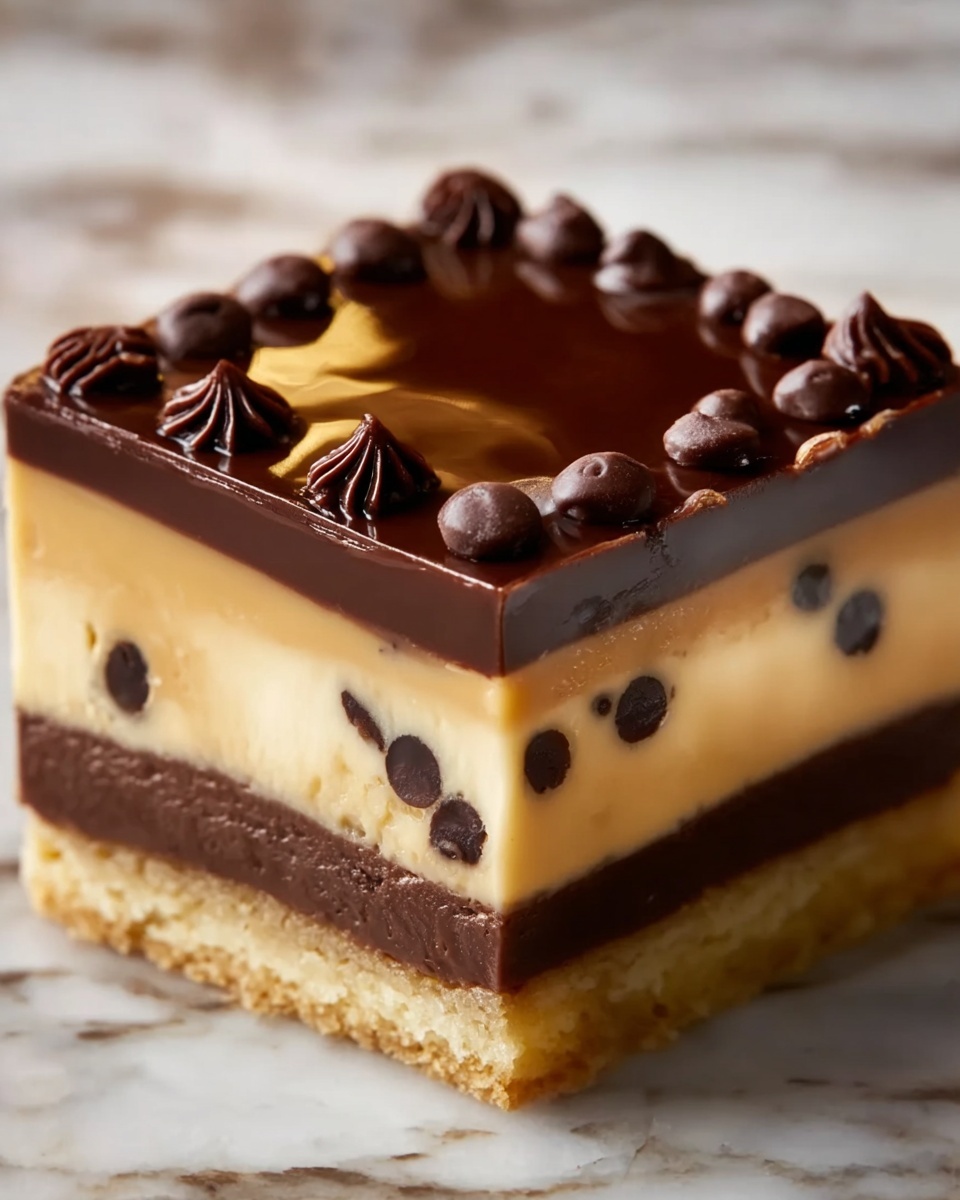
If you adore the classic flavors of Boston Cream Pie but are looking for a fun, fudgy twist, this Boston Cream Pie Fudge Recipe will become an instant favorite. It brilliantly captures the luscious blend of creamy vanilla pudding layered beneath rich milk chocolate, all wrapped up in a smooth, melt-in-your-mouth fudge. This no-bake dessert is simple to make yet impressively decadent, perfect for treating yourself or sharing at your next gathering.

Ingredients You’ll Need
The charm of this Boston Cream Pie Fudge Recipe lies in its straightforward ingredients, each playing a starring role in creating that beautiful balance of creamy sweetness and velvety chocolate. With just a handful of pantry staples, you’ll transform everyday items into an irresistible layered delight.
- Sweetened condensed milk: The foundation for creamy richness that binds the fudge together.
- White chocolate chips: These bring smooth sweetness and a gorgeous pale color to the vanilla layer.
- Instant vanilla pudding mix: Adds authentic vanilla flavor and helps thicken the base layer perfectly.
- Vanilla extract: Enhances the vanilla notes and adds depth to the beginning layer.
- Milk chocolate chips: For a luscious, melty top layer that contrasts beautifully with the vanilla base.
- Heavy cream: Adds silkiness and helps create that glossy chocolate topping you’ll love.
- Unsalted butter: Boosts the richness and smooth texture of the chocolate layer.
How to Make Boston Cream Pie Fudge Recipe
Step 1: Prepare the Pan
Start by lining an 8×8-inch baking dish with parchment paper, being sure to leave some overhang on the sides. This little preparation trick is essential because it allows you to easily lift out the fudge once it’s set, making cutting much cleaner and simpler.
Step 2: Make the Vanilla Layer
Over low heat, gently combine the sweetened condensed milk and white chocolate chips in a medium saucepan. Stir constantly to prevent scorching and melt everything into a smooth, silky mixture. Then, remove from the heat and whisk in the dry instant vanilla pudding mix along with the vanilla extract. Keep whisking until thickened and completely combined—this creamy vanilla layer is the heart of your Boston Cream Pie Fudge Recipe.
Step 3: Set the Vanilla Base
Pour your luscious vanilla mixture into the prepared pan and spread it evenly with a spatula. Let it rest at room temperature for about 20 minutes, just long enough to start setting up while you prepare the chocolate topping.
Step 4: Create the Chocolate Layer
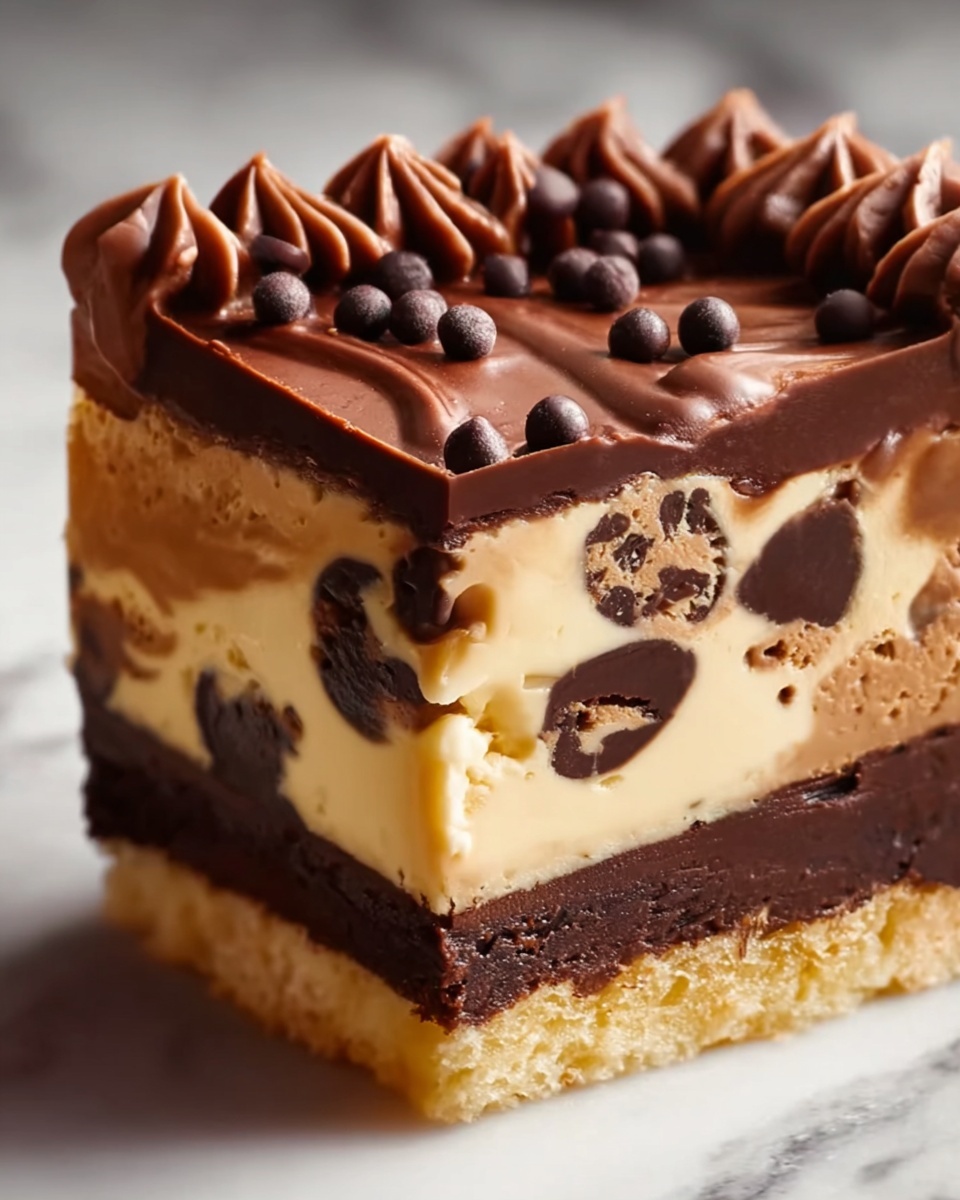
In a clean saucepan over low heat, add the milk chocolate chips, heavy cream, and butter. Stir constantly until the chocolate melts completely and the mixture becomes glossy and smooth. Pour this decadent chocolate mixture over the partially set vanilla base and gently spread it out into an even layer. This layering step adds that classic visual and flavor contrast, elevating the whole fudge experience.
Step 5: Chill the Fudge
Pop your two-layer creation into the fridge and chill for at least four hours until fully firm. Once it’s set, use the parchment overhang to carefully lift the fudge out of the pan. Then, slice into bite-sized squares, perfect for sharing or indulging on your own.
How to Serve Boston Cream Pie Fudge Recipe
Garnishes
While the fudge is a treat all on its own, a sprinkle of finely chopped nuts or a dusting of cocoa powder can add a nice textural contrast and a hint of extra flavor. For a festive touch, try mini chocolate chips or even a drizzle of caramel sauce on top.
Side Dishes
This fudge pairs beautifully with a warm cup of coffee or a robust black tea, where the bitterness complements the sweet, creamy layers perfectly. For an extra indulgent experience, serve alongside fresh berries or a dollop of whipped cream to brighten every forkful.
Creative Ways to Present
Change things up by cutting the fudge into fun shapes using cookie cutters, perfect for parties or holiday celebrations. You can also layer the fudge squares in a pretty jar with parchment separators as a delightful gift idea that everyone will rave about.
Make Ahead and Storage
Storing Leftovers
Because this Boston Cream Pie Fudge Recipe is rich and creamy, it stores best in an airtight container in the refrigerator. It will keep beautifully for up to one week, maintaining its smooth texture and balanced flavors.
Freezing
If you’d like to enjoy the fudge later or prepare it in advance, you can freeze the pieces wrapped tightly in parchment paper and placed in a freezer-safe bag or container. Frozen fudge will stay good for up to three months and thaw quickly at room temperature.
Reheating
This fudge is best enjoyed cold or at room temperature, so simply letting it sit out for about 10 minutes after refrigeration will bring out all the luscious creaminess and soften the texture, making it ready for the perfect bite.
FAQs
Can I use semi-sweet chocolate instead of milk chocolate?
Absolutely! Using semi-sweet chocolate will give your fudge a slightly less sweet, deeper chocolate flavor, which some people really love. Just keep in mind it may change the overall sweetness balance of your Boston Cream Pie Fudge Recipe.
Is this Boston Cream Pie Fudge Recipe gluten-free?
Yes, all the ingredients used in this recipe are naturally gluten-free, making it a safe and delicious option for those avoiding gluten. Just double-check your pudding mix and chocolate chips to be sure they’re certified gluten-free.
How thick should I spread each layer?
A nice even layer about 1 inch thick for the vanilla base and slightly thinner for the chocolate topping works perfectly. This ratio ensures you get that classic creamy vanilla with just enough chocolate on top.
Can I make this recipe without the pudding mix?
The pudding mix is key for that signature Boston Cream Pie flavor and helps set the vanilla layer properly. If you don’t have it on hand, you might experiment with homemade pudding, but the texture and taste will vary from the original Boston Cream Pie Fudge Recipe.
What’s the best way to cut the fudge?
Using a sharp, clean knife, warm it slightly under hot water and wipe dry before cutting. This technique helps achieve smooth, clean edges, giving you those perfect small squares every time.
Final Thoughts
This Boston Cream Pie Fudge Recipe is a charming blend of classic dessert nostalgia with fudge’s rich decadence that’s simply irresistible. It’s a no-fuss, no-bake treat that’s guaranteed to wow whenever you serve it. Go ahead and whip up a batch—you’ll be so happy you did.
Print
Boston Cream Pie Fudge Recipe
- Prep Time: 15 minutes
- Cook Time: 10 minutes
- Total Time: 4 hours 25 minutes
- Yield: 36 pieces
- Category: Dessert
- Method: No-Cook
- Cuisine: American
- Diet: Vegetarian
Description
Boston Cream Pie Fudge is a rich, layered no-bake treat that combines creamy white chocolate and vanilla pudding with a luscious milk chocolate topping. This easy-to-make dessert captures the classic flavors of the Boston cream pie in a delightful fudge form, perfect for celebrations or sweet cravings.
Ingredients
Vanilla Layer
- 1 (14 oz) can sweetened condensed milk
- 1 ½ cups white chocolate chips
- 1 (3.4 oz) box instant vanilla pudding mix (dry)
- 1 teaspoon vanilla extract
Chocolate Layer
- 1 ½ cups milk chocolate chips
- ¼ cup heavy cream
- 2 tablespoons unsalted butter
Instructions
- Prepare the Pan: Line an 8×8-inch baking dish with parchment paper, ensuring there is an overhang on the sides to make removing the fudge easier later.
- Make the Vanilla Layer: In a medium saucepan over low heat, combine the sweetened condensed milk and white chocolate chips. Stir constantly until melted and smooth. Remove from heat and whisk in the dry vanilla pudding mix and vanilla extract until the mixture is fully combined and thickened.
- Set the Vanilla Layer: Pour the vanilla mixture into the prepared pan and spread it evenly. Allow it to set at room temperature for about 20 minutes, giving it time to firm slightly while you prepare the chocolate layer.
- Make the Chocolate Layer: Using a clean saucepan over low heat, combine the milk chocolate chips, heavy cream, and unsalted butter. Stir continuously until the chocolate melts and the mixture becomes smooth and glossy.
- Assemble the Fudge: Pour the chocolate mixture gently over the vanilla base and spread it evenly with a spatula.
- Chill: Refrigerate the assembled fudge for at least 4 hours or until completely firm.
- Serve: Once set, use the parchment paper overhang to lift the fudge from the pan and cut it into 36 small squares.
Notes
- For best texture, let the fudge come to room temperature for about 10 minutes before serving to enhance flavor and soften slightly.
- Store the fudge in an airtight container in the refrigerator for up to 1 week to maintain freshness.


