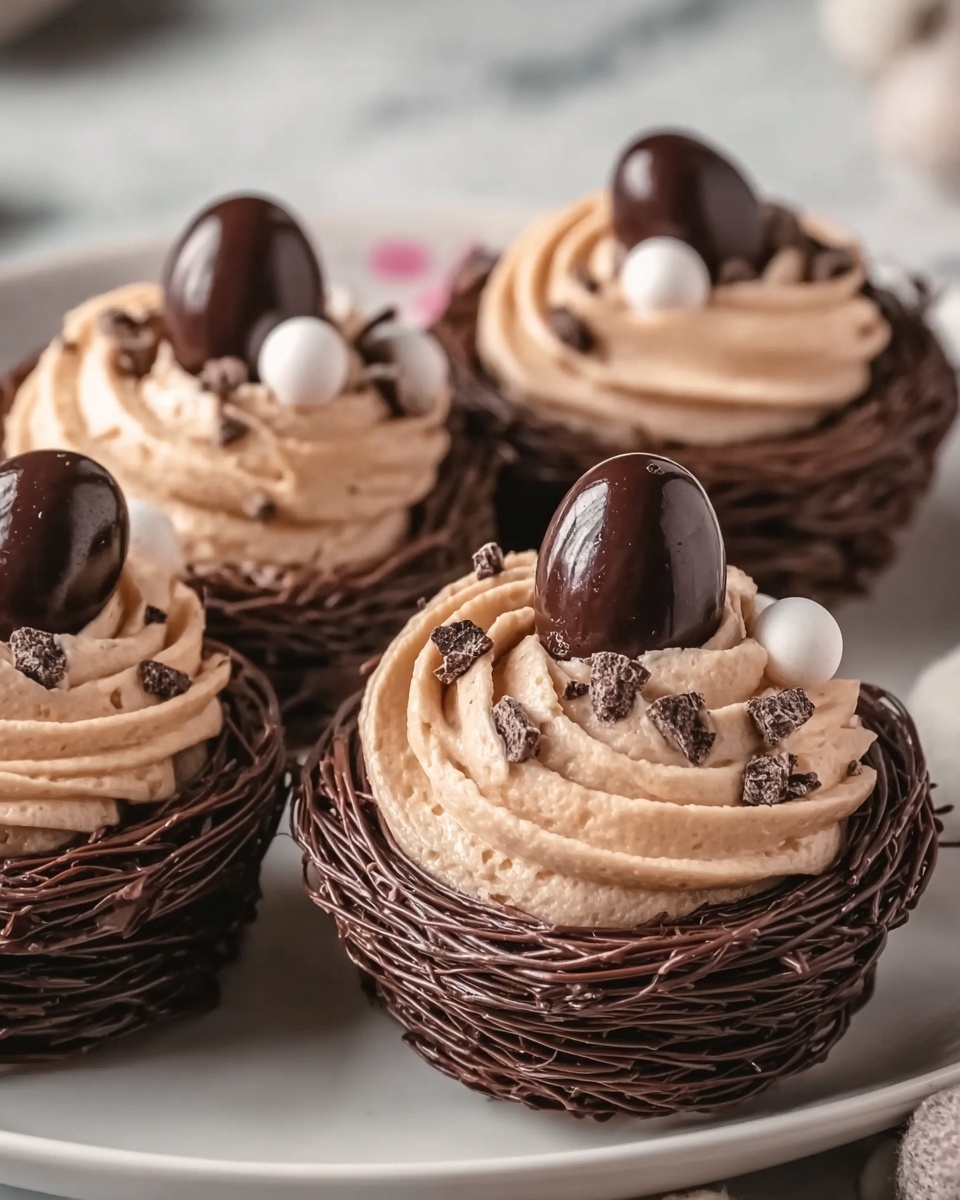
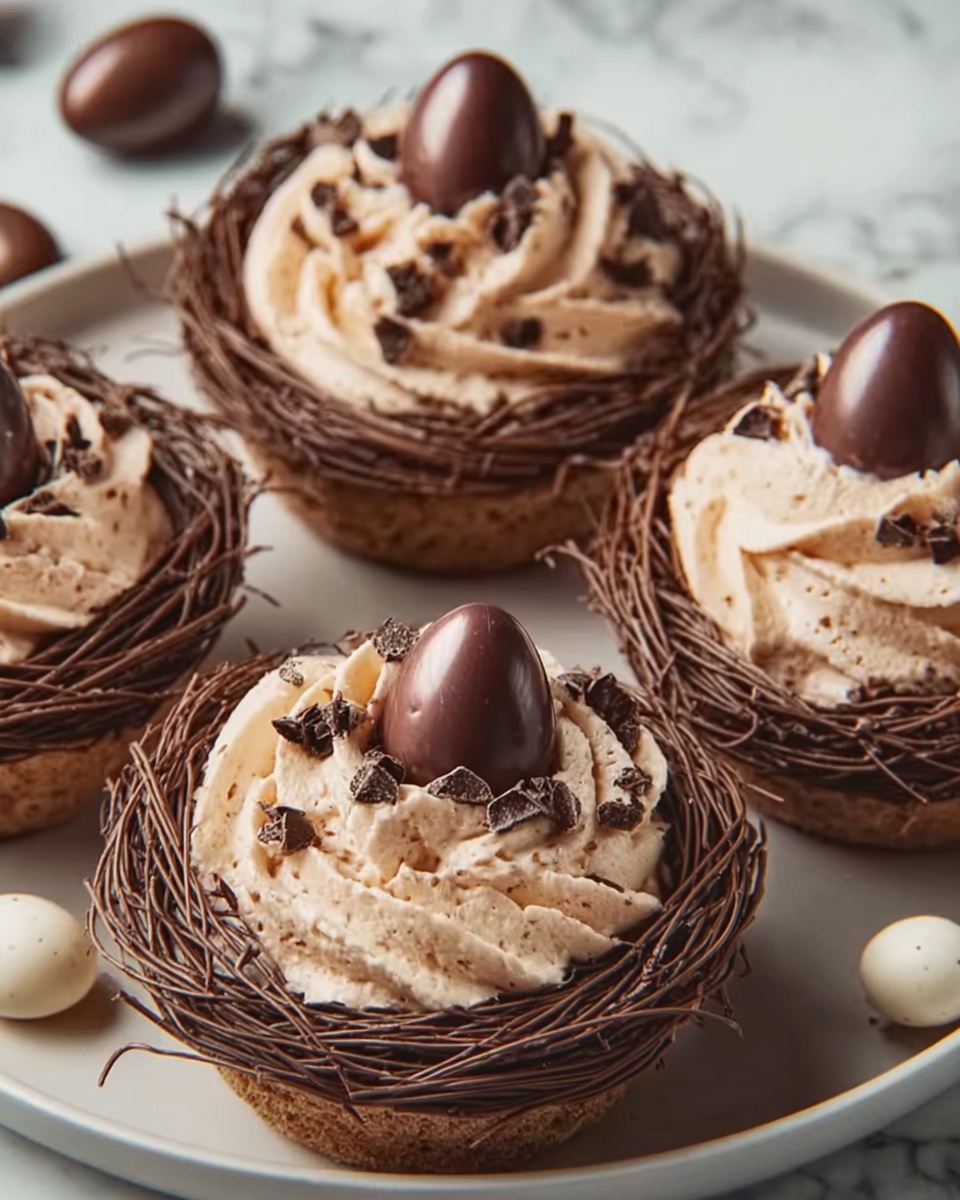
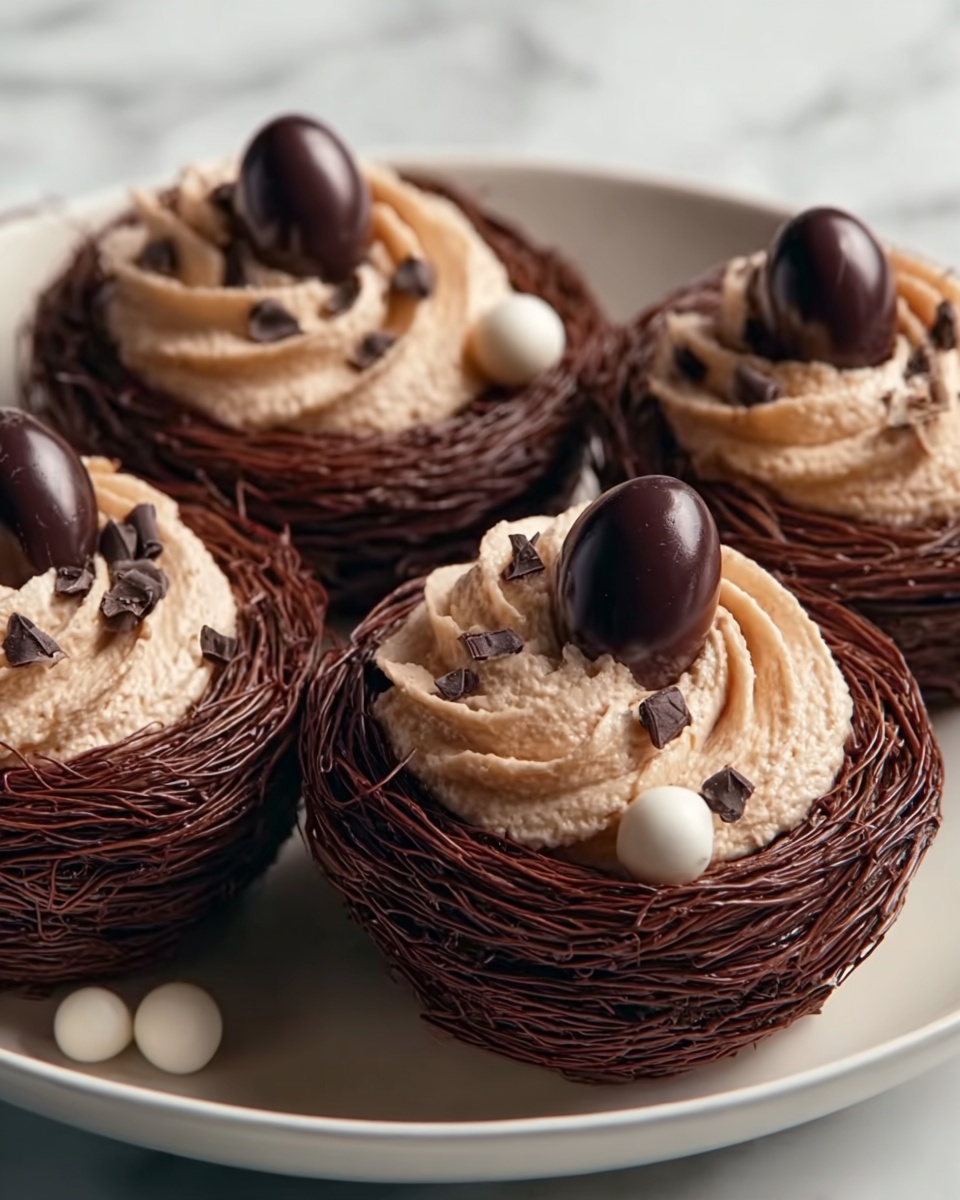
If you are looking for a delightful Easter treat that combines lightness with rich chocolate flavor, the Chocolate Meringue Easter Nests Recipe is an absolute must-try. These delicate, crisp meringue nests infused with cocoa capture the essence of spring celebrations with their charming shape and festive toppings. The crisp texture paired with melted chocolate and a sweet filling makes for a mesmerizing dessert that is as stunning on the table as it is delicious in every bite.
Ingredients You’ll Need
Gathering the right ingredients is essential for achieving the perfect texture and taste in your Chocolate Meringue Easter Nests Recipe. Each component plays an important role, from the airy egg whites that create the meringue’s light structure to the rich cocoa powder that brings a deep chocolate flavor and the mini chocolate eggs that add the final festive touch.
- 4 large egg whites (room temperature): These provide the base for the meringue and whip up to a fluffy, airy consistency.
- 1 cup granulated sugar: Adds sweetness and helps stabilize the meringue for that glossy finish.
- 1/4 teaspoon cream of tartar: Improves stability and volume of the whipped egg whites for perfect peaks.
- 1/4 cup unsweetened cocoa powder (sifted): Gives the nests their luscious chocolate color and flavor without extra moisture.
- 1/2 teaspoon vanilla extract: Enhances the overall flavor with subtle warmth and sweetness.
- Pinch of salt: Balances the sweetness and intensifies the chocolate notes.
- 1/2 cup semi-sweet chocolate chips (melted): Used for drizzling to add a rich finishing touch.
- Mini chocolate eggs or jelly beans (for topping): Provides a playful, colorful Easter decoration to each nest.
- Optional whipped cream or chocolate ganache (for filling): Adds a creamy, indulgent filling that complements the crisp meringue texture.
How to Make Chocolate Meringue Easter Nests Recipe
Step 1: Preheat and Prepare
Start by preheating your oven to 225°F (110°C) and lining a baking sheet with parchment paper. This low temperature ensures the meringues dry out slowly, resulting in crisp exteriors without browning. The parchment also prevents sticking, so your nests lift off easily once baked.
Step 2: Whip Egg Whites
In a large, grease-free mixing bowl, beat the egg whites on medium speed until foamy. Adding cream of tartar and a pinch of salt now helps stabilize the whites. Gradually add sugar one tablespoon at a time while increasing the mixer speed to high. Beat until stiff, glossy peaks form — this is crucial for that light, airy texture.
Step 3: Fold in Cocoa Powder and Vanilla
Gently fold in the sifted cocoa powder and vanilla extract just until incorporated. Be careful not to overmix and deflate the meringue. This step gives your nests their beautiful chocolatey hue while maintaining the fluffy structure.
Step 4: Shape the Nests
Spoon the meringue mixture into a piping bag fitted with a large star tip, or simply use a spoon to drop 2- to 3-inch wide piles onto the prepared baking sheet. Use the back of a spoon to create a shallow well in the center of each mound, which will later hold your fillings and decorations.
Step 5: Bake and Cool
Bake the meringues for 1 hour, then switch off the oven but leave the nests inside with the door closed for another hour to cool completely. This method helps them crisp perfectly inside and out without cracking.
Step 6: Decorate and Fill
Once cooled, drizzle the nests with melted chocolate and allow it to set. Optionally, fill the centers with whipped cream or chocolate ganache before topping them with mini chocolate eggs or jelly beans. These final touches transform your meringues into adorable Easter nests that delight both the eyes and the palate.
How to Serve Chocolate Meringue Easter Nests Recipe
Garnishes
Adding mini chocolate eggs or colorful jelly beans on top of each nest instantly evokes the Easter spirit. You can also sprinkle a light dusting of cocoa powder or shredded coconut for an extra festive and textured look that tantalizes the senses.
Side Dishes
Serve these meringue nests alongside fresh berries or a light fruit salad to balance out the sweetness and add freshness. A cup of rich espresso or softly whipped cream on the side can also elevate the experience, creating a well-rounded dessert presentation.
Creative Ways to Present
Try arranging your Chocolate Meringue Easter Nests Recipe on a rustic wooden board surrounded by spring flowers for a charming centerpiece. Alternatively, place individual nests in pastel-colored cupcake liners for easy serving at parties, making them both pretty and practical.
Make Ahead and Storage
Storing Leftovers
Leftover meringue nests keep best in an airtight container at room temperature for up to three days. Avoid refrigeration which can cause humidity and soften their crisp texture, losing the magic of the snap you want in each bite.
Freezing
You can freeze baked meringue nests by placing them in a single layer on a baking sheet until solid, then transferring them to a freezer-safe container. They freeze well for up to a month. Thaw at room temperature, keeping them covered to avoid moisture absorption.
Reheating
Meringue nests generally do not require reheating, as their appeal lies in their crispness served cool or at room temperature. If needed, briefly warm them in a low oven (just a few minutes at 200°F or 90°C), but watch carefully to prevent melting or browning.
FAQs
Can I use powdered sugar instead of granulated sugar in this recipe?
Granulated sugar is preferred for the Chocolate Meringue Easter Nests Recipe because it helps create a stable, glossy meringue. Powdered sugar contains cornstarch which can affect texture and inhibit forming stiff peaks properly.
Is it necessary to add cream of tartar for these meringues?
Cream of tartar is not absolutely mandatory, but it greatly improves the stability and volume of your whipped egg whites, which is key to achieving the perfect structure for the nests.
Can I make these nests without a piping bag?
Absolutely! While a piping bag with a star tip gives a pretty textured finish, you can simply use a spoon to drop and shape the nests. The final taste and texture will still impress your guests.
How long do the Chocolate Meringue Easter Nests stay fresh?
When stored properly in an airtight container at room temperature, these nests stay fresh and crisp for up to three days. For longer storage, freezing is a great option.
What’s the best filling to use for these nests?
Whipped cream and chocolate ganache both pair beautifully with the meringue nests. Whipped cream adds lightness, while ganache brings rich decadence. Feel free to get creative by adding fresh berries or flavored creams too.
Final Thoughts
Creating these charming Chocolate Meringue Easter Nests Recipe is a joyful way to celebrate the season with friends and family. Their delicate texture and festive look are sure to impress, while the chocolate flavor offers a comforting sweetness that everyone will love. If you’ve been searching for an Easter dessert that’s both fun to make and unforgettable to taste, this recipe is calling your name. Give it a try, and watch these nests become a beloved tradition at your table.
Print
Chocolate Meringue Easter Nests Recipe
- Prep Time: 20 minutes
- Cook Time: 1 hour
- Total Time: 2 hours
- Yield: 10 nests
- Category: Dessert
- Method: Baking
- Cuisine: American
- Diet: Gluten Free
Description
Delight in these elegant Chocolate Meringue Easter Nests, a light and airy gluten-free dessert perfect for spring celebrations. Crisp on the outside with a soft center, these nests are infused with cocoa and topped with mini chocolate eggs or jelly beans, making them a festive treat that’s as beautiful as it is delicious.
Ingredients
Meringue Base
- 4 large egg whites (room temperature)
- 1 cup granulated sugar
- 1/4 teaspoon cream of tartar
- 1/4 cup unsweetened cocoa powder (sifted)
- 1/2 teaspoon vanilla extract
- Pinch of salt
Toppings and Filling
- 1/2 cup semi-sweet chocolate chips (melted)
- Mini chocolate eggs or jelly beans (for topping)
- Optional whipped cream or chocolate ganache (for filling)
Instructions
- Preheat and Prepare: Preheat your oven to 225°F (110°C) and line a baking sheet with parchment paper to prevent sticking and ensure even baking.
- Beat Egg Whites: In a large, clean mixing bowl, beat the egg whites on medium speed until they become foamy and begin to form soft peaks.
- Add Stabilizers: Add the cream of tartar and a pinch of salt to the foamy egg whites. Continue beating while gradually adding the sugar, one tablespoon at a time, ensuring it dissolves completely for a glossy finish.
- Form Stiff Peaks: Increase the mixer speed to high and beat the mixture until stiff, glossy peaks form, indicating the meringue is ready for flavoring.
- Incorporate Cocoa and Vanilla: Gently fold in the sifted cocoa powder and vanilla extract until just combined, being careful not to deflate the meringue.
- Shape Nests: Using a piping bag fitted with a large star tip or a spoon, form 2- to 3-inch wide nests on the baking sheet. Use the back of a spoon to create a shallow well in the center of each nest for filling later.
- Bake: Bake the meringues for 1 hour at 225°F (110°C). After baking, turn off the oven and leave the meringues inside with the door closed for another hour to cool slowly, which helps them dry out perfectly.
- Decorate and Fill: Once cooled, drizzle the nests with melted chocolate chips and let the drizzle set. Fill the nests with whipped cream or chocolate ganache as desired, then top with mini chocolate eggs or jelly beans for a festive finish.
Notes
- Ensure your mixing bowl and beaters are completely grease-free to achieve stiff peaks.
- These meringue nests can be prepared ahead and stored in an airtight container for up to 3 days to maintain crispness.
- Decorate just before serving to keep the meringue crisp and prevent sogginess.


