
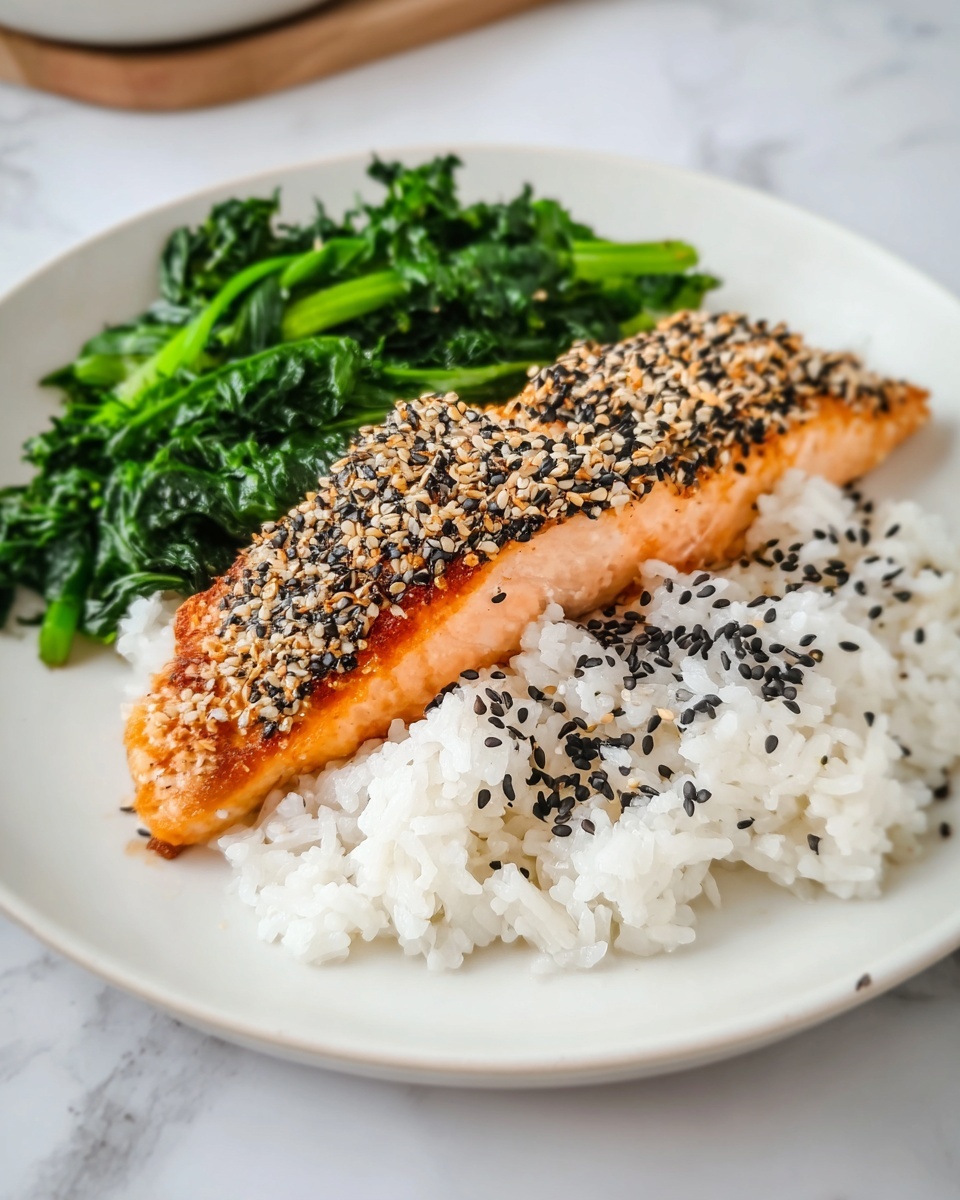
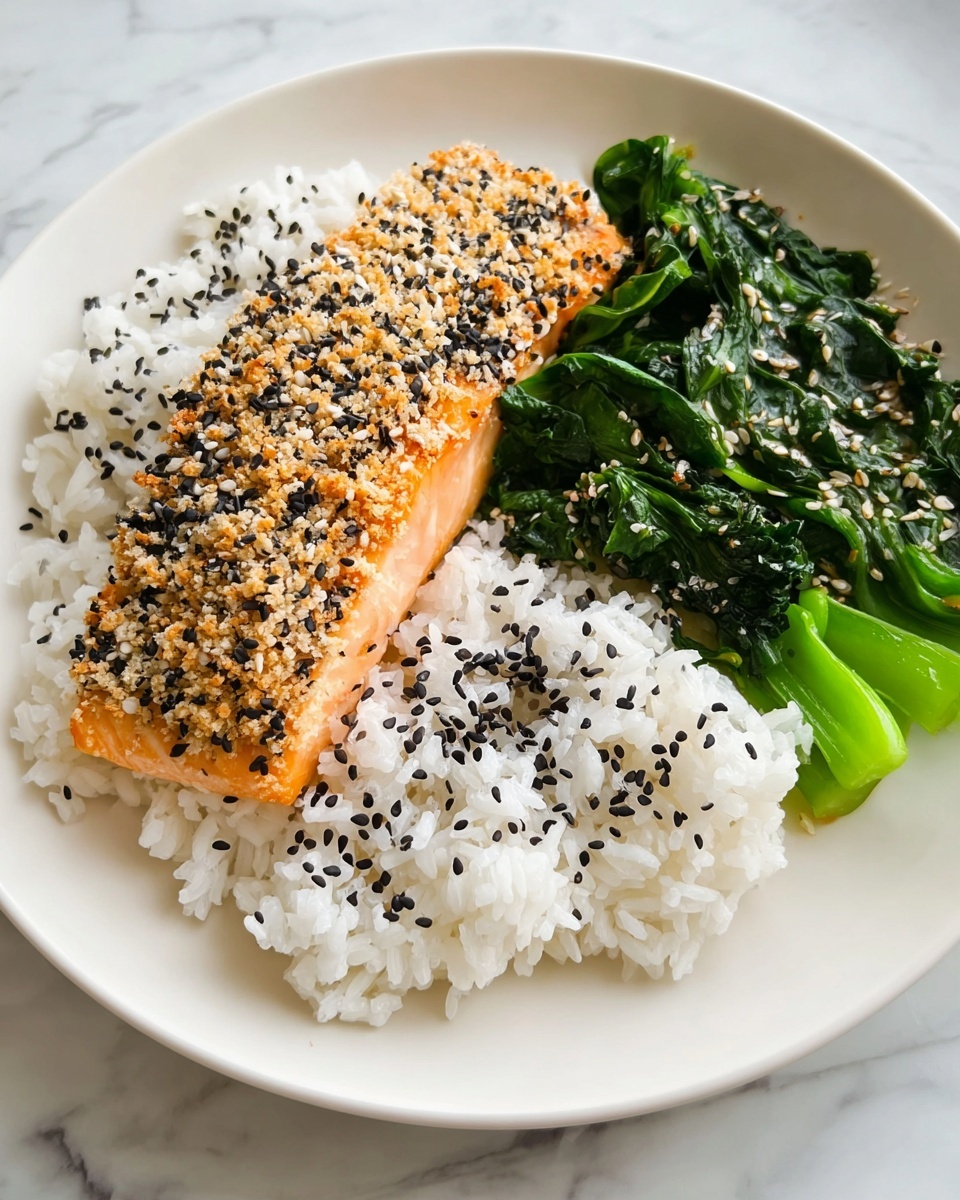
Get ready to fall in love with a dish that brings together crunchy, sweet, and savory in the most delightful way: the Simple Sesame Crusted Teriyaki Trout Recipe. This recipe is a perfect example of how straightforward ingredients and easy steps combine to create something that tastes restaurant-quality but can be whipped up on any weeknight. It’s a celebration of fresh trout, coated in a beautifully toasted sesame crust, glazed with luscious teriyaki sauce, and finished with just the right touch of seasoning and garnish. Whether you’re a seasoned cook or just starting out, this dish promises a spectacular meal that feels both comforting and impressively gourmet.
Ingredients You’ll Need
All you really need to make this Simple Sesame Crusted Teriyaki Trout Recipe are a handful of pantry staples and fresh ingredients that come together effortlessly. Each one plays a vital role: the trout brings a tender, flaky base while sesame seeds add irresistible crunch and a nutty aroma. Teriyaki sauce provides a luscious glaze, and a dash of seasoning elevates the entire profile. Here’s what you’ll want on hand:
- 4 Trout Fillets (Fresh, about 6 ounces each): Fresh trout is key for tenderness and rich flavor.
- 0.5 cup Sesame Seeds (White and black, toasted): Toasting enhances the sesame’s natural nuttiness and adds crisp texture.
- 0.33 cup Teriyaki Sauce: Sweet and savory, this glaze brings all the flavors together effortlessly.
- 1 tablespoon Olive Oil: Used to give the crust a golden finish during baking.
- 1 teaspoon Garlic Powder: A subtle flavor booster that complements the teriyaki.
- Salt, to taste: Essential for seasoning and bringing out the trout’s flavor.
- Pepper, freshly cracked, to taste: Adds a fresh, mild heat that balances the sweetness.
- 2 stalks Green Onions (Chopped): For a vibrant garnish and a slight oniony crunch.
How to Make Simple Sesame Crusted Teriyaki Trout Recipe
Step 1: Prep Your Oven and Baking Sheet
Start by heating your oven to 400°F (200°C). Line a baking sheet with parchment paper so your trout cooks evenly without sticking and clean-up is a breeze. Prepping ahead like this ensures everything goes smoothly as you move through the recipe.
Step 2: Season the Trout
Pat the trout fillets dry with paper towels to help the sesame crust stick nicely. Then, season both sides generously with salt and freshly cracked pepper. This simple seasoning is crucial to build a flavorful foundation.
Step 3: Prepare the Sesame Mixture
In a shallow dish, combine your toasted sesame seeds with garlic powder. Mixing these right before coating helps keep the garlic flavor vibrant rather than dull or stale. This mixture is what will give the trout that irresistible crunchy crust.
Step 4: Coat the Trout
Dip each trout fillet into the teriyaki sauce, letting excess drip off so it isn’t too wet. Then press the fillets firmly into the sesame and garlic powder mixture to evenly coat both sides. The teriyaki helps the crust stick, while also infusing flavor deep into the fish.
Step 5: Arrange and Drizzle
Carefully place the coated fillets on your prepared baking sheet. Drizzle each with a bit of olive oil, which encourages golden browning and adds richness to balance the tangy glaze.
Step 6: Bake to Perfection
Bake in the preheated oven for 15 to 20 minutes, until the sesame seeds turn a beautiful golden brown and the trout flakes easily with a fork. Keep an eye on the color to avoid burning but don’t rush—this step finishes the cooking while locking in moisture and texture.
Step 7: Rest and Garnish
Once out of the oven, let your trout rest for a couple of minutes to allow the juices to settle. Then sprinkle with chopped green onions to add a fresh, slightly sharp contrast to the rich crust.
How to Serve Simple Sesame Crusted Teriyaki Trout Recipe
Garnishes
While the green onions provide a classic fresh flourish, you can also try toasted sesame seeds on top for added crunch or a light drizzle of extra teriyaki sauce for shine and flavor. These simple garnishes lift the entire presentation and invite everyone to dig in.
Side Dishes
This recipe pairs beautifully with steamed jasmine rice or a fluffy quinoa salad to soak up any extra teriyaki glaze. Roasted veggies like broccoli or snap peas complement the nutty flavors perfectly, offering balance and vibrant color to your plate.
Creative Ways to Present
For a dinner party, serve your Simple Sesame Crusted Teriyaki Trout Recipe over a bed of sautéed greens or alongside pickled vegetables for a touch of acidity. Alternatively, plate fillets individually atop crisp Asian slaw for a visually stunning and texturally diverse experience.
Make Ahead and Storage
Storing Leftovers
Place cooled leftover trout in an airtight container and refrigerate for up to two days. The sesame crust may soften but the flavors remain just as delightful if you eat it within this time frame.
Freezing
If you want to save leftovers longer, wrap each fillet tightly in plastic wrap and then foil before freezing. When stored this way, the trout can last up to one month, retaining much of its flavor and texture after thawing.
Reheating
To reheat without losing the sesame crunch, warm fillets in a low oven (around 300°F) for 10 minutes or until heated through. Avoid microwaving if possible, as it tends to make the crust soggy.
FAQs
Can I use other types of fish instead of trout?
Absolutely! While trout is perfect for this recipe’s flavor and texture, salmon or cod also work beautifully with the sesame and teriyaki combination.
Is homemade teriyaki sauce better than store-bought?
Homemade teriyaki can add a personal touch and control over sweetness and saltiness, but good-quality store-bought sauces are convenient and flavorful enough to make this dish shine.
How do I toast sesame seeds properly?
Toast sesame seeds in a dry skillet over medium heat, stirring frequently, until they turn light golden and smell nutty. This usually takes about 2 to 4 minutes—watch carefully to avoid burning.
Can I make this recipe gluten-free?
Yes! Just make sure your teriyaki sauce is gluten-free, as some store-bought varieties contain soy sauce with wheat. There are many great gluten-free options available now.
What if I don’t have garlic powder on hand?
You can substitute with garlic salt (reduce the added salt accordingly) or fresh minced garlic if you prefer a more pronounced garlic flavor. Just adjust amounts to taste.
Final Thoughts
This Simple Sesame Crusted Teriyaki Trout Recipe is a true kitchen winner—bringing a satisfying crunch, rich umami, and fresh flavors all in one beautifully easy dish. I hope you give it a try and find, as I did, that sometimes the simplest recipes become your absolute favorites to share again and again with those you love.
Print
Simple Sesame Crusted Teriyaki Trout Recipe
- Prep Time: 15 minutes
- Cook Time: 20 minutes
- Total Time: 35 minutes
- Yield: 4 servings
- Category: Main Course
- Method: Baking
- Cuisine: Japanese-American Fusion
Description
This Simple Sesame Crusted Teriyaki Trout recipe offers a delightful combination of tender trout fillets coated in a flavorful mix of toasted sesame seeds and garlic powder, glazed with savory teriyaki sauce, and baked to perfection. The sesame crust adds a wonderful crunch and nutty aroma while the teriyaki glaze infuses the fish with a sweet and salty balance, making it a quick and elegant dish perfect for weeknight dinners or entertaining guests.
Ingredients
Fish and Coating
- 4 Trout Fillets (Fresh, about 6 ounces each)
- 0.5 cup Sesame Seeds (A mix of white and black, toasted for flavor)
- 1 teaspoon Garlic Powder (For flavor enhancement)
- to taste Salt (For seasoning)
- to taste Pepper (Freshly cracked for better flavor)
Sauce and Garnish
- 0.33 cup Teriyaki Sauce (Store-bought or homemade)
- 1 tablespoon Olive Oil (For cooking the trout)
- 2 stalks Green Onions (Chopped, for garnish)
Instructions
- Preheat Oven: Preheat your oven to 400°F (200°C) and prepare a baking sheet lined with parchment paper to prevent sticking and make cleanup easy.
- Season Trout: Pat the trout fillets dry with paper towels to remove excess moisture, then season both sides generously with salt and freshly cracked pepper to enhance the natural flavor of the fish.
- Prepare Sesame Mixture: In a shallow dish, combine the toasted sesame seeds with garlic powder, mixing well to distribute the garlic flavor evenly among the seeds.
- Coat Trout: Dip each trout fillet thoroughly into the teriyaki sauce to coat evenly, then press each side into the sesame and garlic powder mixture to create a flavorful crust.
- Arrange & Oil: Place the coated trout fillets skin-side down on the prepared baking sheet and drizzle with olive oil to promote browning and prevent sticking during baking.
- Bake Trout: Bake in the preheated oven for 15-20 minutes until the sesame seeds turn golden brown and the trout fillets flake easily when tested with a fork.
- Garnish & Serve: Allow the baked trout to rest for a couple of minutes, then garnish with chopped green onions to add freshness and a mild onion flavor before serving.
Notes
- For a homemade teriyaki sauce, combine soy sauce, mirin, sugar, and ginger, then simmer until slightly thickened.
- To toast sesame seeds, dry roast them in a skillet over medium heat until fragrant and lightly browned, stirring frequently to avoid burning.
- If you prefer a crispier crust, you can broil the trout for the last 1-2 minutes of baking—watch carefully to prevent burning.
- This recipe works well with other firm white fish like cod or halibut.
- Ensure trout fillets are similar in size and thickness for even cooking.


