
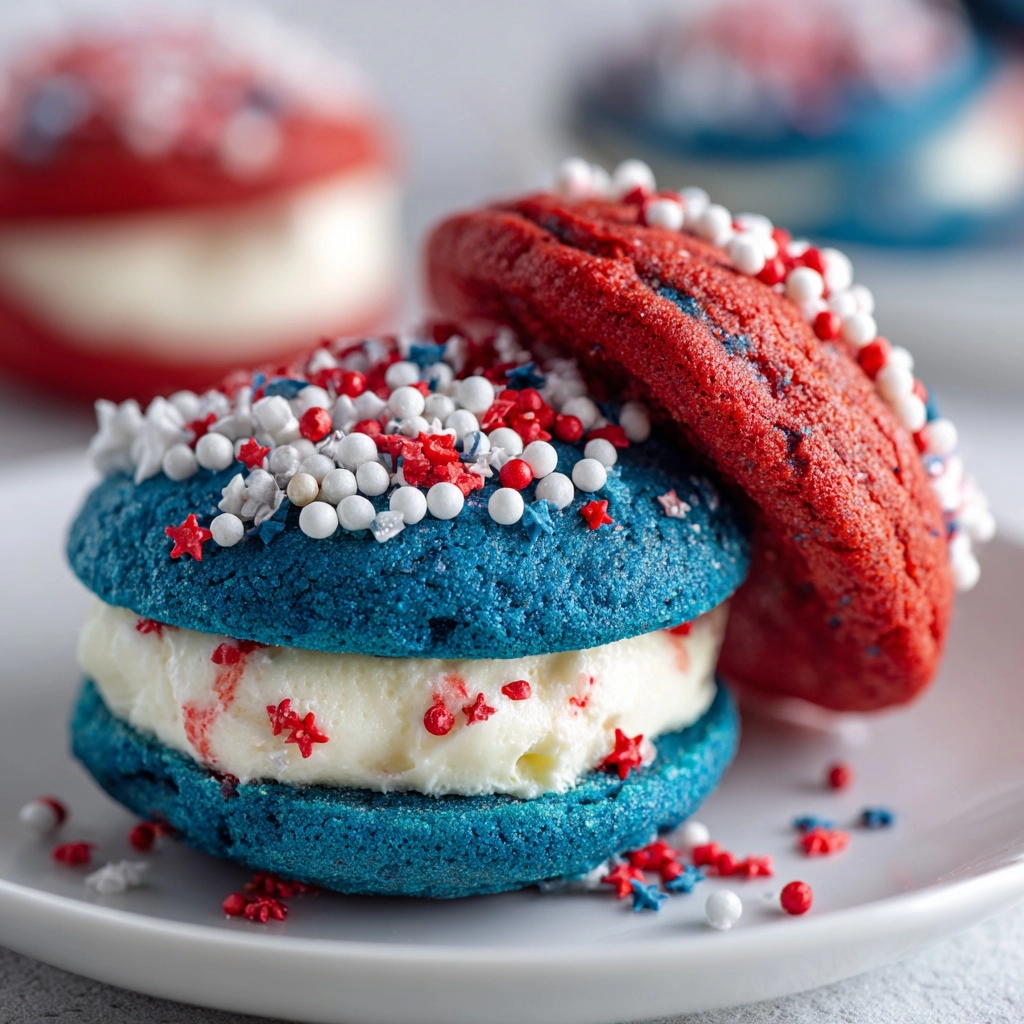
If you’re looking for a dessert that combines fun, flavor, and festive flair, this Red, White and Blue Whoopie Pies Recipe is exactly what you need. These adorable, soft chocolate cakes are brightly colored in patriotic shades, sandwiching a fluffy marshmallow filling that’s sweet and irresistible. Perfect for summer barbecues, Fourth of July celebrations, or any time you want to bring a smile, these whoopie pies blend classic baking with eye-catching colors and a creamy center that truly steals the show.
Ingredients You’ll Need
The beauty of this Red, White and Blue Whoopie Pies Recipe lies in how simple yet essential each ingredient is. Every item plays a vital role, from the cocoa powder providing rich chocolate flavor to the buttermilk that keeps the cakes tender and moist. The red and blue gel food coloring adds the festive touch, while the marshmallow creme in the filling creates that iconic pillowy texture you expect from a truly indulgent whoopie pie.
- 2 cups all-purpose flour: The foundation for your soft cakey texture makes these whoopie pies delightfully tender.
- 1/2 cup unsweetened cocoa powder: Adds deep, chocolatey richness to make the base irresistible.
- 1 1/4 teaspoons baking soda: Acts as a leavening agent giving the cakes a light puff.
- 1/2 teaspoon salt: Balances the sweetness and enhances all other flavors.
- 1 cup buttermilk: Keeps the cake moist and adds a slight tang that complements the cocoa.
- 1 teaspoon vanilla extract: Introduces warmth and rounds out the chocolate’s aroma.
- 1/2 cup unsalted butter (softened): Creates richness and tenderness in the cake.
- 1 cup granulated sugar: Sweetens and helps create a light crumb structure.
- 1 large egg: Binds ingredients together and adds structure.
- Red and blue gel food coloring: Provides vibrant, festive colors without watering down the batter.
- For the filling:
- 1 cup unsalted butter (softened): Makes the filling luscious and creamy.
- 2 cups powdered sugar: Sweetens and helps provide a smooth texture.
- 1 jar (7 ounces) marshmallow creme: Creates that signature fluffy, marshmallow center.
- 1 teaspoon vanilla extract: Adds depth to the filling flavor.
- Red and blue sprinkles: Perfect for decorating edges and adding a playful crunch.
How to Make Red, White and Blue Whoopie Pies Recipe
Step 1: Prepare the Dry Ingredients
Start by whisking together the all-purpose flour, cocoa powder, baking soda, and salt in a medium bowl. This ensures your leavening and flavors are evenly distributed, which will help your whoopie pies bake up perfectly every time.
Step 2: Cream Butter and Sugar
In a separate large bowl, beat the softened butter and granulated sugar until the mixture is light and fluffy. This step is crucial as it incorporates air, giving the cakes their tender, airy texture.
Step 3: Combine Wet Ingredients
Add the egg and vanilla extract to the creamed butter mixture, mixing thoroughly. The egg adds structure and moisture, while vanilla brings a lovely aromatic note that balances the richness of the cocoa.
Step 4: Alternate Adding Dry Ingredients and Buttermilk
Slowly add the dry ingredient mixture and buttermilk to the butter mixture, alternating between them. Begin and end with the dry ingredients to keep the batter balanced. Mix just until combined to avoid a tough texture.
Step 5: Color the Batter
Divide the batter evenly into three bowls. Tint one bowl red, one blue, and leave the last plain to represent white. Using gel food coloring is best to keep the batter thick and vibrant without affecting texture.
Step 6: Bake the Cakes
Drop heaping tablespoons of colored batter onto parchment-lined baking sheets, spacing them about 2 inches apart. Bake at 350°F for 10 to 12 minutes. You’ll know they’re ready when the cakes spring back lightly to the touch. Transfer to a wire rack and cool completely.
Step 7: Make the Filling
Beat together the softened butter, powdered sugar, marshmallow creme, and vanilla extract until the filling is smooth and fluffy. This classic marshmallow filling is what gives Red, White and Blue Whoopie Pies Recipe its signature, heavenly soft center.
Step 8: Assemble the Whoopie Pies
Spread or pipe a generous amount of filling onto the flat side of one cake and gently press another cake on top to form a sandwich. For an extra festive touch, roll the edges in red and blue sprinkles for color and crunch.
How to Serve Red, White and Blue Whoopie Pies Recipe

Garnishes
To really bring the festive vibe to your Red, White and Blue Whoopie Pies Recipe, sprinkle bright red and blue nonpareils or edible glitter along the edges. Fresh berries, like raspberries or blueberries, make a gorgeous and tasty garnish while reinforcing the patriotic color scheme.
Side Dishes
Pair these whoopie pies with light, refreshing sides like a crisp mixed green salad or a bowl of fresh fruit salad for balance. For a classic summer picnic, ice-cold lemonade or berry-infused sparkling water makes the perfect companion drink.
Creative Ways to Present
Stack the whoopie pies on a tiered dessert stand for a show-stopping centerpiece at your party. Alternatively, arrange them individually in clear treat bags tied with red, white, and blue ribbons for a charming party favor that guests will adore taking home.
Make Ahead and Storage
Storing Leftovers
After assembling your whoopie pies, store them in an airtight container in the refrigerator. They will stay fresh and moist for up to three days, making them ideal for preparing a bit in advance of your event or enjoying as a treat throughout the week.
Freezing
You can freeze these delightful treats if you want to make them well ahead of time. Wrap each whoopie pie individually in plastic wrap and place them in a freezer-safe container. They freeze beautifully for up to one month without losing that soft, fresh texture.
Reheating
When you’re ready to enjoy your frozen whoopie pies, thaw them overnight in the refrigerator. Serve chilled or bring them to room temperature for a few minutes. Avoid microwaving as this can alter the texture of the marshmallow filling.
FAQs
Can I make the batter without cocoa powder for a white whoopie pie?
Absolutely! Simply omit the cocoa powder and add a touch more flour to maintain the right consistency. This will result in a classic vanilla-style whoopie pie that could be used for your white portion or as a separate treat.
What if I don’t have buttermilk on hand?
No worries! You can easily make a substitute by adding one tablespoon of white vinegar or lemon juice to one cup of milk. Let it sit for five minutes before using. This will provide the acidity needed to tenderize the cakes.
Can I use natural food coloring instead of gel?
Natural colorings tend to be less vibrant and may affect the batter’s texture, so gel food coloring is recommended for the bright red and blue colors needed in this recipe.
What type of marshmallow creme is best?
Look for a good-quality marshmallow fluff or marshmallow creme that is smooth and sweet. It should not be too firm or grainy to keep the filling light and creamy.
How do I get perfectly round whoopie pie cakes?
Using a small ice cream scoop or spoon to portion out the batter helps keep sizes consistent. You can also gently spread the batter rounds slightly before baking to encourage a uniform shape.
Final Thoughts
There is something so joyful about sharing a plate of Red, White and Blue Whoopie Pies Recipe with friends and family. Their tender texture, festive colors, and marshmallow filling make them a guaranteed celebration hit. I hope this recipe inspires you to bring a little fun and flavor to your next gathering—you might just find yourself making them again and again!
Print
Red, White and Blue Whoopie Pies Recipe
- Prep Time: 25 minutes
- Cook Time: 12 minutes
- Total Time: 37 minutes
- Yield: 12 whoopie pies
- Category: Dessert
- Method: Baking
- Cuisine: American
- Diet: Vegetarian
Description
These Red, White and Blue Whoopie Pies are a festive and delicious dessert perfect for patriotic celebrations like the 4th of July. Soft chocolate cake rounds in vibrant red, white, and blue hues are sandwiched with a fluffy marshmallow creme filling and decorated with matching sprinkles, making a delightful treat that’s as visually appealing as it is tasty.
Ingredients
Cake
- 2 cups all-purpose flour
- 1/2 cup unsweetened cocoa powder
- 1 1/4 teaspoons baking soda
- 1/2 teaspoon salt
- 1 cup buttermilk
- 1 teaspoon vanilla extract
- 1/2 cup unsalted butter, softened
- 1 cup granulated sugar
- 1 large egg
- Red gel food coloring
- Blue gel food coloring
Filling
- 1 cup unsalted butter, softened
- 2 cups powdered sugar
- 1 jar (7 ounces) marshmallow creme
- 1 teaspoon vanilla extract
- Red and blue sprinkles, for decoration
Instructions
- Preheat and prepare pans: Preheat your oven to 350°F (175°C) and line two baking sheets with parchment paper to prevent sticking and ensure even baking.
- Mix dry ingredients: In a medium bowl, whisk together the all-purpose flour, unsweetened cocoa powder, baking soda, and salt until well combined.
- Cream butter and sugar: In a separate large bowl, beat the softened unsalted butter and granulated sugar together with an electric mixer until the mixture becomes light and fluffy, about 3-4 minutes.
- Add egg and vanilla: Beat in the large egg and vanilla extract until fully incorporated and smooth.
- Combine wet and dry ingredients: Alternately add the dry ingredient mixture and buttermilk to the butter mixture, beginning and ending with the dry ingredients. Mix just until combined to maintain a tender texture.
- Divide and color batter: Unevenly divide the batter into three separate bowls. Tint one bowl with red gel food coloring, one with blue gel food coloring, and leave the last bowl plain for the white portion.
- Scoop batter onto baking sheets: Drop heaping tablespoons of each colored batter onto the prepared baking sheets, spacing them about 2 inches apart to allow for spreading.
- Bake the cakes: Place the sheets in the preheated oven and bake for 10 to 12 minutes or until the cakes spring back when lightly touched.
- Cool cakes: Remove the baked cakes from the oven and let them cool completely on a wire rack before assembling.
- Prepare the filling: In a mixing bowl, beat together the softened unsalted butter, powdered sugar, marshmallow creme, and vanilla extract until the mixture is smooth, light, and fluffy.
- Assemble whoopie pies: Spread or pipe the marshmallow filling onto the flat side of one cake and sandwich it with another cake of any color. Repeat until all cakes are paired.
- Decorate edges: Optionally, roll the edges of the whoopie pies in red and blue sprinkles to add extra festive flair.
- Chill before serving: For easier handling, chill the assembled whoopie pies in the refrigerator for about 30 minutes before serving.
Notes
- Chill the assembled whoopie pies for 30 minutes before serving to make them easier to handle.
- You can store whoopie pies in an airtight container in the refrigerator for up to 3 days.
- Ensure the cakes are completely cooled before assembling to prevent the filling from melting.
- Use gel food coloring for the most vibrant colors without altering batter consistency.
