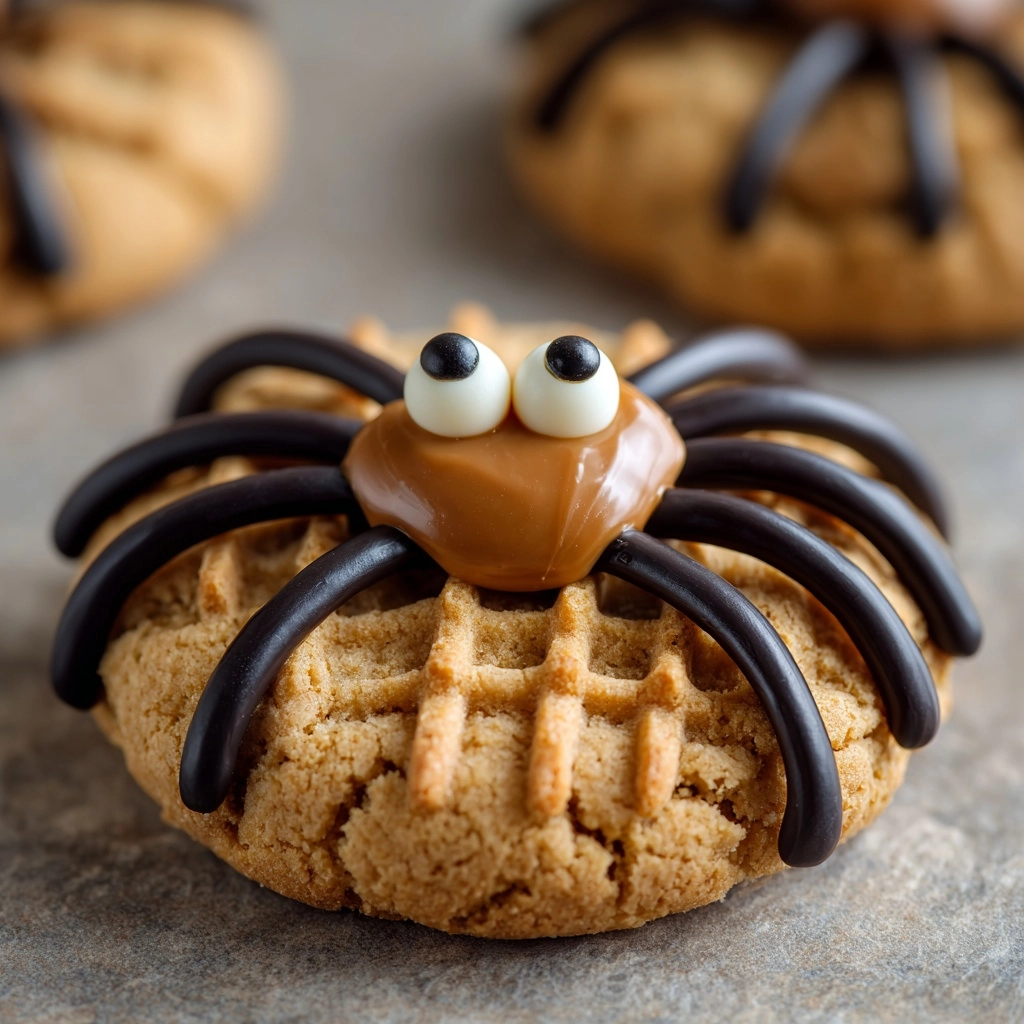
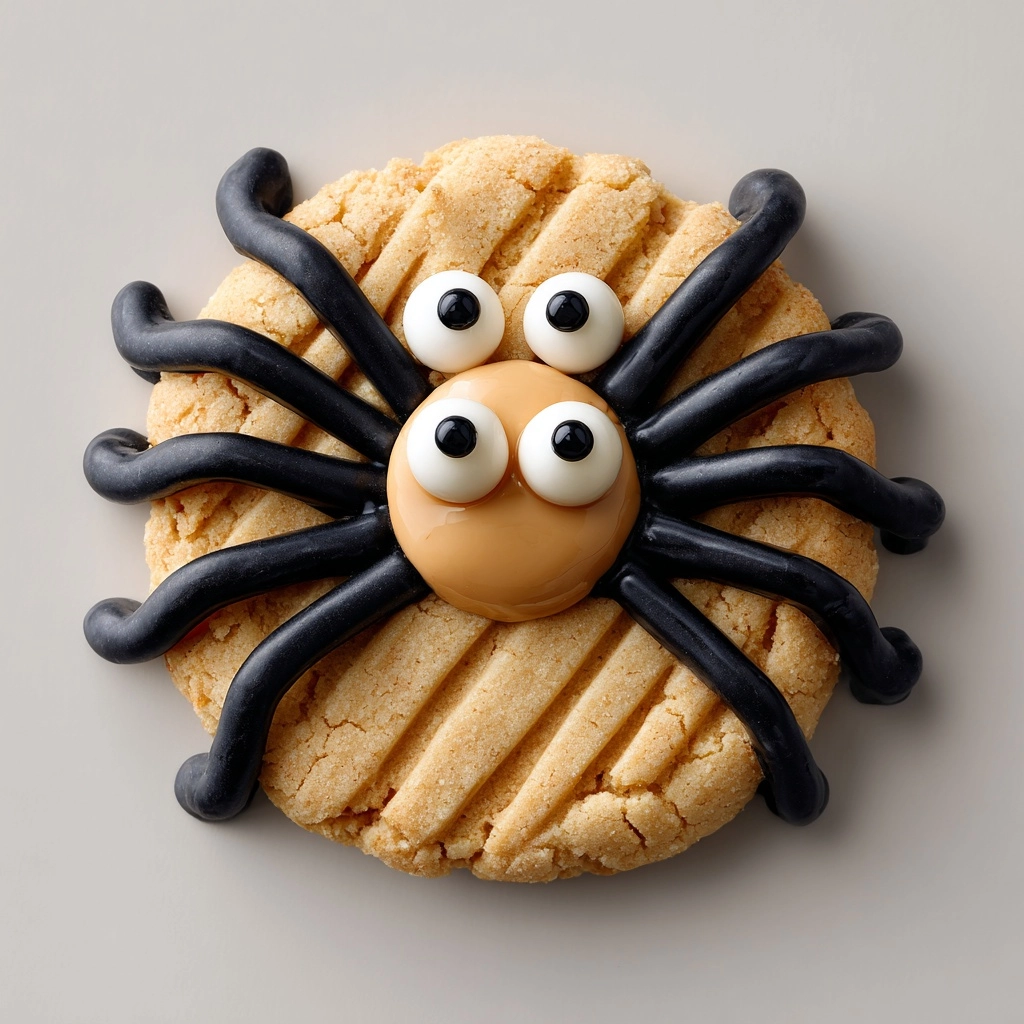
If you are looking for a fun and festive treat that combines classic flavors with a delightfully spooky twist, then you have to try this Peanut Butter Spider Cookies Recipe. These adorable, creepy-crawly cookies burst with rich peanut butter goodness and feature a perfectly melted peanut butter cup as the spider’s body, complemented by chocolate spider legs and candy eyes that make them irresistibly fun to eat. Whether you’re hosting a Halloween party or just want a charming snack to enjoy with friends and family, these cookies bring joy, flavor, and creativity all in one delicious bite.
Ingredients You’ll Need
The beauty of this recipe lies in its simplicity: just a handful of common pantry staples and a few decorative extras create a show-stopping treat. Each ingredient plays a crucial role, from the creamy peanut butter for that comforting taste to the mini peanut butter cups that serve as the spider’s body, adding both texture and extra decadence.
- 1/2 cup unsalted butter, softened: Provides a rich base and tender texture to the cookie dough.
- 1/2 cup creamy peanut butter: Delivers signature peanut buttery flavor and moistness.
- 1/2 cup granulated sugar: Adds sweetness and helps create a slightly crisp edge.
- 1/2 cup brown sugar, packed: Brings deep caramel notes and moisture for chewy cookies.
- 1 large egg: Binds ingredients together and contributes to the cookie’s structure.
- 1 tsp vanilla extract: Enhances overall flavor with warm, aromatic undertones.
- 1 1/2 cups all-purpose flour: Gives structure and body to the cookie dough.
- 1/2 tsp baking soda: Helps cookies rise slightly and creates a tender crumb.
- 1/4 tsp salt: Balances sweetness and intensifies flavors.
- 24 mini peanut butter cups (unwrapped and chilled): The adorable spider’s body that melts slightly but keeps shape during baking.
- 1/2 cup semisweet chocolate chips: Melted to pipe spider legs and attach candy eyes.
- 48 candy eyeballs: The finishing touch that gives your spider cookies their charming, spooky character.
How to Make Peanut Butter Spider Cookies Recipe
Step 1: Cream the Butter and Sugars
Start by preheating your oven to 350°F (175°C) and preparing a baking sheet lined with parchment paper. In a large mixing bowl, cream together the softened butter, creamy peanut butter, granulated sugar, and brown sugar until the mixture becomes light, fluffy, and well combined. This step is crucial for developing the base texture and ensuring each bite is soft with just the right amount of chew.
Step 2: Combine Wet Ingredients
Next, beat in the egg and vanilla extract until the mixture is fully incorporated. The egg works to bind all the ingredients while the vanilla adds a lovely depth of flavor that complements the peanut butter beautifully.
Step 3: Mix Dry Ingredients
In a separate bowl, whisk together the all-purpose flour, baking soda, and salt. This ensures even distribution of leavening and seasoning, which guarantees that the cookies bake consistently and have balanced flavor.
Step 4: Form the Dough
Gradually add the dry ingredients to the wet peanut butter mixture, mixing just until a soft dough forms. Avoid overmixing here to prevent dense cookies; you want them tender and delightful.
Step 5: Shape and Bake
Roll the dough into 1-inch balls and space them about 2 inches apart on the prepared baking sheet. Bake the cookies for 10 to 12 minutes, or until the edges are lightly golden while the centers remain soft. This perfect bake time lets them set while preserving peanut butter’s signature softness.
Step 6: Add Peanut Butter Cup Body
Right after removing the cookies from the oven, immediately press a chilled mini peanut butter cup into the center of each cookie. Chilling the peanut butter cups beforehand prevents them from melting too much, helping the spiders keep their shape.
Step 7: Cool and Decorate
Allow the cookies to cool on the baking sheet for 5 minutes, then transfer them to a wire rack to cool completely. While they cool, melt the semisweet chocolate chips and transfer the melted chocolate to a piping bag or a zip-top bag with a tiny snip at the corner. Pipe three small spider legs on each side of the peanut butter cup, then attach two candy eyeballs using a dab of melted chocolate for the eyes. This decorating step truly brings the peanut butter spiders to life and makes your Peanut Butter Spider Cookies Recipe a thrilling treat.
How to Serve Peanut Butter Spider Cookies Recipe

Garnishes
For a festive touch, sprinkle a tiny bit of edible glitter or colored sugar around the cookies to mimic spiderweb sparkle. Adding a sprinkle of crushed nuts around the edges also enhances both texture and visual appeal.
Side Dishes
Serve these with a cold glass of milk or a steaming cup of spiced hot chocolate to contrast the sweet, nutty richness of the cookies. You can also pair them with fresh fruit for a balanced snack that complements their sweetness.
Creative Ways to Present
Arrange your Spider Cookies Recipe on a tiered serving tray surrounded by faux cobwebs or autumn leaves for a dramatic Halloween display. You can also place them in small individual cellophane bags tied with black and orange ribbons for party favors that guests will rave about.
Make Ahead and Storage
Storing Leftovers
Once fully cooled and decorated, store your peanut butter spider cookies in an airtight container at room temperature. They will stay fresh and soft for up to five days, making them perfect for preparing in advance for your Halloween festivities.
Freezing
To freeze, place undecorated cookie dough balls on a baking sheet and freeze until solid, then transfer to a freezer-safe bag. Freeze for up to three months. You can bake directly from frozen—just add a couple of extra minutes to the bake time. For decorated cookies, it’s best to freeze them individually wrapped in plastic wrap and then stored in an airtight container to protect the decorations.
Reheating
If you want to enjoy them warm, briefly microwave the cookies for about 10 seconds or pop them in a low-temperature oven for a few minutes. This will soften the peanut butter cup and melt chocolate legs slightly, making the experience absolutely mouthwatering.
FAQs
Can I use chunky peanut butter instead of creamy?
Yes, you can substitute chunky peanut butter if you prefer some added crunch in your cookies. It will give a slightly different texture but maintain that wonderful peanut flavor.
What if I don’t have candy eyeballs?
If you can’t find candy eyeballs, you can use small dots of white and dark chocolate or even mini chocolate chips to create the eyes. Nail the look with a bit of melted chocolate as glue!
Are these cookies suitable for kids?
Absolutely! These Peanut Butter Spider Cookies Recipe treats are kid-friendly and perfect for Halloween parties or an after-school snack. The fun spider design will definitely get kids excited to help out in the kitchen or enjoy their spooky snack.
How do I prevent the peanut butter cups from melting too much?
Be sure to chill your mini peanut butter cups in the freezer before pressing them into the hot cookies. This helps them hold their shape without melting excessively and makes decorating easier.
Can I make these cookies gluten-free?
You can substitute the all-purpose flour with a 1-to-1 gluten-free baking blend that includes xanthan gum. The cookies may have a slightly different texture, but they will still taste amazing and keep the fun spider look intact.
Final Thoughts
This Peanut Butter Spider Cookies Recipe is not just a delightful dessert; it’s a playful experience that brings smiles and sweet memories, especially around Halloween. With easy-to-follow steps and no-fuss ingredients, these cookies are perfect for bakers of all levels who want to impress family and friends with charming, tasty treats. I can’t wait for you to try them and see just how fun peanut butter and chocolate can be together in cookie form!
Print
Peanut Butter Spider Cookies Recipe
- Prep Time: 20 minutes
- Cook Time: 12 minutes
- Total Time: 45 minutes
- Yield: 24 cookies
- Category: Dessert
- Method: Baking
- Cuisine: American
- Diet: Vegetarian
Description
Peanut Butter Spider Cookies are a fun and festive Halloween treat featuring soft peanut butter-flavored cookies topped with chilled mini peanut butter cups, decorated with chocolate legs and candy eyes to resemble spooky spiders. These kid-friendly cookies are perfect for parties and make an adorable addition to any Halloween dessert spread.
Ingredients
Cookie Dough
- 1/2 cup unsalted butter, softened
- 1/2 cup creamy peanut butter
- 1/2 cup granulated sugar
- 1/2 cup brown sugar, packed
- 1 large egg
- 1 tsp vanilla extract
- 1 1/2 cups all-purpose flour
- 1/2 tsp baking soda
- 1/4 tsp salt
Decoration
- 24 mini peanut butter cups (unwrapped and chilled)
- 1/2 cup semisweet chocolate chips (for spider legs)
- 48 candy eyeballs
Instructions
- Preheat Oven and Prepare Sheet: Preheat your oven to 350°F (175°C) and line a baking sheet with parchment paper to prevent sticking and ensure even baking.
- Cream Butter, Peanut Butter, and Sugars: In a large mixing bowl, beat together the softened butter, creamy peanut butter, granulated sugar, and brown sugar until the mixture is light and fluffy, which usually takes a few minutes using an electric mixer.
- Add Egg and Vanilla: Beat in the large egg and vanilla extract until fully combined to help bind the dough and add flavor.
- Combine Dry Ingredients: In a separate bowl, whisk together the all-purpose flour, baking soda, and salt to evenly distribute the leavening agents and salt.
- Mix Dry Ingredients into Wet: Gradually add the dry ingredients mixture to the wet ingredients, mixing until a soft dough forms without overmixing to keep the cookies tender.
- Shape and Bake: Roll the dough into 1-inch balls and place them about 2 inches apart on the prepared baking sheet to allow spreading. Bake for 10–12 minutes or until the edges turn lightly golden.
- Add Peanut Butter Cups: Remove the cookies from the oven and immediately press one chilled mini peanut butter cup into the center of each warm cookie so it sticks without melting excessively.
- Cool Cookies: Allow the cookies to cool on the baking sheet for 5 minutes, then transfer them to a wire rack to cool completely before decorating further.
- Melt Chocolate and Decorate Legs: Melt the semisweet chocolate chips using a microwave or double boiler, then transfer the melted chocolate to a piping bag or a zip-top plastic bag with a tiny corner snipped off to pipe 3 small spider legs on each side of the peanut butter cup on every cookie.
- Attach Candy Eyes: Use a small dab of melted chocolate as ‘glue’ to attach two candy eyeballs on each peanut butter cup, completing the spider look. Allow the chocolate to set before serving.
Notes
- Chill the mini peanut butter cups before pressing into the warm cookies to prevent them from melting too much and losing shape.
- Store the finished cookies in an airtight container at room temperature for up to 5 days to maintain freshness.
- These cookies are perfect for Halloween parties and add a fun, spooky touch to festive gatherings.

