
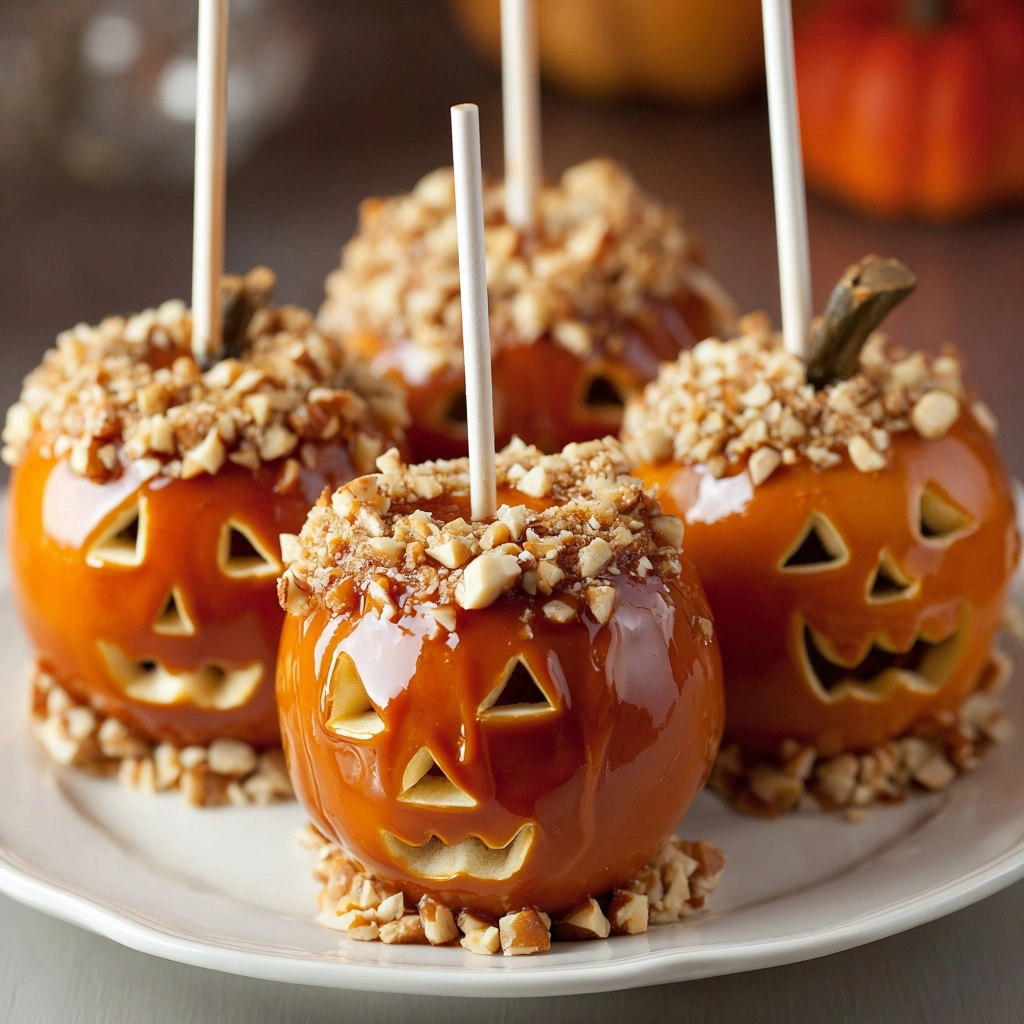
There is something utterly magical about making and enjoying candied treats, and few evoke the spirit of the season quite like the Candied Apples for Halloween Recipe. Imagine crisp, tart apples encased in a glossy, vibrant red candy shell that cracks delightfully with every bite. This classic dessert brings together simple ingredients and a touch of kitchen alchemy to create a festive treat that feels both nostalgic and exciting. Whether you’re gearing up for a Halloween party or craving a homemade fall delight, the Candied Apples for Halloween Recipe is sure to be your sweet go-to, pairing the natural crunch of fresh apples with a perfectly sweet, snap-worthy coating.
Ingredients You’ll Need
Ingredients You’ll Need
Gathering the right ingredients is half the fun, and this recipe keeps things delightfully straightforward. Each element plays a vital role in crafting that perfect, shiny candy shell and keeping the apples fresh and ready for the coating.
- 6 small apples (preferably firm varieties like Granny Smith or Fuji): Firm apples ensure a crisp bite that holds up well under the candy coating.
- 6 wooden sticks or lollipop sticks: Essential for handling and serving your candied masterpieces easily.
- 2 cups granulated sugar: The backbone of the candy shell, providing sweetness and crunch.
- 1/2 cup light corn syrup: Helps prevent crystallization for a smooth, glassy finish.
- 3/4 cup water: Dissolves the sugar and corn syrup evenly, critical in creating the candy mixture.
- 1/2 tsp red food coloring: Gives the apples their iconic vibrant red coating; you can experiment with colors for festive flair.
- Candy thermometer: A must-have for reaching the perfect hard crack stage without guesswork.
- Nonstick cooking spray or parchment paper: Keeps your finished apples from sticking as they cool and harden.
How to Make Candied Apples for Halloween Recipe
Step 1: Prepare Your Apples
Start by washing your apples thoroughly and drying them completely—this is crucial because any moisture can cause the candy coating to seize or slide off. Remove the stems and firmly insert wooden sticks into the center of each apple for easy dipping and handling later. Set them aside on a clean surface.
Step 2: Get Your Workstation Ready
Line a baking sheet with parchment paper or a silicone mat, then lightly grease it with nonstick cooking spray. This will provide the perfect surface for setting your candied apples and prevent any sticky situations after dipping.
Step 3: Make the Candy Syrup
In a medium saucepan over medium-high heat, combine the granulated sugar, light corn syrup, and water. Stir gently just until the sugar dissolves completely to avoid premature crystallization. Attach your candy thermometer to the pan’s side and bring the mixture to a boil. Avoid stirring now to ensure a smooth syrup. Cook until it hits 300°F, known as the hard crack stage, which usually takes about 20 minutes. This temperature ensures your candy shell will be perfectly hard and crisp once cooled.
Step 4: Add Color and Dip
Remove the saucepan from heat and quickly but carefully stir in the red food coloring. Work swiftly as the syrup hardens fast. Tilt the pan for better dipping and dip each apple, rotating it to coat every inch evenly in the glossy, vibrant candy shell. Let excess syrup drip back into the pan, then place the coated apple onto your prepared sheet.
Step 5: Let Them Cool and Harden
Allow your candied apples to cool at room temperature for about 30 minutes. This resting period lets the candy coating set into that iconic, shiny hard shell you know and love, ready to be enjoyed or displayed for your Halloween festivities.
How to Serve Candied Apples for Halloween Recipe
Garnishes
Elevate your candied apples by adding festive garnishes. Sprinkling edible glitter over the red candy before it sets gives a magical shimmer, perfect for Halloween. You can also roll the apples in crushed nuts, sprinkles, or mini chocolate chips for extra texture and pizzazz. For a spooky twist, try using black or purple food coloring instead of red and top with edible eyes or Halloween-themed candy pieces.
Side Dishes
Candied apples shine as a standalone treat but pair wonderfully with warm seasonal sides. Serve alongside a mug of spiced apple cider or hot chocolate to create a cozy fall dessert spread. If you want to balance the sweetness, try mild cheeses like sharp cheddar or creamy brie that complement the tartness of the apples beautifully.
Creative Ways to Present
Display your candied apples in a fun and festive way by arranging them in a wooden crate filled with hay or shredded paper to mimic a harvest theme. Use a tiered stand to showcase various colored candied apples for visual impact. Wrapping each apple in clear cellophane tied with a ribbon also makes for adorable party favors or gifts that friends and family will adore.
Make Ahead and Storage
Storing Leftovers
If you have leftovers, store your candied apples at room temperature on a nonstick surface or parchment paper to keep the candy shell crisp. Avoid refrigeration, as condensation can cause the coating to become sticky or dissolve. Ideally, consume within 24 hours for the best texture and flavor experience.
Freezing
Freezing candied apples is generally not recommended since the apples can become mushy upon thawing, and the candy coating may crack or lose its shine. For best results, enjoy your candied apples fresh and avoid freezing.
Reheating
Reheating is not necessary for candied apples and can actually ruin the hard candy shell. Instead, serve them at room temperature for that perfect crack when you bite in.
FAQs
Can I use any type of apple to make candied apples?
While you can use many apple varieties, firm apples like Granny Smith and Fuji are best because they hold up well during dipping and provide a satisfying crunch that contrasts perfectly with the hard candy shell.
What happens if the candy syrup doesn’t reach 300°F?
If the syrup doesn’t reach the hard crack stage of 300°F, the candy coating may be too soft and sticky rather than crisp. Using a reliable candy thermometer helps ensure the perfect texture every time.
How do I prevent the candy coating from cracking unevenly?
Avoid touching the candy shell while it’s cooling and hardening. Also, be sure to store candied apples at room temperature and not in the fridge, as cold temperatures and moisture can cause cracking and stickiness.
Can I make candied apples with other colors or flavors?
Absolutely! Feel free to swap out the red food coloring for black, purple, or orange for fun Halloween effects. You can also experiment with adding flavored extracts to the syrup, such as cinnamon or vanilla, for a unique twist.
Is it okay if the candy hardens in the saucepan before I finish dipping?
It’s important to work quickly as the candy syrup cools fast and becomes difficult to dip. If it hardens, you’ll need to reheat the mixture gently until it liquefies again before continuing.
Final Thoughts
The Candied Apples for Halloween Recipe is a timeless, delightful way to celebrate the fall season with friends and family. It’s surprisingly easy to make, incredibly fun to share, and always brings smiles and festive spirit to any gathering. So why wait? Grab your apples, heat up that sugary syrup, and dive into making your own beautiful, crunchy candied apples that taste as good as they look. Trust me, once you try this recipe, it’ll become a seasonal favorite you’ll return to year after year.
Print
Candied Apples for Halloween Recipe
- Prep Time: 15 minutes
- Cook Time: 20 minutes
- Total Time: 35 minutes
- Yield: 6 candied apples
- Category: Dessert
- Method: Stovetop
- Cuisine: American
- Diet: Vegetarian
Description
Delight in these classic Halloween Candied Apples, featuring crisp firm apples coated in a glossy, sweet hard candy shell with a vibrant red color. Perfect for fall festivities and spooky celebrations, these treats combine a crunchy candy coating with juicy apples for an irresistible seasonal dessert.
Ingredients
Apples and Sticks
- 6 small apples (preferably firm varieties like Granny Smith or Fuji), stems removed
- 6 wooden sticks or lollipop sticks
Candy Coating
- 2 cups granulated sugar
- 1/2 cup light corn syrup
- 3/4 cup water
- 1/2 tsp red food coloring
Other
- Nonstick cooking spray or parchment paper
- Candy thermometer
Instructions
- Prepare the Apples: Wash and thoroughly dry the apples to ensure no moisture remains, which is crucial for proper candy adhesion. Insert a wooden stick into the center of each apple securely.
- Prepare the Baking Sheet: Line a baking sheet with parchment paper and either lightly grease it or use a silicone mat to prevent sticking.
- Make the Candy Syrup: In a medium saucepan over medium-high heat, combine the sugar, corn syrup, and water. Stir gently just until the sugar dissolves.
- Boil to Hard Crack Stage: Clip a candy thermometer to the side of the saucepan and bring the mixture to a boil without stirring further. Cook until the syrup reaches 300°F (hard crack stage), which takes approximately 20 minutes.
- Add Coloring: Remove the saucepan from heat and carefully stir in the red food coloring to give the syrup a vibrant Halloween hue.
- Dip the Apples: Working quickly, tilt the pan and dip each apple into the hot syrup, turning to coat evenly in the glossy candy coating.
- Cool and Harden: Let excess syrup drip off the apples and place each coated apple on the prepared baking sheet. Allow them to cool and harden at room temperature for about 30 minutes before serving.
Notes
- Ensure apples are completely dry before dipping to prevent candy coating from seizing or slipping.
- For a spooky variation, try using black or deep purple food coloring and edible glitter.
- These candied apples are best enjoyed the same day but can be stored at room temperature for up to 24 hours.


