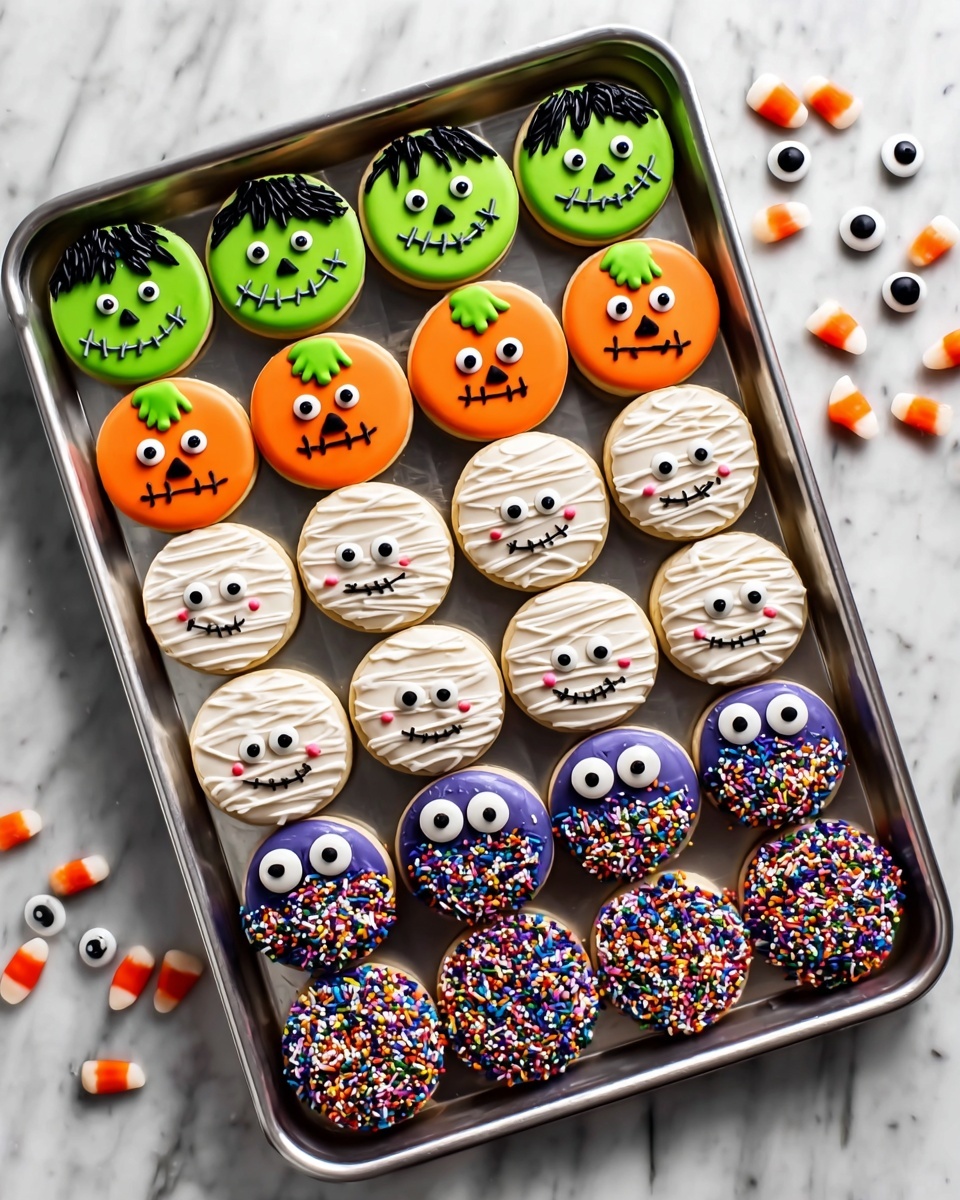
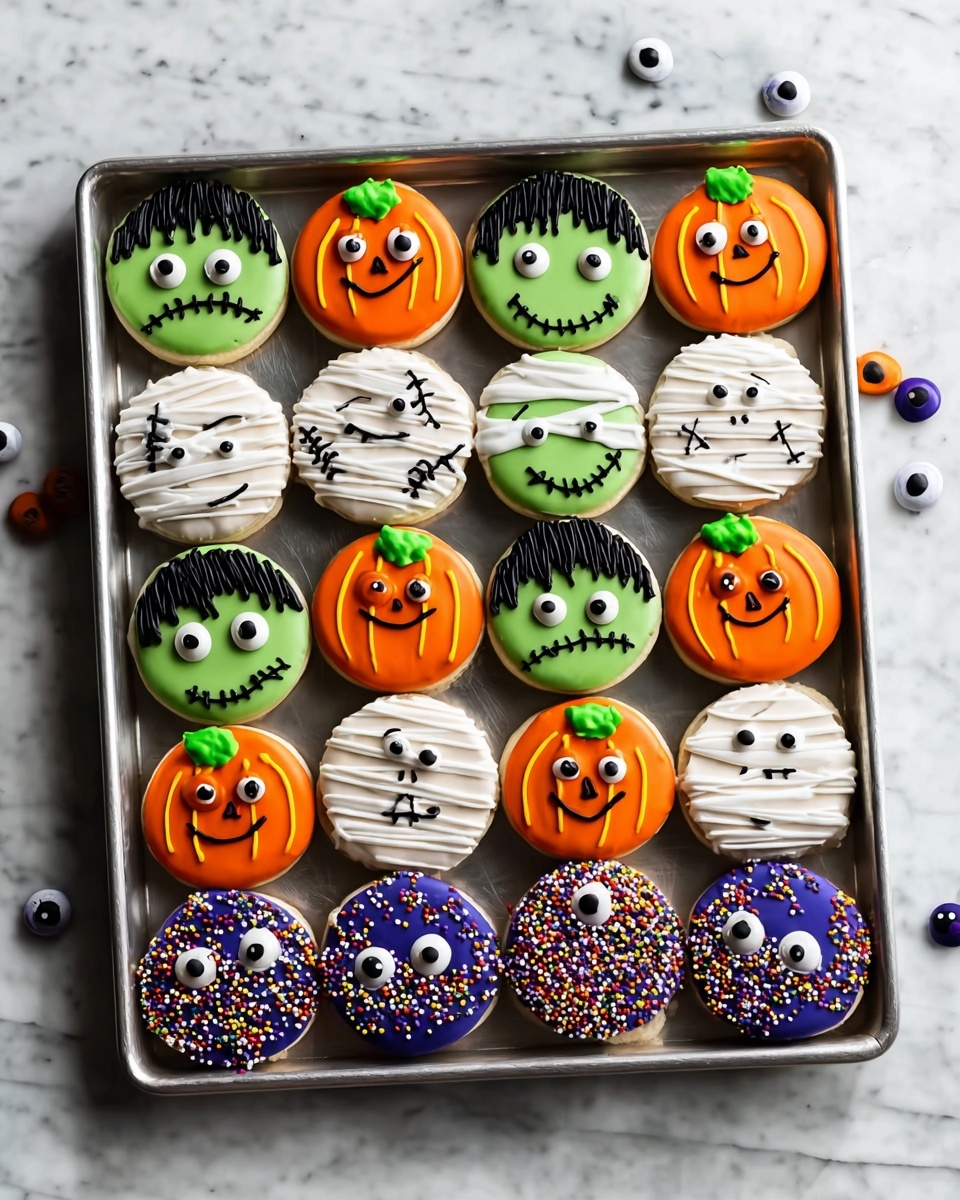
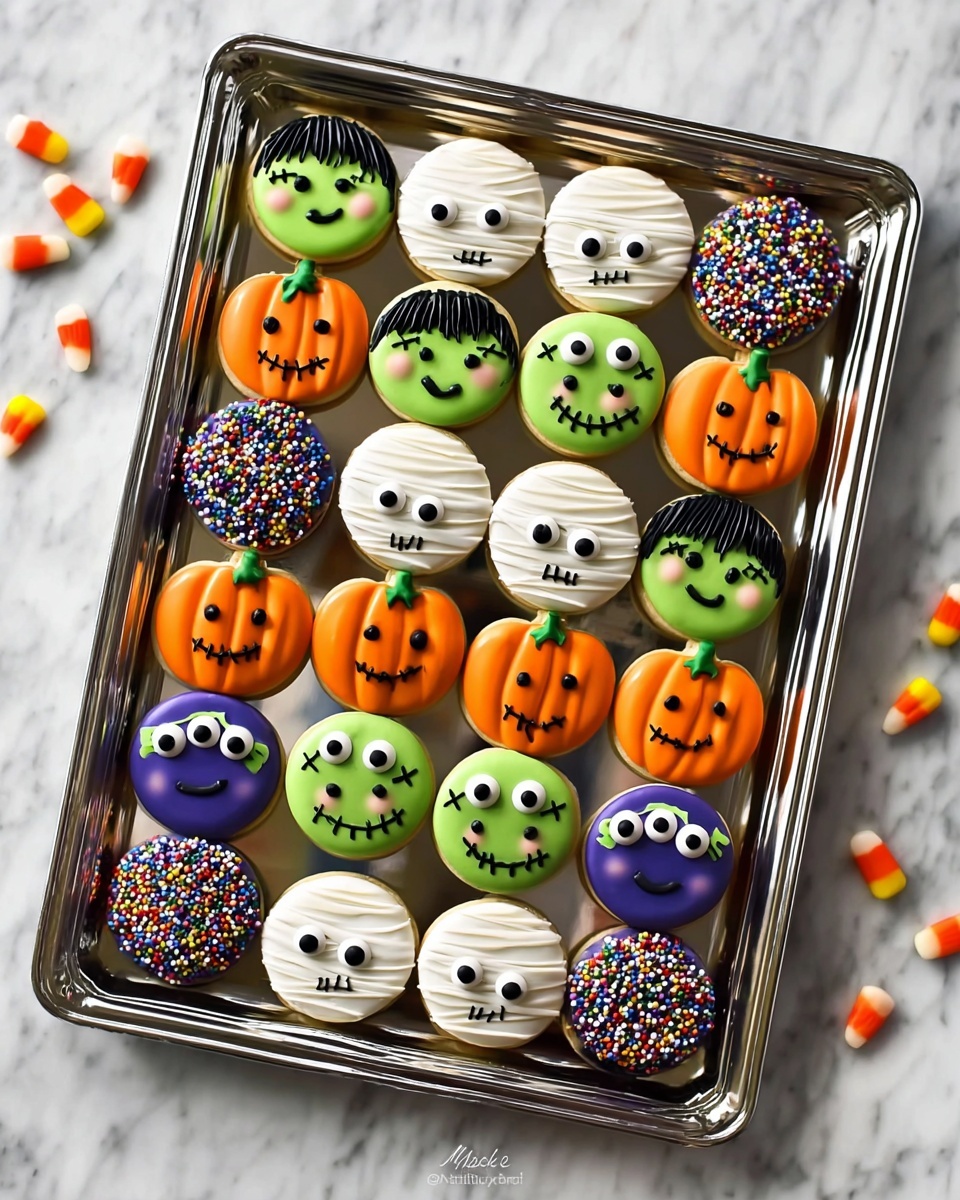
If you are looking to impress your friends, family, or party guests this spooky season, the Chocolate Covered Halloween Oreos Recipe is your new best friend. This fun and festive twist on classic Oreos transforms ordinary cookies into ghastly, colorful treats that are as delicious as they are eye-catching. With a rainbow of candy coatings and creepy-cute decorations, these chocolate covered Oreos offer a perfect balance of sweet, crunchy, and creamy that will have everyone coming back for more. Whether you’re making them for a Halloween party or just a cozy night treat, this recipe is a total crowd-pleaser.
Ingredients You’ll Need
Gathering the right ingredients is the first step to creating these irresistible treats, and you’ll be amazed by how simple yet essential each one is. From the crunchy Oreos to the colorful candy melts, each ingredient adds its own unique touch to the final masterpiece—whether it’s flavor, texture, or just that perfect Halloween vibe.
- Chocolate sandwich cookies (Oreos): The classic cookie base provides that crunchy, chocolatey goodness every bite needs.
- White candy melts: Perfect for a crisp, creamy coating that serves as a bright canvas for decorating.
- Green candy melts: Adds a spooky, vibrant color that screams Halloween fun.
- Purple candy melts: Gives a mysterious, rich pop of color that pairs beautifully with the other hues.
- Orange candy melts: Brings the iconic Halloween color that makes these treats instantly festive.
- Black candy melts: Essential for piping creepy details and finishing touches that elevate the design.
- Halloween sprinkles: Adds texture, sparkle, and playful Halloween themes to your coated Oreos.
- Candy eyeball decorations: These adorable and spooky eyes bring your cookies to life and add a whimsical edge.
How to Make Chocolate Covered Halloween Oreos Recipe
Step 1: Prepare Your Workspace
Start by lining a cookie sheet with wax paper or a smooth silicone baking mat. This simple step is a game changer because it prevents sticking and keeps cleanup super easy, allowing you to focus more on the creative fun.
Step 2: Melt the Candy Coating
Place one color of candy melts in a microwave-safe bowl and heat at 50% power, stirring every 30 seconds. This slow melting process ensures a silky smooth coating without burning the candy. Patience here will pay off in that perfect, glossy finish.
Step 3: Dip the Oreos
Using a spoon, gently submerge one Oreo into the melted candy melts, flipping it upside down to cover every inch. A fork helps lift and shake off excess coating to avoid messy drips. This step is where the magic of transforming your Oreo begins.
Step 4: Decorate Immediately
Place the coated cookie on your prepared sheet and quickly top with Halloween sprinkles or candy eyeballs before the coating hardens. This timing is crucial so your decorations stick perfectly and look professionally done.
Step 5: Repeat With Different Colors
Keep melting different colored candy melts and coating Oreos until you have a vibrant assortment. Alternating colors not only enhances the visual appeal but also keeps things exciting as you work through the batch.
Step 6: Add Spooky Black Details
Once all the cookies have set, melt the black candy melts and use a piping bag with a small tip to add signatures like spider webs, creepy faces, or other Halloween designs. These details take your Chocolate Covered Halloween Oreos Recipe from cute to spectacularly spooky.
Step 7: Let Them Set and Store
Allow the chocolate coating to fully harden before transferring to an airtight container. Proper storage keeps these delicious treats fresh and maintains the satisfying crunch of the Oreo and coating.
How to Serve Chocolate Covered Halloween Oreos Recipe
Garnishes
Make each cookie extra special by adding Halloween-themed sprinkles right after dipping. Candy eyeballs are a classic choice that instantly give your cookies personality and catch everyone’s attention.
Side Dishes
Serve these with a glass of cold milk or a cup of hot cocoa to balance out the sweetness and add a comforting touch to your Halloween snack spread.
Creative Ways to Present
Arrange your Chocolate Covered Halloween Oreos on a tiered stand surrounded by mini pumpkins, fake spider webs, or LED string lights. You could also package them individually in clear bags tied with themed ribbons for party favors or trick-or-treat handouts.
Make Ahead and Storage
Storing Leftovers
Keep any extras in an airtight container at room temperature for up to two weeks. This maintains the texture and flavor perfectly, so you can enjoy them later without worrying about freshness.
Freezing
Freeze the dipped and decorated Oreos by placing them in a single layer on a baking sheet until firm, then transfer to a freezer-safe bag or container. Thaw at room temperature before serving for best taste and texture.
Reheating
Since these cookies are best enjoyed cold or at room temperature, reheating isn’t recommended. Simply bring them out of the fridge or freezer ahead of time to allow them to soften slightly.
FAQs
Can I use other types of cookies instead of Oreos?
Absolutely! While Oreos work perfectly thanks to their iconic flavor and crispness, other sandwich cookies can also be dipped and decorated to your liking.
What if I don’t have all the candy melt colors?
No worries! You can use whichever colors you have on hand. You can also combine colors for a marbled effect or keep it simple with white and black for a classic ghostly look.
How do I avoid the candy melts from clumping or becoming grainy?
The key is to melt them slowly at low power and stir frequently. Overheating causes clumping, so if it thickens too much, stir in a little vegetable oil to smooth it back out.
Can I make these vegan or allergen-free?
Yes, just choose vegan or allergen-free candy melts and cookies. Many brands offer dairy-free alternatives, making it easy to adapt this recipe to dietary needs.
How do I pipe the black candy melts for decorating?
Use a small piping bag or a resealable plastic bag with a tiny corner snipped off. Practice on parchment paper first to get comfortable before decorating your Oreos.
Final Thoughts
Embracing the festive spirit with the Chocolate Covered Halloween Oreos Recipe is such a joy, especially when you see how much fun everyone has decorating and eating these spooky treats. Not only are they easy to make, but they also bring a splash of color, creativity, and deliciousness to your Halloween celebrations. I can’t wait for you to try this recipe and watch it become one of your favorite seasonal traditions!
Print
Chocolate Covered Halloween Oreos Recipe
- Prep Time: 30 minutes
- Cook Time: 0 minutes
- Total Time: 30 minutes
- Yield: 40 cookies
- Category: Dessert
- Method: No-Cook
- Cuisine: American
Description
Celebrate Halloween with these festive Chocolate Covered Halloween Oreos! Colorfully coated in white, green, purple, and orange candy melts, then decorated with spooky sprinkles and candy eyeballs, these treats are perfect for parties or trick-or-treaters. Easy to make with simple melting and dipping steps, they offer a fun mix of creamy chocolate and classic sandwich cookie crunch.
Ingredients
Cookies
- 40 chocolate sandwich cookies (Oreos)
Candy Melts
- 6 ounces white candy melts
- 6 ounces green candy melts
- 6 ounces purple candy melts
- 6 ounces orange candy melts
- 2 ounces black candy melts
Decorations
- Halloween sprinkles
- Candy eyeball decorations
Instructions
- Prepare Surface: Line a cookie sheet with wax paper or a smooth reusable silicone baking mat to place the dipped cookies on, preventing sticking and easing cleanup.
- Melt Candy Melts: In a microwave-safe glass bowl, melt one color of candy melts at 50% power. Stir every 30 seconds until completely smooth and fully melted, taking care to avoid overheating.
- Coat Cookies: Using a spoon, carefully drop one Oreo into the melted candy, flip it upside down to coat all sides thoroughly, then lift with a fork, shaking off excess coating to prevent drips.
- Decorate Wet Coating: Place the coated Oreo on the prepared sheet and immediately add Halloween sprinkles or candy eyeball decorations onto the wet coating to ensure they stick properly before hardening.
- Repeat for All Colors: Repeat melting and dipping with the remaining candy melt colors, coating and decorating cookies in various festive hues.
- Add Details: After coatings harden, melt black candy melts and pipe spooky designs like spider webs or faces using a piping bag with a small tip for added Halloween flair.
- Store Cookies: Store the decorated, fully set cookies in an airtight container at room temperature for up to two weeks to keep them fresh and crisp.
Notes
- Do not overheat candy melts while melting; stir frequently for smooth consistency.
- Use a fork to lift cookies to minimize excess coating and prevent dripping.
- Decorate cookies immediately after dipping for the best adherence of sprinkles and eyeballs.
- Allow cookies to fully harden before piping black details to avoid smudging.
- Store in an airtight container to maintain freshness and crispness for up to two weeks.


