
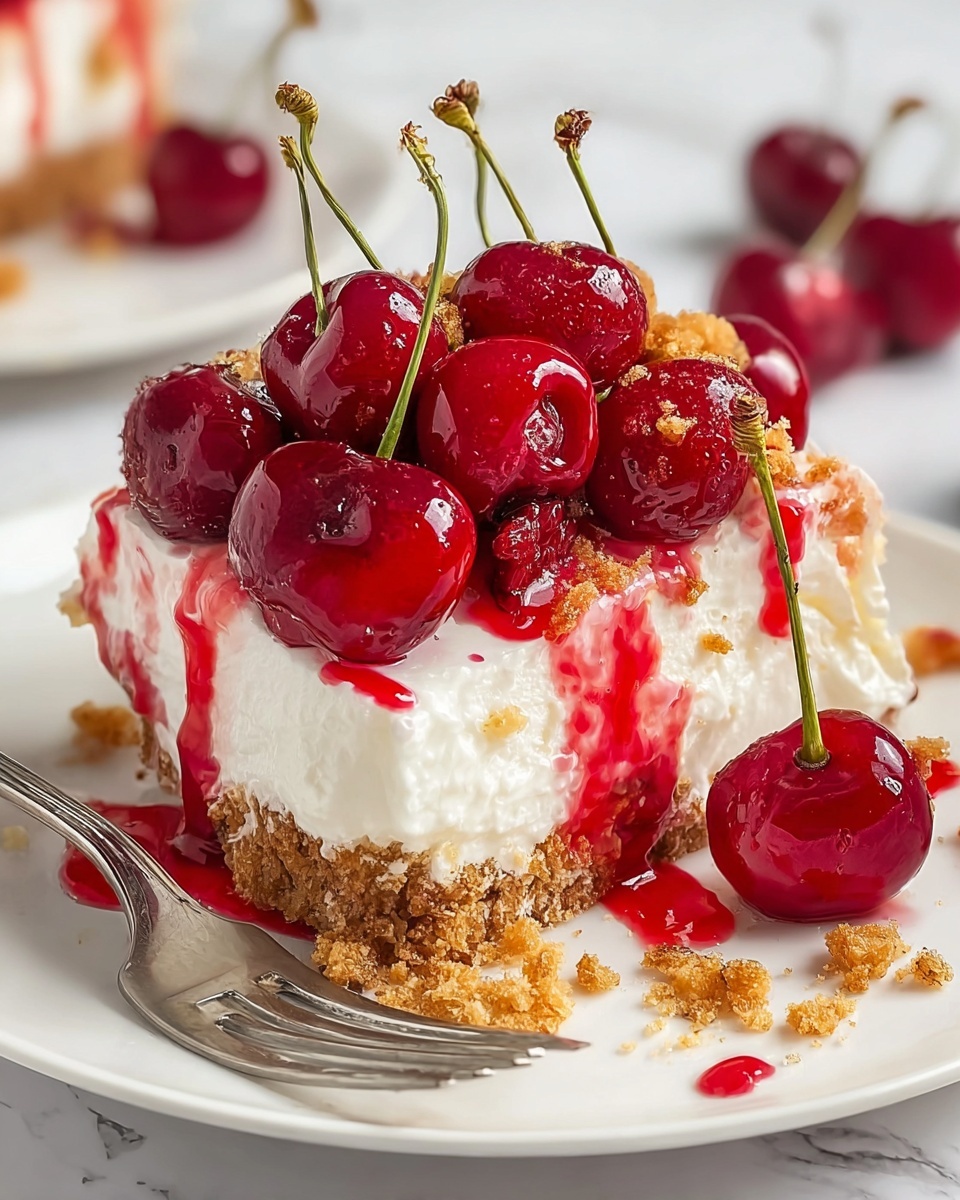
There’s something absolutely irresistible about a homemade cherry dessert, and this Cherry Delight Recipe captures that perfect balance of creamy sweetness, buttery crunch, and fruity zing that everyone will adore. Whether you’re making it for a family gathering or a casual treat, this dessert is impressively simple to whip up and delivers a vibrant, nostalgic flavor that brings a smile with every bite. It’s one of those dishes that feels like a warm hug on a plate, and I can’t wait for you to try it and discover your new favorite go-to dessert!
Ingredients You’ll Need
To create this Cherry Delight Recipe, you’ll rely on a few straightforward ingredients that each play a crucial role in flavor, texture, and overall deliciousness. From the crisp, buttery graham cracker crust to the smooth cream cheese layer and bright cherry topping, these pantry staples come together to make magic.
- Graham cracker crumbs: Provide the perfect crunchy base that’s buttery and slightly sweet.
- Brown sugar: Adds a rich caramel note to the crust that deepens the flavor.
- Butter, melted: Binds the crust ingredients together and creates that melt-in-your-mouth texture.
- Cream cheese, softened: Gives the dessert its creamy, tangy middle layer that balances sweetness.
- Granulated sugar: Sweetens the cream cheese layer perfectly without overpowering.
- Vanilla extract: Enhances all other flavors with its warm, familiar aroma.
- Whipped topping, thawed: Lightens the cream cheese mixture, making it fluffy and airy.
- Cherry pie filling: Brings the vibrant red color and juicy, fruity finish that defines this dessert.
How to Make Cherry Delight Recipe
Step 1: Prepare the Crust
Start by combining the graham cracker crumbs, brown sugar, and melted butter in a medium bowl. Stir until every crumb is evenly coated, which ensures a uniformly sweet and buttery crust once set. This base is the foundation of your Cherry Delight Recipe’s delightful texture.
Step 2: Set the Crust
Press the crumb mixture firmly into the bottom of a 13×9-inch baking dish. Use the back of a spoon or your fingers to compact it well, which helps the crust hold together when you slice the dessert. Pop the crust into the freezer for 15 minutes to set—it’s quick and sets you up perfectly for the next step.
Step 3: Make the Cream Cheese Filling
With an electric mixer, beat the softened cream cheese, granulated sugar, and vanilla extract until smooth and creamy. This ensures your filling has that velvety texture that contrasts beautifully with the crunchy crust and juicy cherries.
Step 4: Fold in the Whipped Topping
Gently fold in the thawed whipped topping at low speed to avoid deflating it. This step is key because it makes the cream cheese layer fluffy and light, turning the dessert from dense to delightfully airy.
Step 5: Assemble the Layers
Spread the cream cheese mixture evenly over your frozen crust. Taking your time here to smooth it out ensures every bite has the perfect balance of crust and creamy filling. Next, spoon the cherry pie filling evenly over the cream cheese layer, adding that iconic cherry burst that the Cherry Delight Recipe is famous for.
Step 6: Chill to Set
Cover the dessert with plastic wrap and refrigerate it for at least four hours. This chilling time lets the flavors meld together and allows the layers to set properly, making slicing easy and presentation beautiful.
How to Serve Cherry Delight Recipe

Garnishes
For an extra touch of elegance and flavor, consider topping your Cherry Delight with freshly whipped cream and a few whole cherries or a sprinkle of toasted almonds. These simple garnishes elevate the look and add a fresh texture contrast that’ll impress your guests without much effort.
Side Dishes
This dessert is rich and satisfying enough to stand alone, but it also pairs wonderfully with a scoop of vanilla ice cream or a light cup of hot coffee or tea. These sides enhance the flavors without overshadowing the cherry and cream cheese star of the show.
Creative Ways to Present
If you want to shake things up, try serving the Cherry Delight Recipe in individual glass parfait dishes, layering the crust, filling, and cherry topping for a beautiful, see-through presentation. Alternatively, turn it into bite-sized trifle cups for parties—easy to grab and oh so charming.
Make Ahead and Storage
Storing Leftovers
Leftover Cherry Delight keeps beautifully in the refrigerator for up to four days when covered tightly with plastic wrap or stored in an airtight container. This means you can make it ahead of time and enjoy the convenience and flavor later without any hassle.
Freezing
If you want to keep your Cherry Delight Recipe fresh for longer, freeze it uncovered for a couple of hours until solid, then wrap it tightly in plastic wrap followed by aluminum foil. It will maintain its quality for up to one month. Just thaw in the fridge overnight before serving to enjoy the best texture.
Reheating
This dessert is meant to be served chilled, so it’s best not to reheat. However, if you want to soften it slightly for easier slicing, let it sit at room temperature for 15-20 minutes before serving. This subtle warming helps bring out the creaminess without melting the layers.
FAQs
Can I use fresh cherries instead of canned cherry pie filling?
Absolutely! Fresh cherries can add a lovely natural sweetness and texture to this Cherry Delight Recipe. Just make sure to cook them down a bit with sugar to create a thick topping similar to pie filling, or they might be too watery.
Is it possible to make this dessert dairy-free?
Yes, you can use dairy-free cream cheese and whipped topping alternatives to make a dairy-free version. The flavor will be a bit different but still delicious and creamy, perfect for those with dietary restrictions.
How long does this dessert need to chill before serving?
It needs at least 4 hours in the refrigerator to set properly, but chilling it overnight can make it even more flavorful and easier to slice.
Can I make the crust gluten-free?
Definitely! Substitute the graham cracker crumbs with gluten-free graham cracker crumbs or crushed gluten-free cookies. The texture may vary slightly, but the taste will still satisfy your Cherry Delight Recipe cravings.
What’s the best way to cut Cherry Delight for serving?
Use a sharp knife dipped in hot water and wiped dry between cuts. This technique helps you achieve clean, neat slices without the layers sticking to the knife.
Final Thoughts
Making this Cherry Delight Recipe feels like bringing a little bit of joy and nostalgia into your kitchen, and sharing it brings even more happiness. Its simplicity and crowd-pleasing flavors make it an absolute winner for any occasion. So grab your ingredients, invite some friends over, and enjoy the magic that this layered cherry dessert brings to the table!
Print
Cherry Delight Recipe
- Prep Time: 15 minutes
- Cook Time: 0 minutes
- Total Time: 4 hours 15 minutes
- Yield: 12 servings
- Category: Dessert
- Method: No-Cook
- Cuisine: American
Description
Cherry Delight is a no-bake, luscious layered dessert featuring a crunchy graham cracker crust, creamy sweetened cream cheese filling, and a glossy cherry pie topping. This easy-to-make treat is perfect for gatherings and requires minimal prep time with a satisfying combination of textures and flavors.
Ingredients
Crust
- 1 1/2 cups graham cracker crumbs
- 1/4 cup brown sugar
- 6 tablespoons butter, melted
Filling
- 8 oz cream cheese, softened
- 1/2 cup granulated sugar
- 1 teaspoon vanilla extract
- 8 oz whipped topping, thawed
Topping
- 1 can (21 oz) cherry pie filling
Instructions
- Prepare the crust: Mix graham cracker crumbs, brown sugar, and melted butter in a medium bowl until the crumbs are evenly coated with butter and sugar, creating a moist mixture.
- Set the crust: Press the crumb mixture firmly into the bottom of a 13×9-inch baking dish to form an even layer. Freeze the crust for 15 minutes to ensure it sets properly.
- Make the cream cheese filling: Using an electric mixer, beat softened cream cheese, granulated sugar, and vanilla extract on medium speed until smooth and creamy.
- Fold in whipped topping: Gently fold the thawed whipped topping into the cream cheese mixture. Mix at low speed until just combined, ensuring a light and fluffy texture.
- Layer the filling: Spoon the cream cheese mixture evenly over the chilled graham cracker crust and spread it out smoothly with a spatula.
- Add cherry topping: Pour the cherry pie filling evenly over the cream cheese layer to complete the dessert.
- Chill before serving: Cover the dish with plastic wrap and refrigerate the dessert for at least 4 hours to allow the flavors to meld and the layers to firm up before slicing and serving.
Notes
- For a firmer crust, chilling the crust longer than 15 minutes is recommended.
- Ensure the cream cheese is fully softened to prevent lumps in the filling.
- You can substitute cherry pie filling with any fruit pie filling of your choice.
- Use full-fat cream cheese and whipped topping for richest flavor.
- This dessert should be kept refrigerated and is best served within 2 days.
