If you’re ready to revolutionize your holiday centerpiece or weekend feast, this Spatchcock Turkey Recipe is an absolute game-changer. By cleverly butterflying the bird and roasting it at a high temperature, you’re in for turkey with irresistibly crisp skin, juicy meat, and a much faster cook time than traditional methods. It’s a technique that brings together convenience and flavor in one stunning presentation, making this recipe a favorite in many kitchens. Whether you’re a seasoned pro or new to the whole spatchcocking adventure, this recipe delivers all the tastiness and show-stopping appeal you could want from your turkey.
Ingredients You’ll Need
This Spatchcock Turkey Recipe keeps things simple but brilliant. Each ingredient plays an essential role, creating layers of flavor, texture, and color that come together effortlessly.
- 1 large turkey (approximately 14 lbs) (spatchcocked or butterflied): The star of the dish, ensuring quick and even roasting.
- 1 tablespoon sea salt (kosher salt): Essential for seasoning and drawing out moisture to crisp the skin.
- 1 tablespoon fresh cracked pepper: Adds a bold, aromatic warmth.
- 3 tablespoons butter (soft): Melts into the skin for gorgeous golden color and deep flavor.
- 3 pounds chopped vegetables (Brussel sprouts, carrots, butternut squash, sweet potato): Roasted alongside for sweetness, earthiness, and a beautiful medley of colors.
- 2 cups chicken stock: Keeps the turkey moist and infuses the pan juices with savory richness.
How to Make Spatchcock Turkey Recipe
Step 1: Prep Your Turkey in Advance
If you have the luxury of time, prepping your turkey ahead by resting it uncovered in the fridge for 12 to 24 hours results in skin that crisps up to a stunning golden brown during roasting. This step, though optional, elevates the Spatchcock Turkey Recipe from delicious to extraordinary.
Step 2: Prepare Your Vegetable “Rack”
Chop your selection of vegetables ahead, toss them lightly with olive oil, salt, and pepper, and spread them in the bottom of your roasting pan. These veggies double as a flavor-packed roasting rack, elevating the turkey just enough to allow air to circulate and collect those luscious pan drippings.
Step 3: Remove Packaging and Clean
If you’re not using the vegetable rack, place a wire rack inside your roasting pan. Remove any plastic netting and wrappings from the turkey. Cut off the plastic leg tie and remove the gizzards and neck from inside the cavity. These parts can be reserved for homemade stock, so don’t toss them unless you don’t want to make broth later.
Step 4: Spatchcock the Turkey
Place the turkey breast-side down on a sturdy cutting board. Using sharp poultry shears, cut along each side of the backbone and remove it entirely, setting it aside for stock if you like. For tougher sections, a serrated knife can help slice through the bone.
Step 5: Flatten the Bird
Flip your bird so it’s breast-side up. Place the heel of your hand firmly on the center of the breast and press down hard to crack the breastbone, allowing you to flatten the turkey. It might take a couple of tries, but the popping sound is a great sign you’re doing it right. Tuck the legs inward and the wings under the bird to even out cooking times.
Step 6: Season Generously
Pat the whole bird dry with paper towels to encourage a crisp skin. In a bowl, combine the kosher salt and cracked pepper to prevent cross-contamination. Rub this seasoning mix all over the turkey, then smother it with softened butter for that golden finish. If you want to experiment, a compound herb butter slipped under the skin is divine and adds incredible depth to the Spatchcock Turkey Recipe.
Step 7: Set Up Roasting Pan
Place your turkey on the vegetable “rack” or wire rack in the roasting pan. Pour 1 cup of chicken stock or water into the pan to keep everything moist and help build wonderful pan juices perfect for gravy.
Step 8: Roast at High Heat
Preheat your oven to 400 degrees Fahrenheit and roast the bird for one hour. If the skin browns too quickly, tent with foil to prevent burning. After that first hour, reduce heat to 375 degrees and continue roasting for another 90 minutes. Keep an eye on the skin and tent as needed to keep it gorgeous.
Step 9: Check the Temperature
Use a reliable instant-read or probe thermometer to ensure food safety and perfect doneness: the thickest part of the breast should reach 165 degrees Fahrenheit, and the thickest part of the thigh should hit 175 degrees. Make sure the thermometer probe isn’t resting against bone to avoid inaccurate readings.
Step 10: Rest and Serve
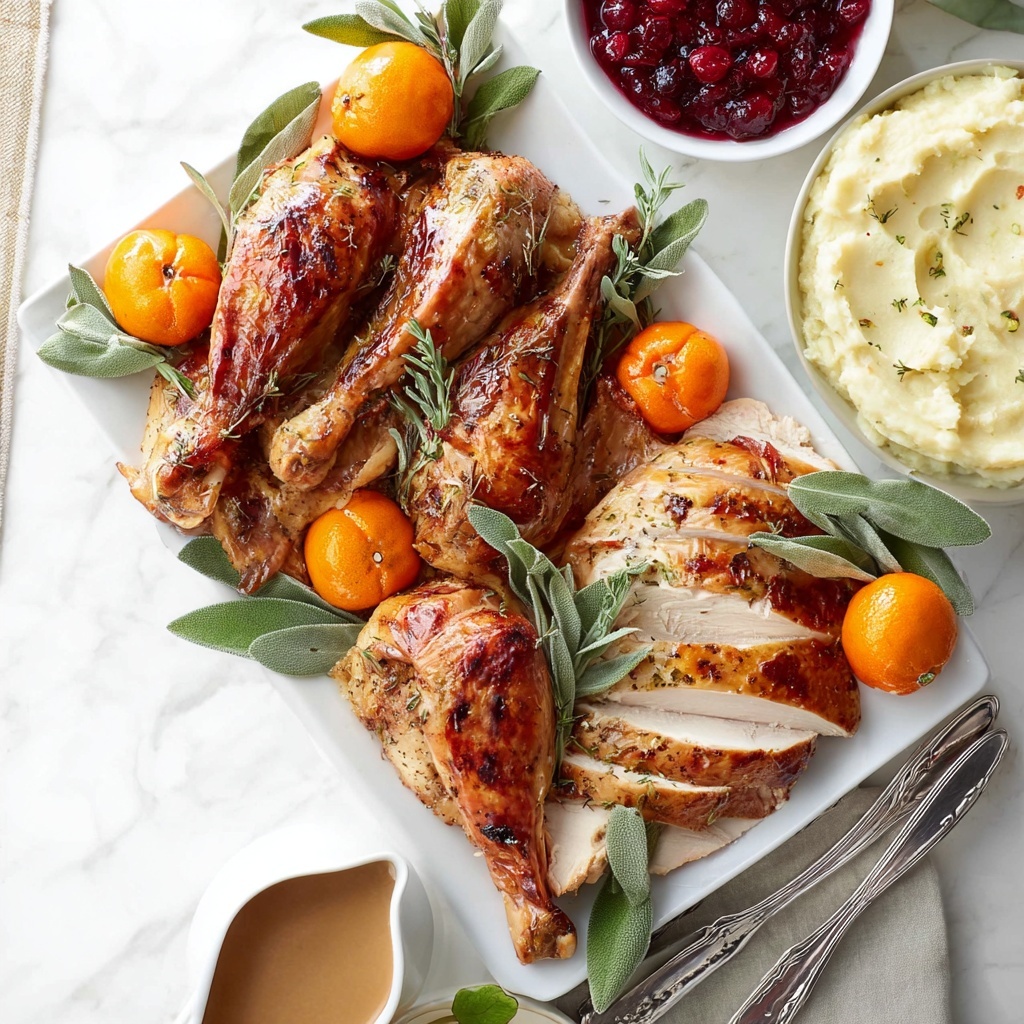
Once your turkey hits the magic temperature, remove it from the oven and let it rest for 10 to 15 minutes on a cutting board, uncovered to keep skin crisp. Carve with a sharp knife and get ready to wow your guests with the tenderest, juiciest, crispiest bird they’ve ever had.
How to Serve Spatchcock Turkey Recipe
Garnishes
Fresh herbs like parsley, thyme, or rosemary sprinkled on top add a burst of color and a lovely fresh aroma. A few bright lemon wedges can balance out the rich flavors perfectly, giving a zesty pop that makes your plate sing.
Side Dishes
The beauty of this Spatchcock Turkey Recipe is it pairs so well with a variety of sides. Roasted root vegetables or a classic mashed potato offer comforting textures. Light, tangy cranberry sauce or a crisp, refreshing salad cut through the richness like a dream. Don’t forget some buttery dinner rolls to soak up that delicious pan sauce!
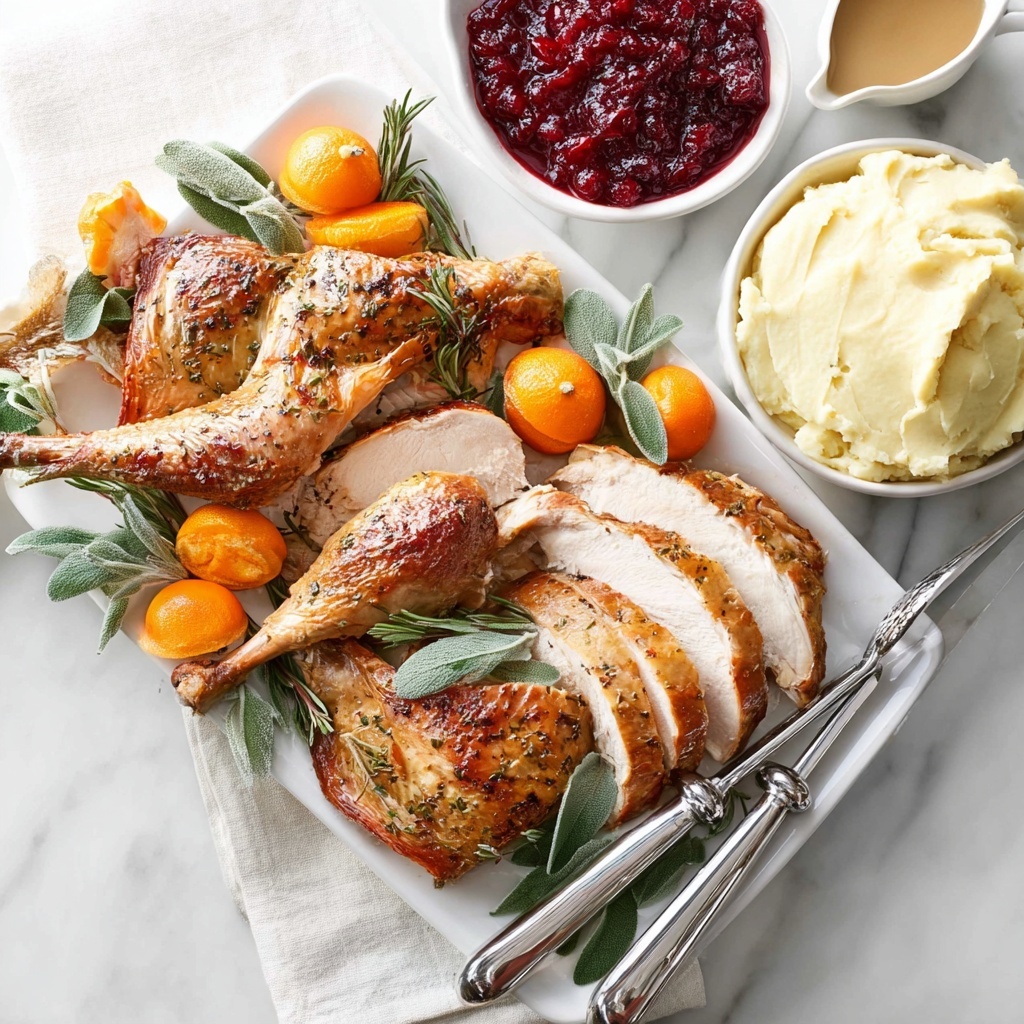
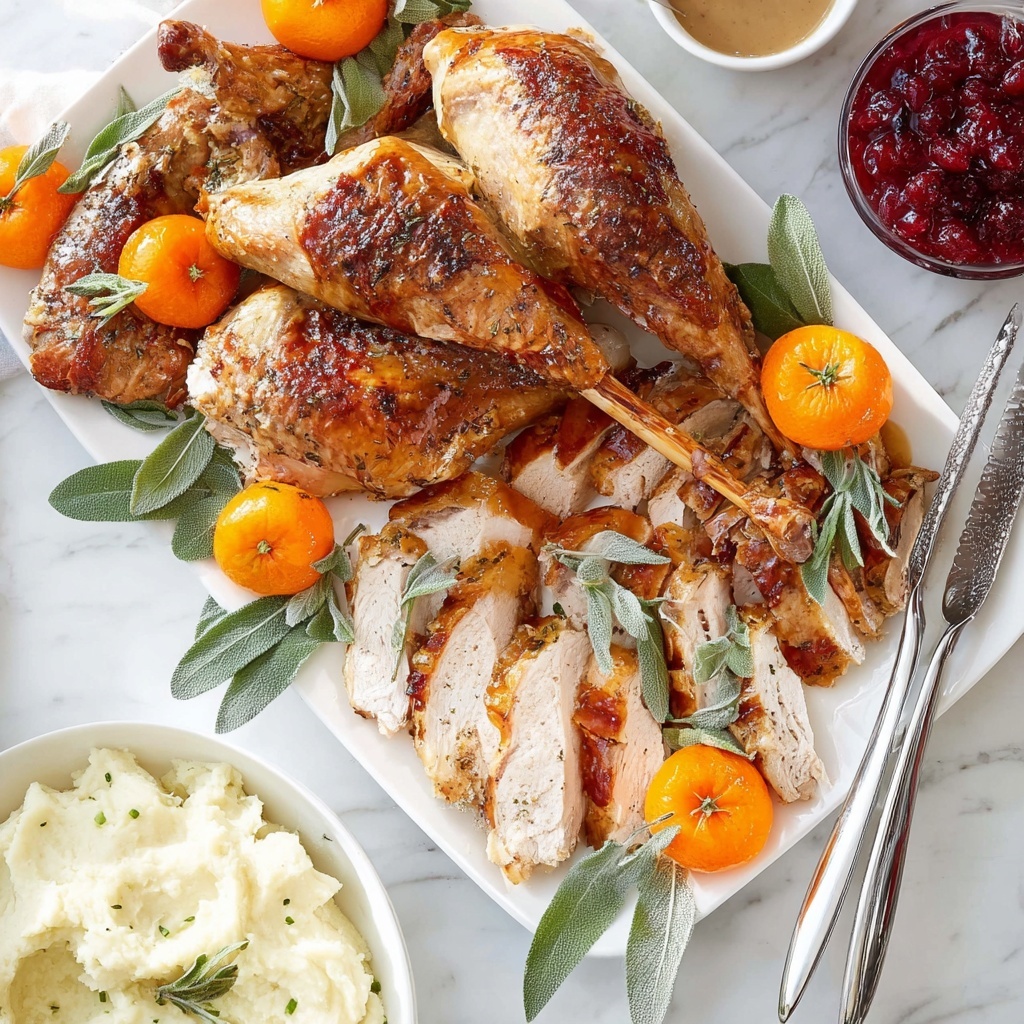
Creative Ways to Present
For a rustic feel, serve the turkey whole on a large wooden board surrounded by your roasted vegetables. For elegance, carve the turkey into individual portions and arrange them neatly on a platter with herb sprigs and delicate drizzles of pan jus. Adding a few whole roasted garlic cloves and bright edible flowers can make your presentation festive and inviting.
Make Ahead and Storage
Storing Leftovers
Store leftover turkey in airtight containers in the fridge within two hours of serving. The Spatchcock Turkey Recipe’s juicy meat holds well for 3 to 4 days, making for perfect sandwiches, salads, or warming up as a quick meal during the week.
Freezing
If you want to keep leftovers longer, tightly wrap turkey pieces in plastic wrap and aluminum foil or place them in freezer-safe bags. Properly stored, the turkey can last up to 3 months in the freezer without losing much quality.
Reheating
To keep the turkey moist when reheating, warm it gently in the oven at 300 degrees with a splash of broth or water covered with foil. For quick reheats, slices can be microwaved covered with a damp paper towel to prevent drying out.
FAQs
What is spatchcocking, and why do I do it?
Spatchcocking is the method of removing the backbone of the turkey and flattening it for roasting. This technique allows the bird to cook more evenly and quickly while producing crispier skin and juicier meat.
Can I use a frozen turkey for this Spatchcock Turkey Recipe?
It’s best to use a fully thawed turkey before spatchcocking to make cutting easier and safer. Thaw your turkey in the refrigerator for several days prior to cooking.
What if I don’t have poultry shears? Can I use a regular knife?
A very sharp, sturdy knife can work, but poultry shears make the process much smoother and safer, especially when cutting through bones. If you use a knife, take your time and handle it carefully.
How do I make pan gravy from the drippings?
After roasting, pour off most of the fat from the pan juices, then place the pan on the stovetop, deglaze with broth or wine, and whisk in a roux made from butter and flour. Simmer until thickened for luscious gravy to accompany your Spatchcock Turkey Recipe.
Is this recipe suitable for smaller turkeys?
Absolutely! The spatchcocking method works well for smaller birds too, just adjust the cooking time accordingly and keep a close eye on your thermometer for perfect doneness.
Final Thoughts
Once you try this Spatchcock Turkey Recipe, you’ll wonder how you ever managed with any other method. It’s a brilliant way to get beautifully crispy skin and juicy meat in less time, with simple steps and fantastic flavors. So gather your ingredients, sharpen those shears, and get ready to impress—this turkey is destined to become a household favorite.
Print
Spatchcock Turkey Recipe
- Prep Time: 20 minutes
- Cook Time: 2 hours 30 minutes
- Total Time: 2 hours 50 minutes
- Yield: 12 servings
- Category: Main Course
- Method: Roasting
- Cuisine: American
Description
This Spatchcock Turkey recipe delivers a juicy, evenly cooked turkey with crispy golden skin by removing the backbone and flattening the bird for quicker roasting. Enhanced with kosher salt, fresh cracked pepper, and butter, this method shortens cooking time and ensures rich flavor. Serve with roasted vegetables or use leftovers for various dishes.
Ingredients
Turkey
- 1 large turkey (approximately 14 lbs), spatchcocked or butterflied
- 1 tablespoon sea salt (kosher salt)
- 1 tablespoon fresh cracked pepper
- 3 tablespoons butter (softened)
Vegetables (Optional)
- 3 pounds chopped vegetables (Brussels sprouts, carrots, butternut squash, sweet potato)
- Olive oil (for tossing, as needed)
- Salt (to taste, for vegetables)
- Pepper (to taste, for vegetables)
Additional
- 2 cups chicken stock or water (for roasting pan)
Instructions
- Prep Ahead (Optional): If possible, prep the turkey by resting it uncovered and unseasoned in the fridge for 12-24 hours before cooking. This step helps the skin dry out, promoting a crispier, golden finish during roasting.
- Prepare Vegetables (Optional): Chop your chosen vegetables and toss them with olive oil, salt, and pepper. Spread them evenly in the bottom of your roasting or deep baking pan. These vegetables will act as a natural rack for your turkey to roast upon, absorbing delicious drippings.
- Setup Roasting Equipment: If not using vegetables, place a wire rack inside your roasting pan. Remove all packaging from the turkey including plastic netting, leg ties, and remove giblets and neck from the cavity. Trim any excess skin from neck and tail using kitchen scissors.
- Spatchcock the Turkey: Place the turkey breast-side down on a cutting board. Using sharp kitchen or poultry shears, cut along both sides of the backbone to remove it, using a serrated knife for any tough bone spots. Reserve backbone and turkey parts for stock if desired.
- Flatten the Turkey: Flip the turkey breast-side up and press firmly on the breastbone with the heel of your hand to crack it. This allows the bird to lie flat for even roasting. Tuck the legs inward and the wings under the bird to prevent burning.
- Season the Turkey: Pat the turkey dry thoroughly with paper towels to promote browning. In a small bowl, combine kosher salt and black pepper. Rub salt, pepper, and softened butter all over the turkey’s surface, including under the skin if possible, to add flavor and crispiness.
- Position Turkey in Roasting Pan: Place the turkey on top of the prepared vegetables or wire rack in the roasting pan. Pour 1 cup of chicken stock or water into the bottom of the pan to keep the meat moist and create flavorful pan juices.
- Roast the Turkey: Preheat your oven to 400°F (204°C). Roast the turkey for 1 hour initially. If the skin browns too quickly, tent the bird loosely with aluminum foil. Then reduce oven temperature to 375°F (190°C) and roast for an additional 90 minutes, tenting with foil as needed to prevent burning.
- Check Internal Temperature: Using a reliable meat or instant-read thermometer, check the thickest part of the breast making sure it reaches 165°F (74°C). Also verify the thigh temperature hits 175°F (79°C). Avoid touching bone with the thermometer for accurate reading.
- Rest and Carve: Once cooked through, remove the turkey from the oven and let it rest uncovered on a large cutting board for 10-15 minutes. Resting keeps the skin crisp while allowing juices to redistribute. Carve with a sharp knife and serve warm alongside your favorite sides or save leftovers for other recipes.
Notes
- Spatchcocking reduces the overall cooking time compared to roasting a whole turkey traditionally.
- Resting the turkey uncovered in the fridge before cooking promotes crispier skin.
- Using vegetables as a roasting rack adds flavor and prevents turkey from sticking to the pan.
- Butter under the skin adds moisture and enhances browning.
- Always use a meat thermometer to ensure safe, perfectly cooked turkey.
- Save the removed backbone and scraps for homemade turkey stock.
- Tenting with foil prevents the skin from over-browning while allowing the turkey to cook thoroughly.


