
“`html
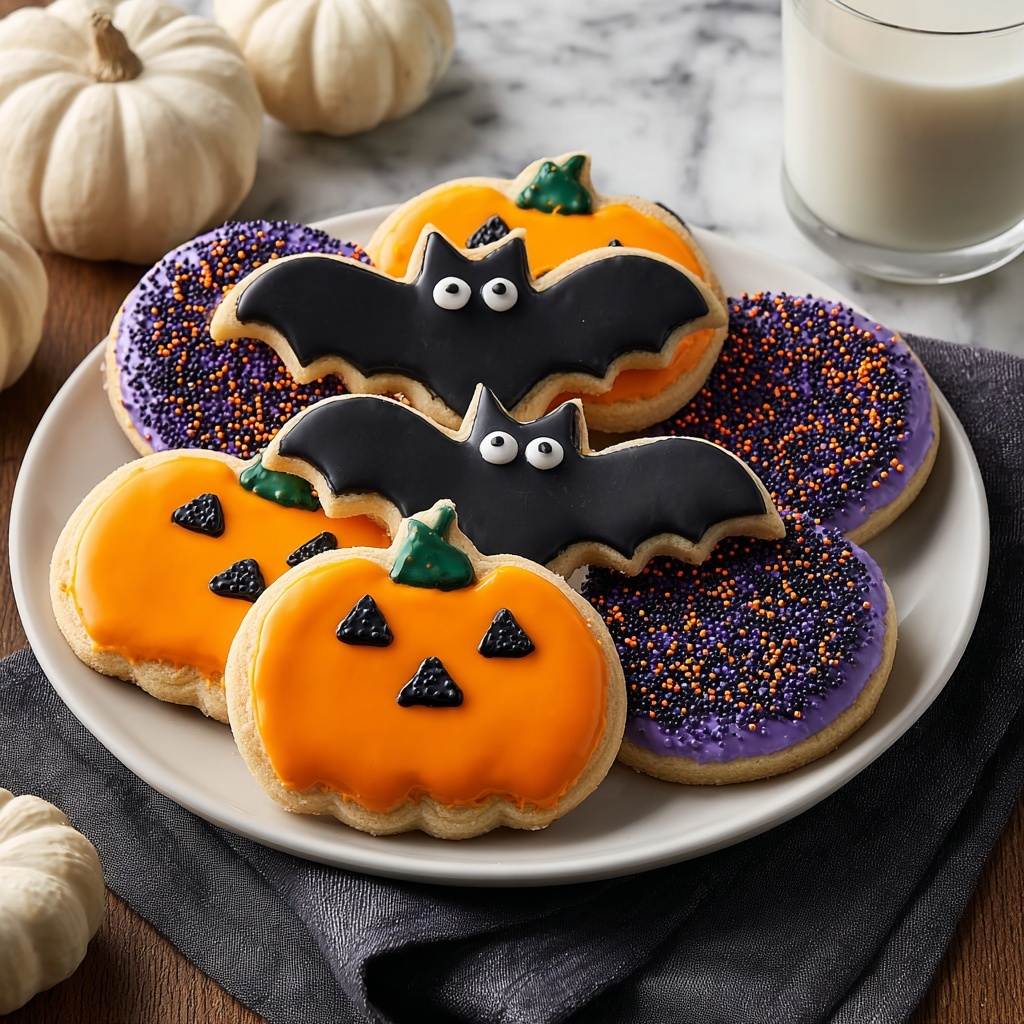
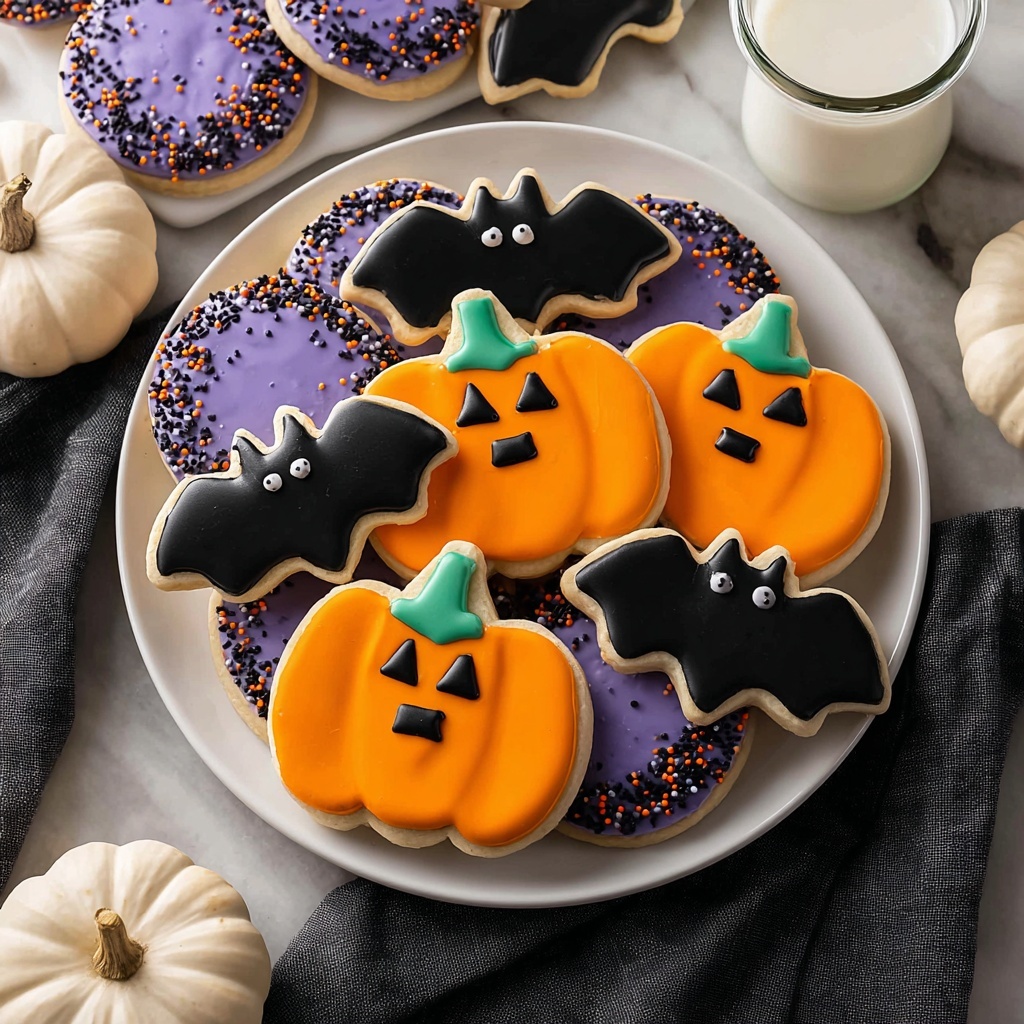
There is something truly magical about holiday baking, and the No-Spread Halloween Sugar Cookies Recipe is a perfect example of that festive joy made simple. These cookies hold their shape perfectly, allowing you to create all your favorite spooky silhouettes without worrying about them melting into a puddle during baking. With a tender crumb, a buttery base, and just the right amount of sweetness, this recipe is a delightful canvas for colorful icing and whimsical decorations that bring Halloween to life in every bite.
Ingredients You’ll Need
The beauty of the No-Spread Halloween Sugar Cookies Recipe lies in its simplicity, relying on a handful of classic ingredients that come together to create a cookie both sturdy and soft. Each component plays a crucial part: the butter lends richness and tenderness, sugar adds sweetness and structure, extracts provide aroma, and the flour, baking powder, and salt balance texture and flavor perfectly.
- 1 cup unsalted butter, softened: Ensures a creamy texture and rich flavor without extra saltiness.
- 1 cup granulated sugar: Sweetens and helps with the tender crispness of the cookies.
- 1 large egg: Binds ingredients and adds moisture for a soft bite.
- 1 ½ tsp vanilla extract: Adds warm, familiar sweetness to the dough.
- ½ tsp almond extract (optional): Introduces a subtle nutty, aromatic twist that’s a lovely touch.
- 2 ¾ cups all-purpose flour: Forms the sturdy base that keeps your shapes intact.
- ½ tsp baking powder: Gives just enough lift to avoid flat, dense cookies.
- ½ tsp salt: Enhances all the flavors for balance and depth.
How to Make No-Spread Halloween Sugar Cookies Recipe
Step 1: Prepare Your Oven and Baking Sheets
Start by preheating your oven to 350°F (175°C) so it’s ready when your dough is formed. Line your baking sheets with parchment paper to keep your cookies from sticking and make cleanup effortless.
Step 2: Cream the Butter and Sugar
In a large bowl, beat the softened butter and granulated sugar together until the mixture becomes light, fluffy, and pale in color. This step is essential for a tender texture and lovely crumb.
Step 3: Add the Egg and Extracts
Next, beat in the egg for moisture and binding power, followed by the vanilla and optional almond extracts. These extracts bring beautiful aroma and flavor depth, making your cookies smell irresistible.
Step 4: Combine the Dry Ingredients
In a separate bowl, whisk together the flour, baking powder, and salt. This ensures an even distribution of leavening and seasoning for the ideal texture and taste.
Step 5: Form the Cookie Dough
Gradually incorporate the dry ingredients into the wet mixture until a firm dough forms. It should be soft but not sticky, easy to handle, and ready to be rolled out.
Step 6: Roll Out the Dough
Lightly flour your work surface and roll the dough to about ¼ inch thickness. This thickness lets the cookies bake through evenly while holding their shapes beautifully.
Step 7: Cut Out Halloween Shapes
Use your favorite spooky Halloween cookie cutters to craft shapes like ghosts, pumpkins, bats, and witches’ hats. This fun step brings the Halloween spirit alive in your kitchen.
Step 8: Bake Until Edges Turn Golden
Place your cut shapes onto the prepared baking sheet and bake for 8 to 10 minutes. Keep a close eye and remove them once the edges are just turning golden to achieve a perfect balance of tenderness and slight crispness.
Step 9: Cool and Decorate
Allow the cookies to cool completely on a wire rack before decorating. Use icing, sprinkles, edible eyeballs, or any festive embellishments to give them that final Halloween touch.
How to Serve No-Spread Halloween Sugar Cookies Recipe
Garnishes
The joy of this recipe is in the decorating! After cookies cool, a thin layer of royal icing lets you paint on intricate spider webs, grinning jack-o’-lantern faces, or colorful candy details. Edible glitter, mini chocolate chips, and sugar eyeballs make fantastic additions to add personality and fun to each treat.
Side Dishes
Pair your No-Spread Halloween Sugar Cookies with classic fall beverages like hot apple cider, warm pumpkin spice lattes, or a rich cup of hot chocolate topped with marshmallows. The combination makes for a cozy snack that’s perfect for chilly autumn afternoons or spooky parties.
Creative Ways to Present
Arrange your cookies on a decorative platter lined with autumn leaves or themed napkins to showcase their festive charm. You can also stack them in clear jars tied with Halloween ribbons for adorable gift-giving or party favors that guests will adore taking home.
Make Ahead and Storage
Storing Leftovers
Store your baked and fully decorated cookies in an airtight container at room temperature to keep them fresh and chewy for up to five days. Placing a slice of bread in the container helps maintain softness and prevents them from drying out.
Freezing
If you want to make these ahead of time, freeze the raw cookie dough well wrapped or in a sealed bag for up to three months. When you’re ready, thaw it overnight in the fridge, roll, cut, and bake as usual. Baked cookies freeze well too; just layer them between parchment paper to avoid sticking.
Reheating
Reheat leftover cookies briefly in a low oven (about 300°F) for five minutes to revive that fresh-baked warmth. Avoid microwaving as it can make the texture gummy. Enjoy them with a cold glass of milk as if they just came out of the oven!
FAQs
Can I make this recipe vegan?
Yes! Substitute the butter with vegan margarine or coconut oil, use a flax egg or other egg replacers, and ensure your extracts don’t contain animal products. The texture might vary slightly but will still be delicious and hold their shape well.
Why don’t the cookies spread during baking?
This cookie dough is made with the right balance of flour and baking powder and lacks extra liquid or melting fats that cause spreading. The dough’s firmness ensures each Halloween shape stays crisp and recognizable after baking.
Can I use other extracts instead of vanilla and almond?
Absolutely! Feel free to experiment with lemon, orange, or even peppermint extracts for a unique twist. Just remember that stronger flavors might overpower the classic sugar cookie taste, so use sparingly.
What’s the best way to decorate these cookies for Halloween?
Royal icing is a fantastic choice since it dries hard, allowing you to paint or pipe intricate designs. Combine with sprinkles, edible markers, or candy eyes for festive spooky faces and patterns that make Halloween extra fun.
Can I make these cookies gluten-free?
Yes, by substituting the flour with a gluten-free all-purpose flour blend that includes xanthan gum, you can achieve a similar texture. Be mindful that gluten-free doughs sometimes require slight adjustments in moisture; start by adding an extra tablespoon of flour if the dough feels too sticky.
Final Thoughts
There’s something so satisfying about baking up a batch of perfectly shaped, tender No-Spread Halloween Sugar Cookies Recipe with friends or family. These cookies are just the right balance of simple ingredients and playful decorating opportunities that make holiday baking a wonderful tradition. So gather your cookie cutters, fire up the oven, and enjoy a sweet slice of Halloween magic that’s sure to bring smiles and spooky fun to any celebration.
“`
Print
No-Spread Halloween Sugar Cookies Recipe
- Prep Time: 15 minutes
- Cook Time: 10 minutes
- Total Time: 25 minutes
- Yield: About 30 cookies
- Category: Dessert
- Method: Baking
- Cuisine: American
- Diet: Vegetarian
Description
These No-Spread Halloween Sugar Cookies are perfect for festive baking with kids or for a fun Halloween party. They hold their shape beautifully, requiring no spreading during baking, making them ideal for detailed spooky cookie cutters. Soft, buttery, and mildly sweet, they are delightful on their own or decorated with your favorite icing and spooky toppings.
Ingredients
Wet Ingredients
- 1 cup unsalted butter, softened
- 1 cup granulated sugar
- 1 large egg
- 1 ½ tsp vanilla extract
- ½ tsp almond extract (optional)
Dry Ingredients
- 2 ¾ cups all-purpose flour
- ½ tsp baking powder
- ½ tsp salt
Instructions
- Preheat Oven: Preheat your oven to 350°F (175°C) and line baking sheets with parchment paper to prevent sticking and promote even baking.
- Cream Butter and Sugar: In a large mixing bowl, beat together the softened butter and granulated sugar until the mixture turns light and fluffy, which incorporates air for a tender texture.
- Add Egg and Extracts: Beat in the egg, vanilla extract, and optional almond extract until fully combined for enhanced flavor.
- Combine Dry Ingredients: In a separate bowl, whisk together the all-purpose flour, baking powder, and salt to evenly distribute the leavening and seasoning.
- Make Dough: Gradually add the dry ingredient mixture to the wet ingredients, mixing until a cohesive dough forms without any lumps.
- Roll Out Dough: On a lightly floured surface, roll the dough out to approximately ¼-inch thickness to ensure even baking and proper cookie shape.
- Cut Shapes: Use Halloween-themed cookie cutters to cut out spooky shapes like ghosts, pumpkins, and bats.
- Bake Cookies: Arrange the cutouts on the prepared baking sheets and bake for 8–10 minutes or until the edges just turn golden brown, maintaining the cookie shapes perfectly.
- Cool and Decorate: Allow cookies to cool completely on a wire rack before decorating with icing, sprinkles, or edible eyeballs for a festive Halloween touch.
Notes
- Ensure butter is softened but not melted for best creaming results.
- If you prefer a stronger almond flavor, you can increase the almond extract slightly, but be cautious as it is potent.
- Rolling dough between parchment paper can help prevent sticking and make transfer easier.
- Cookies can be stored in an airtight container for up to 5 days or frozen for longer preservation.
- Decorating options include royal icing, colored sugar, or candy eyes to enhance the Halloween theme.


